Finance
Finance
With the finance module you can create quotations, orders and invoices. You can clearly keep track of the process from the first customer contact till the completion of your project or sale.
Initial setup
There are a couple of modules related to finance. You should consider which ones you need:
Finance: Base module for creating quotations, orders and invoices.
Catalog: If you need a catalog of products that can be added to quotes and invoices.
Contracts: Contracts create repeating invoices or orders.
PayPal, Mollie & MultiSafePay: Payment providers for online payments.
Navigate to System settings -> modules and install the modules you need:

Install modules
Then reload GroupOffice so the System settings page is updated with the new options.
Languages
The finance module is multilingual. It takes over the language from the address book. You’ll have to configure various templates for quotes, invoices, reminders, emails etc. They all have a language option. Organisations and contacts also have a language option. The contact language will be used to find a template in their language. If not found it will fall back on the first language. The template syntax and examples are found below in the templates section.
Business
After reloading navigate to System settings -> Business and double click your business. Make sure your business has a correct name and organization from the address book. Also make sure your address book entry has a valid, address, bank details and contact details. These will appear on your templates for quotes, invoices etc.
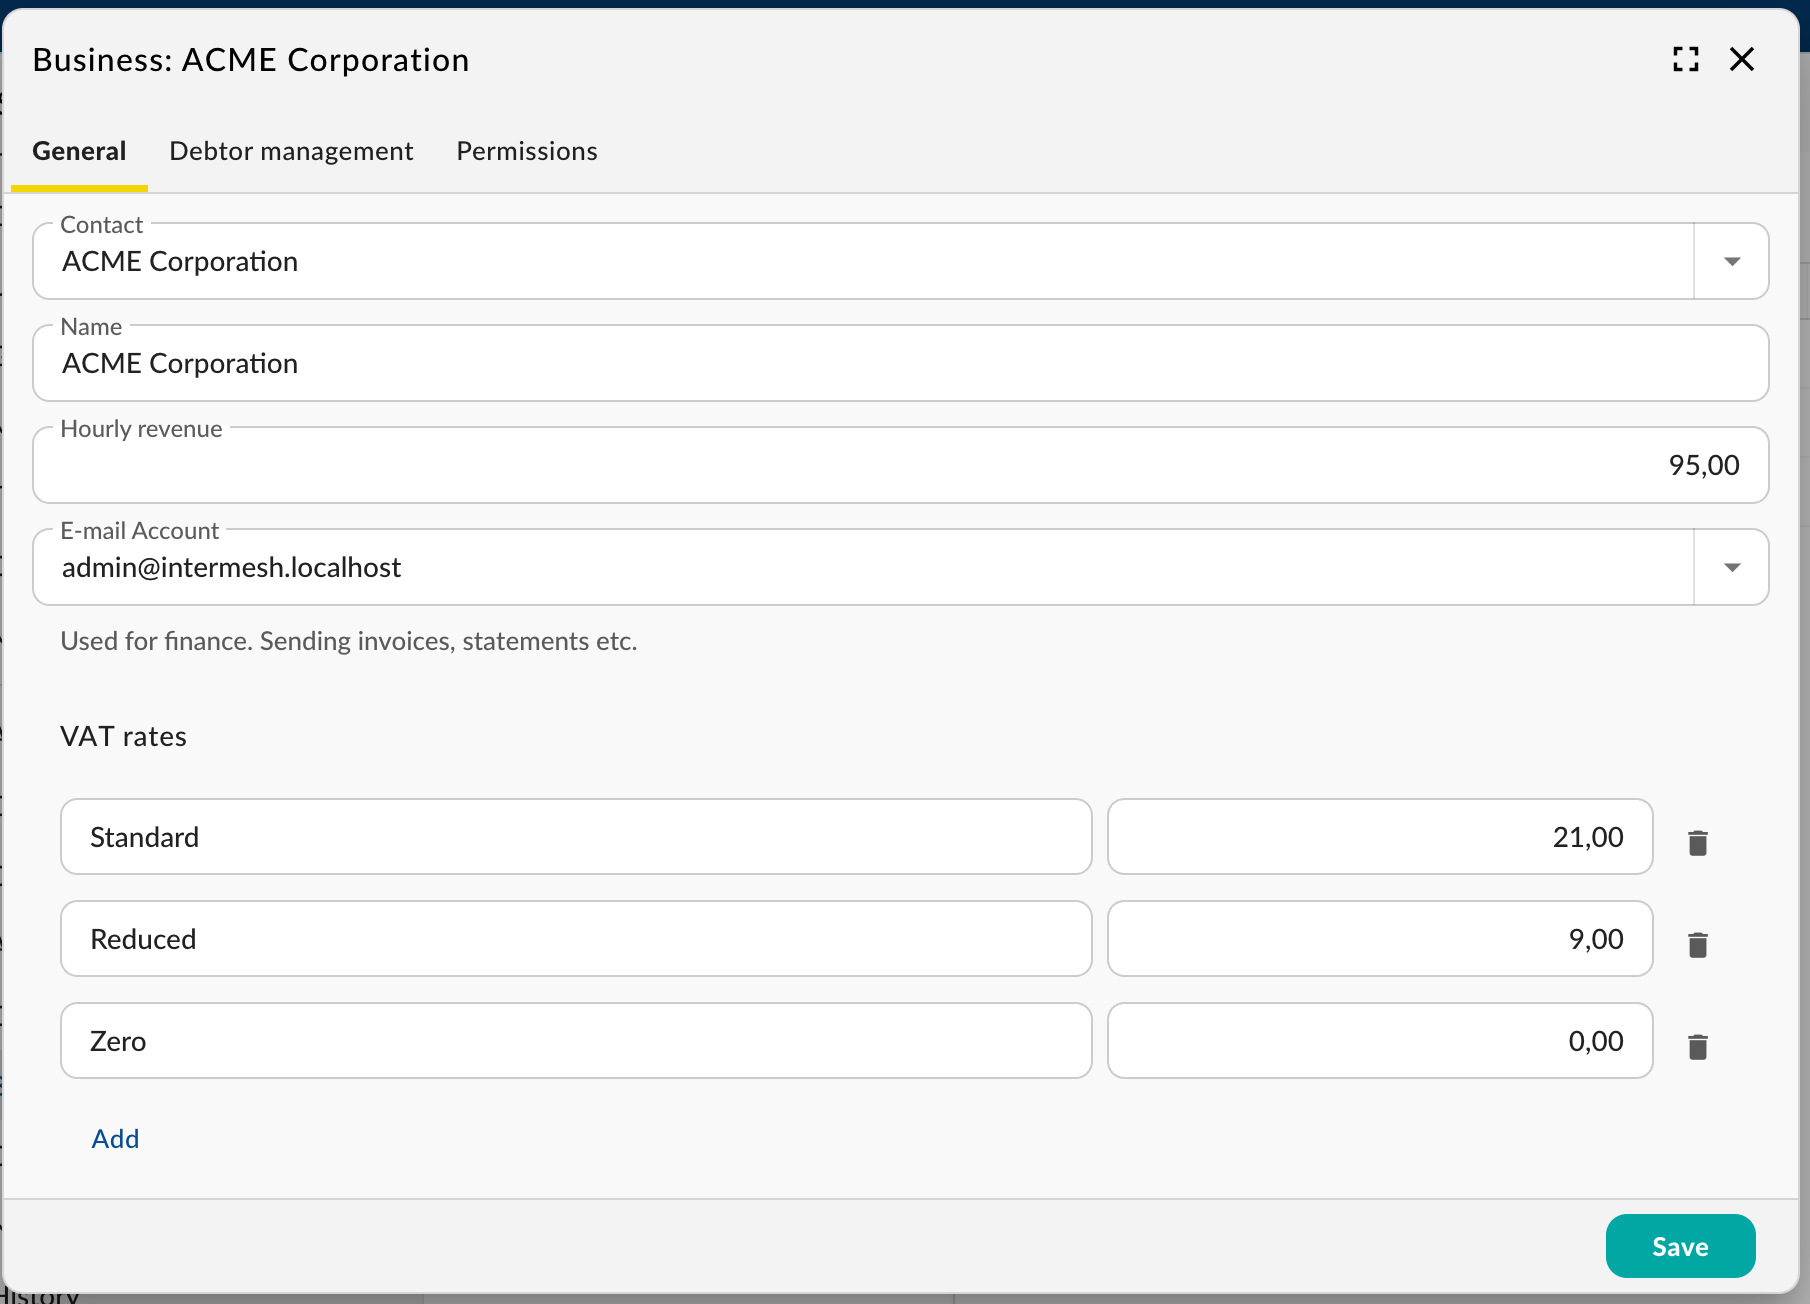
Business
Debtor management
In the debtor management tab you can modify the PDF template for the statement and debtor profile. The profile controls when a customer should receive a reminder and how often. You can also setup to create a task to call the customer about payments.
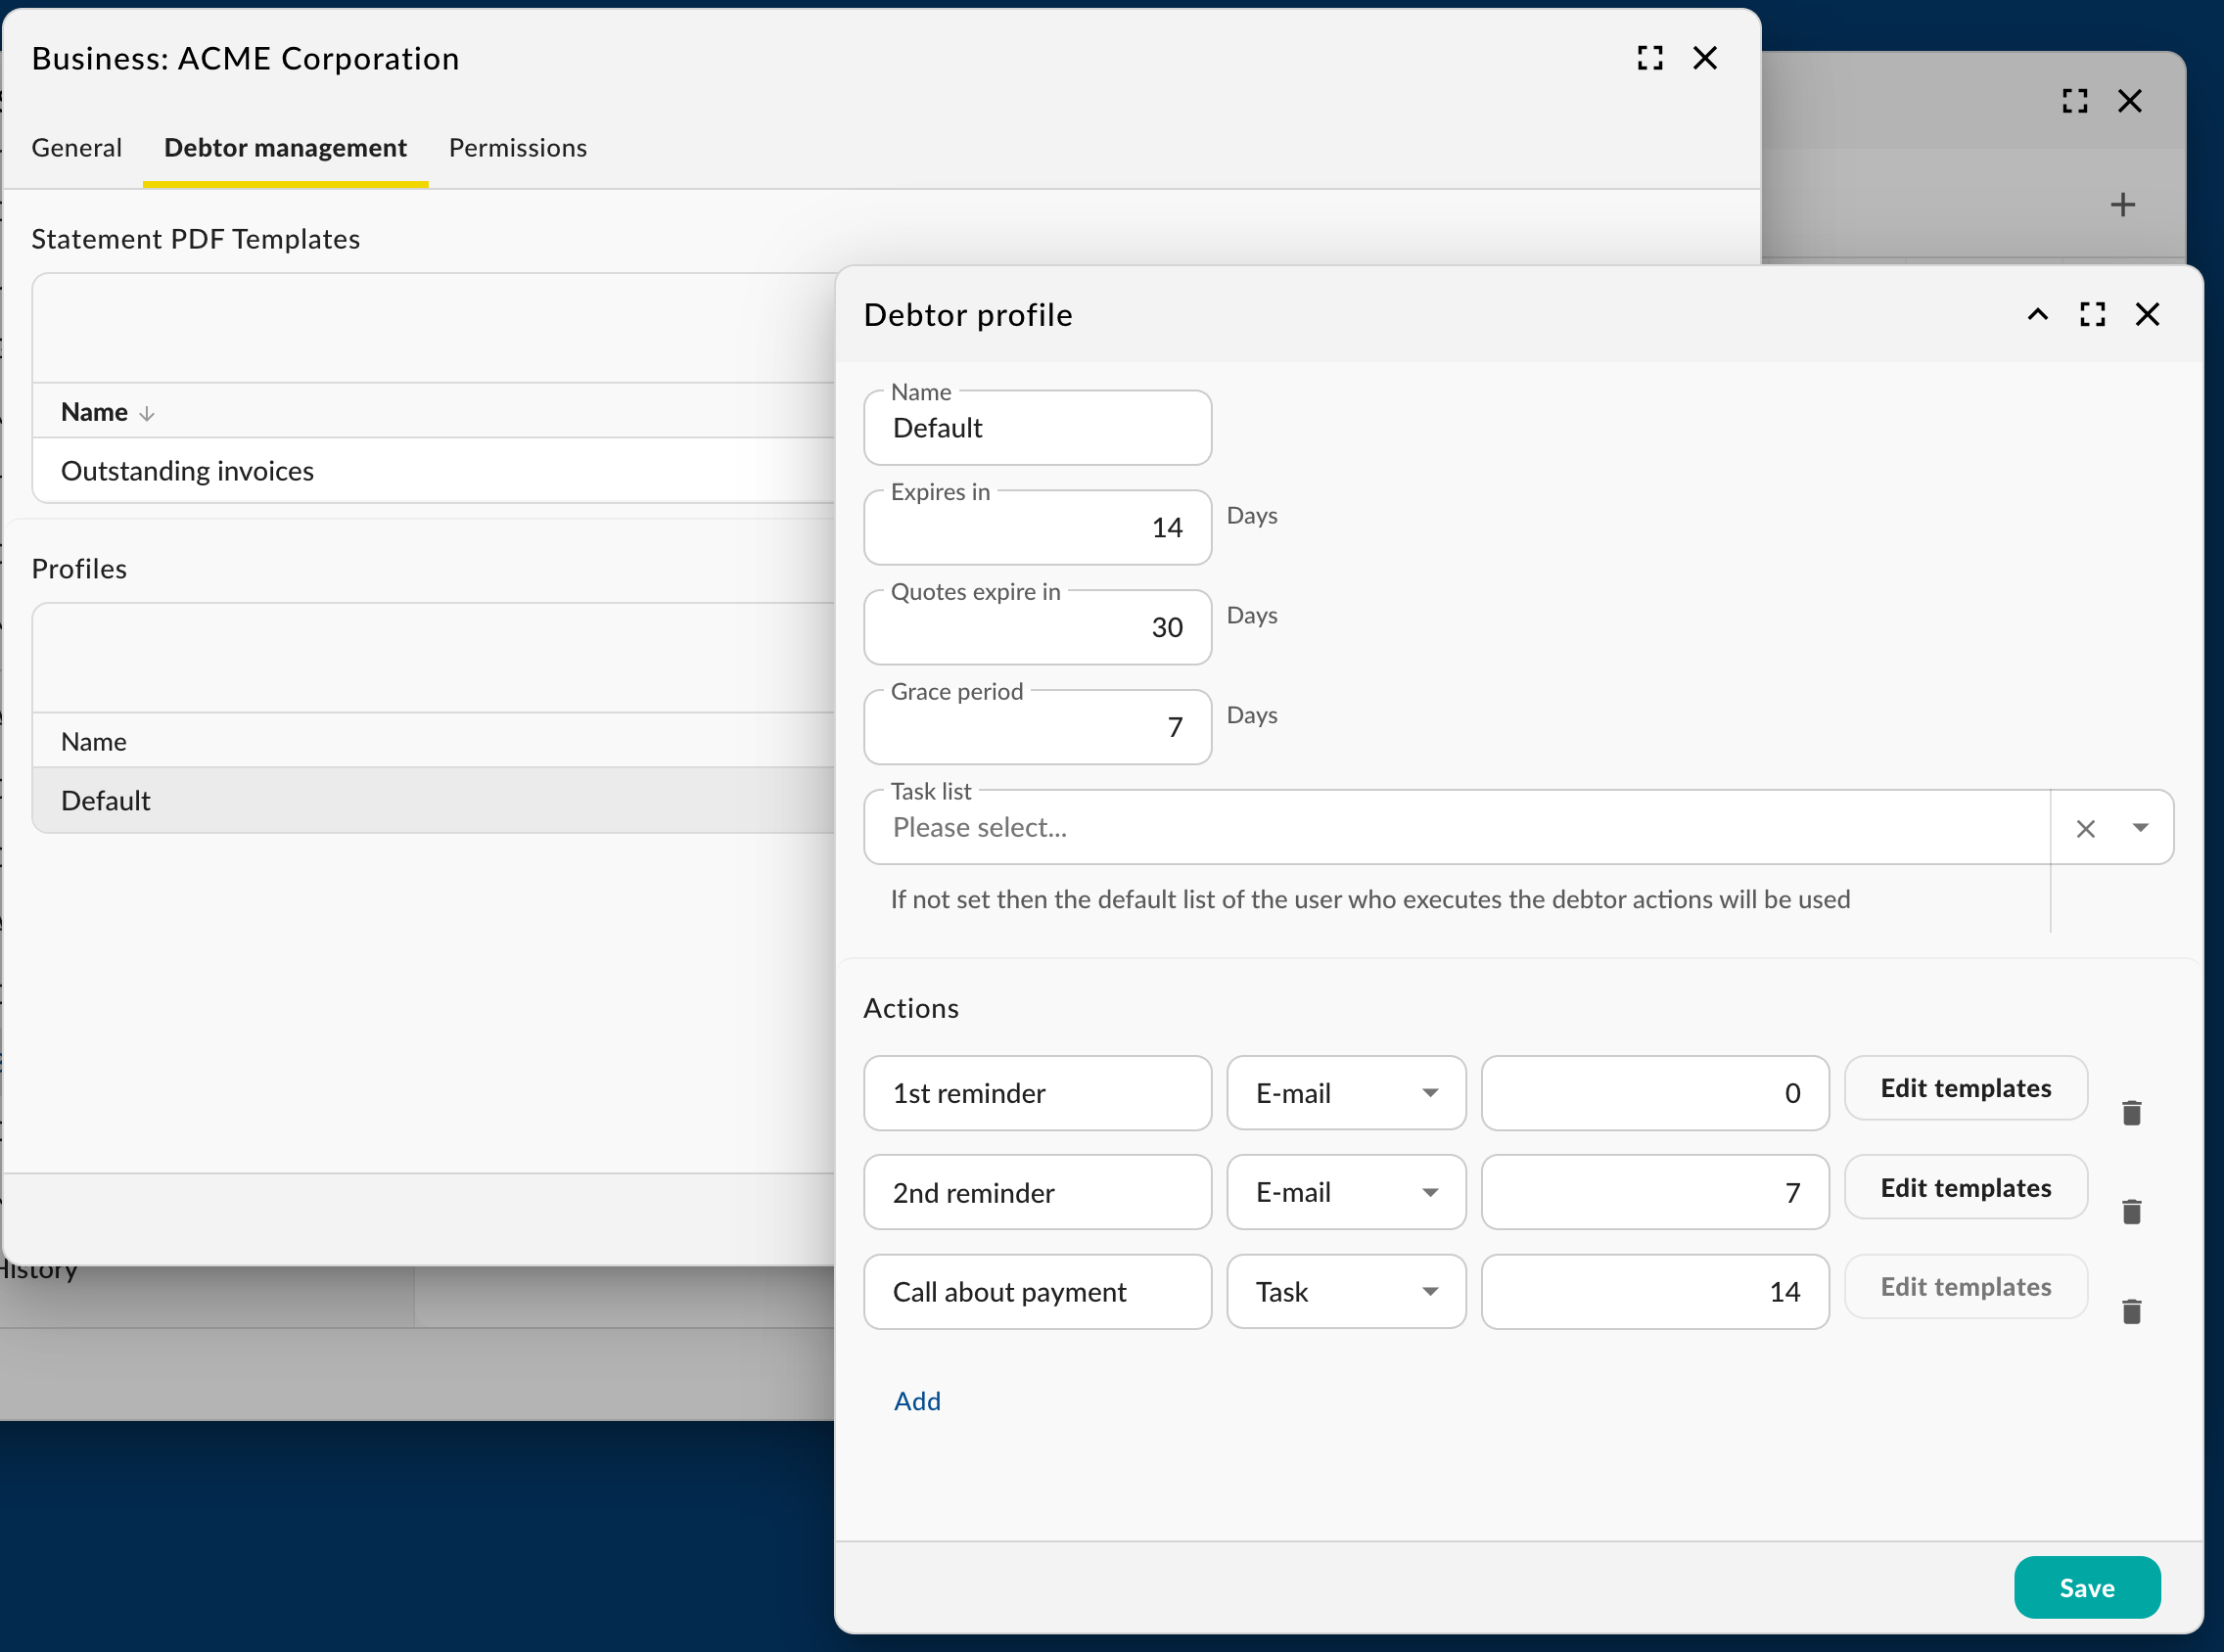
Debtor management
Permissions
Make sure everyone in the organisation has read permission for the business.
Books
Now that the business has been setup it’s time to configure books for your business. By default it already has a book installed for all of the supported types:
Sales invoices
Sales orders
Purchase invoices
Purchase orders
Quotes
It might be that you don’t need all of these types. You can remove the ones you don’t need. Edit the properties of the books you need. By clicking the 3 dots behind the book and choose “Edit”.
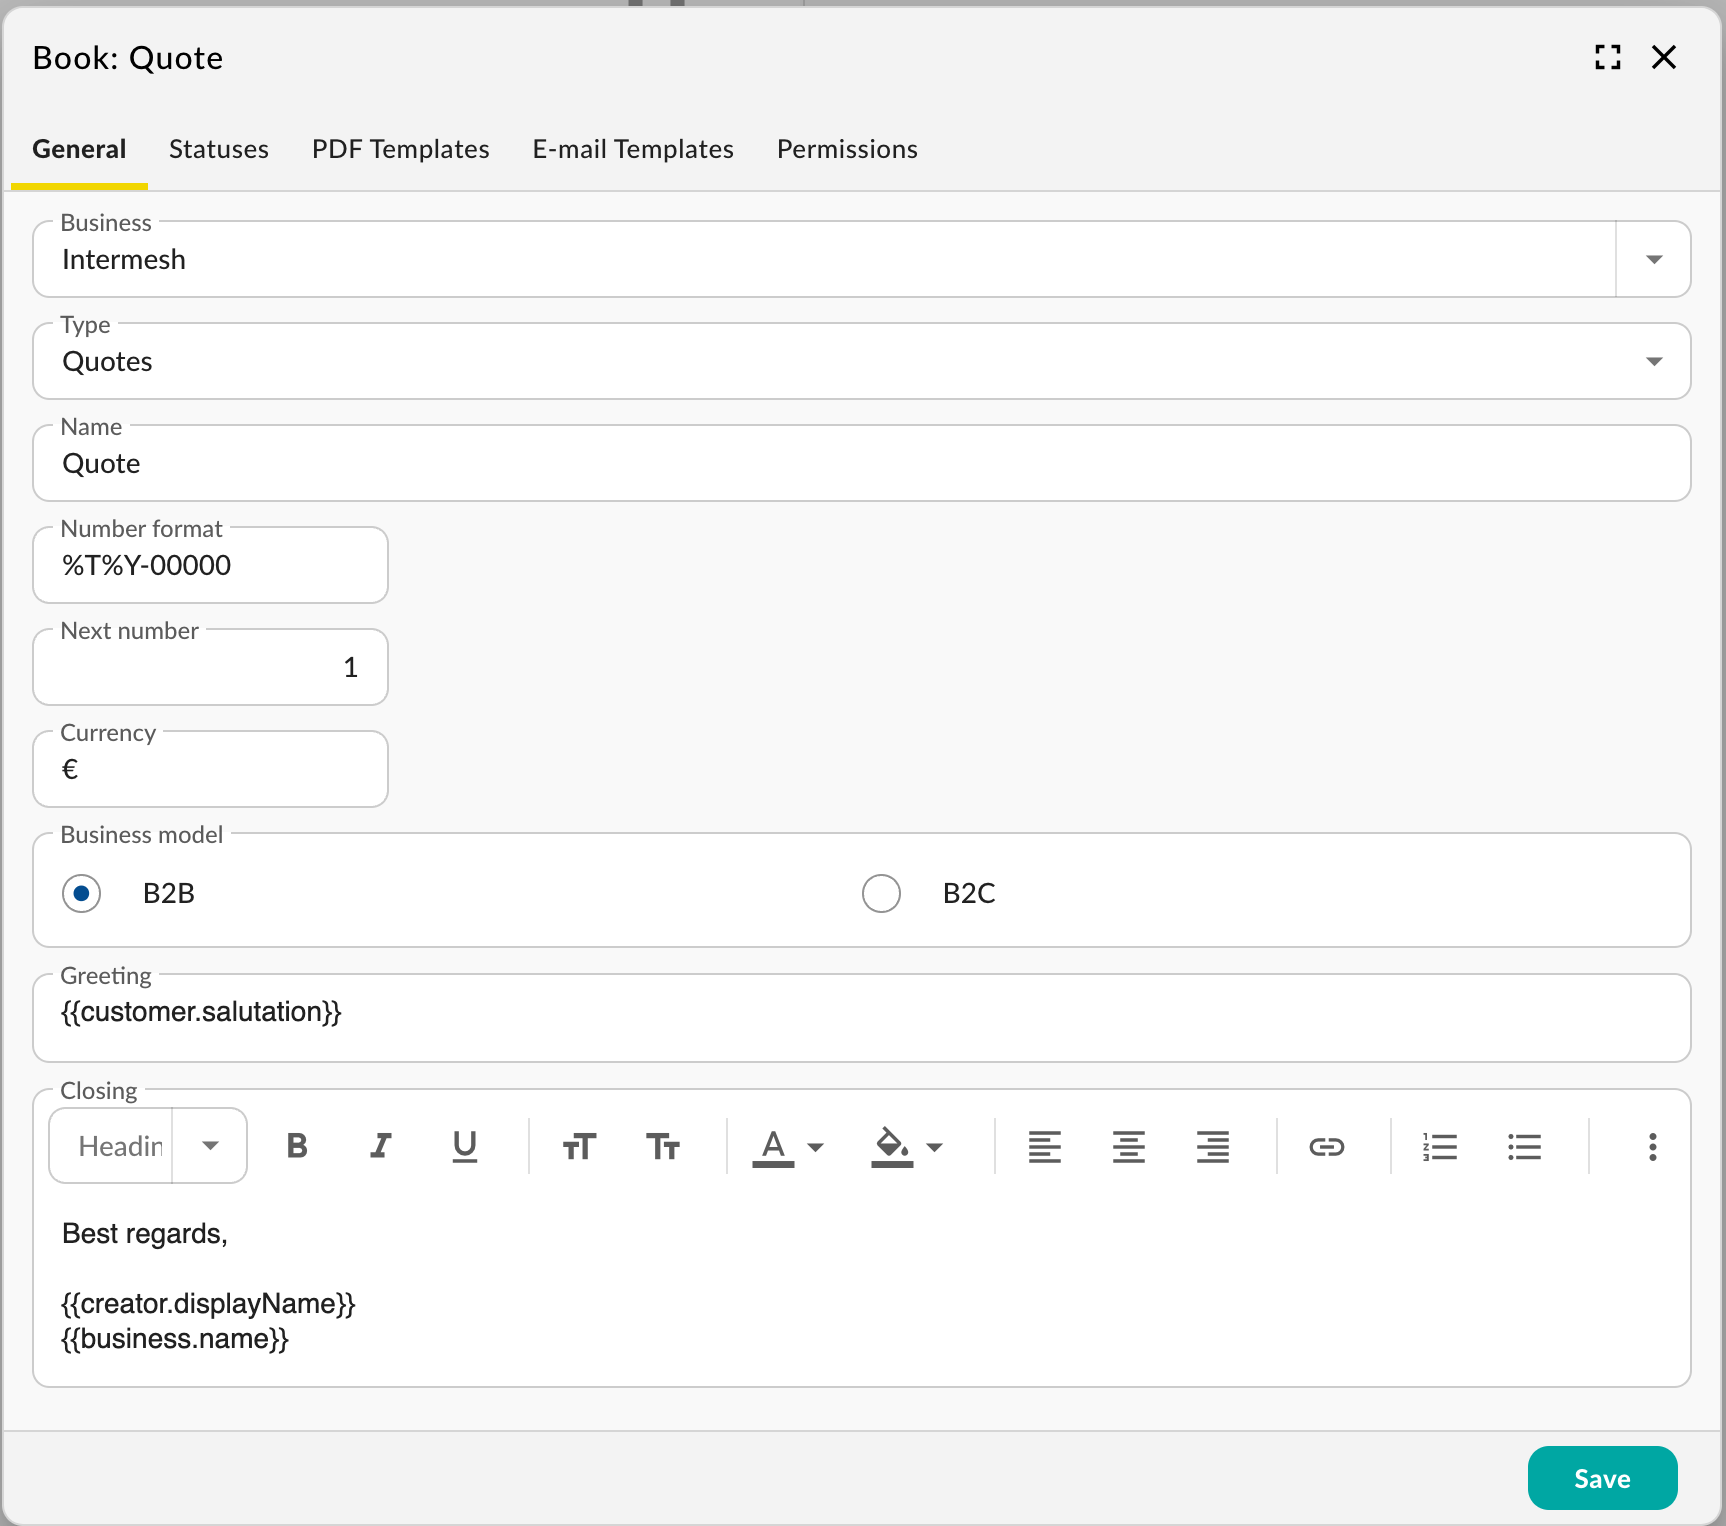
Book dialog
Here you can edit:
Name
Type: See above.
Number format: You can use %T that will be replaced by a prefix of the type, %Y for the year and a number of 00000 for the standard length of the generated number.
Next number: the next document will get this number.
Currency
Business model: When B2B is selected the customer selection will select organisations, with B2C it will select contacts.
Greeting and closing are defaults for the fields in new quotes. You can use template tags in these fields. TODO document tags.
Statuses
By default some statuses are always present based on the state of the document:
- Invoices
Draft: The invoice is new and doesn’t have a number yet
Sent: The invoice has been sent to the customer
Late: The invoice was not paid in time
Paid: The invoice as paid
- Quotes and Orders
Draft: The quote is new and doesn’t have a number yet
Sent: The quote has been sent to the customer
Late: The quote was not accepted in time (see business settings)
Accepted: The quote was accepted
Rejected: The quote was rejected
Complete: The quote was invoiced in full
In the statuses tab of the book properties you can define your own statuses that suit your business process. They will appear between late and complete.
PDF and E-mail templates
Here you can customise what the PDF looks like you’ll send to the customer. Remember to complete your address book entry that is connected to your business.
Default templates
The default E-mail/PDF templates are used when you click on the “Email” or “PDF” button from the document’s detail panel when it’s in the draft status:
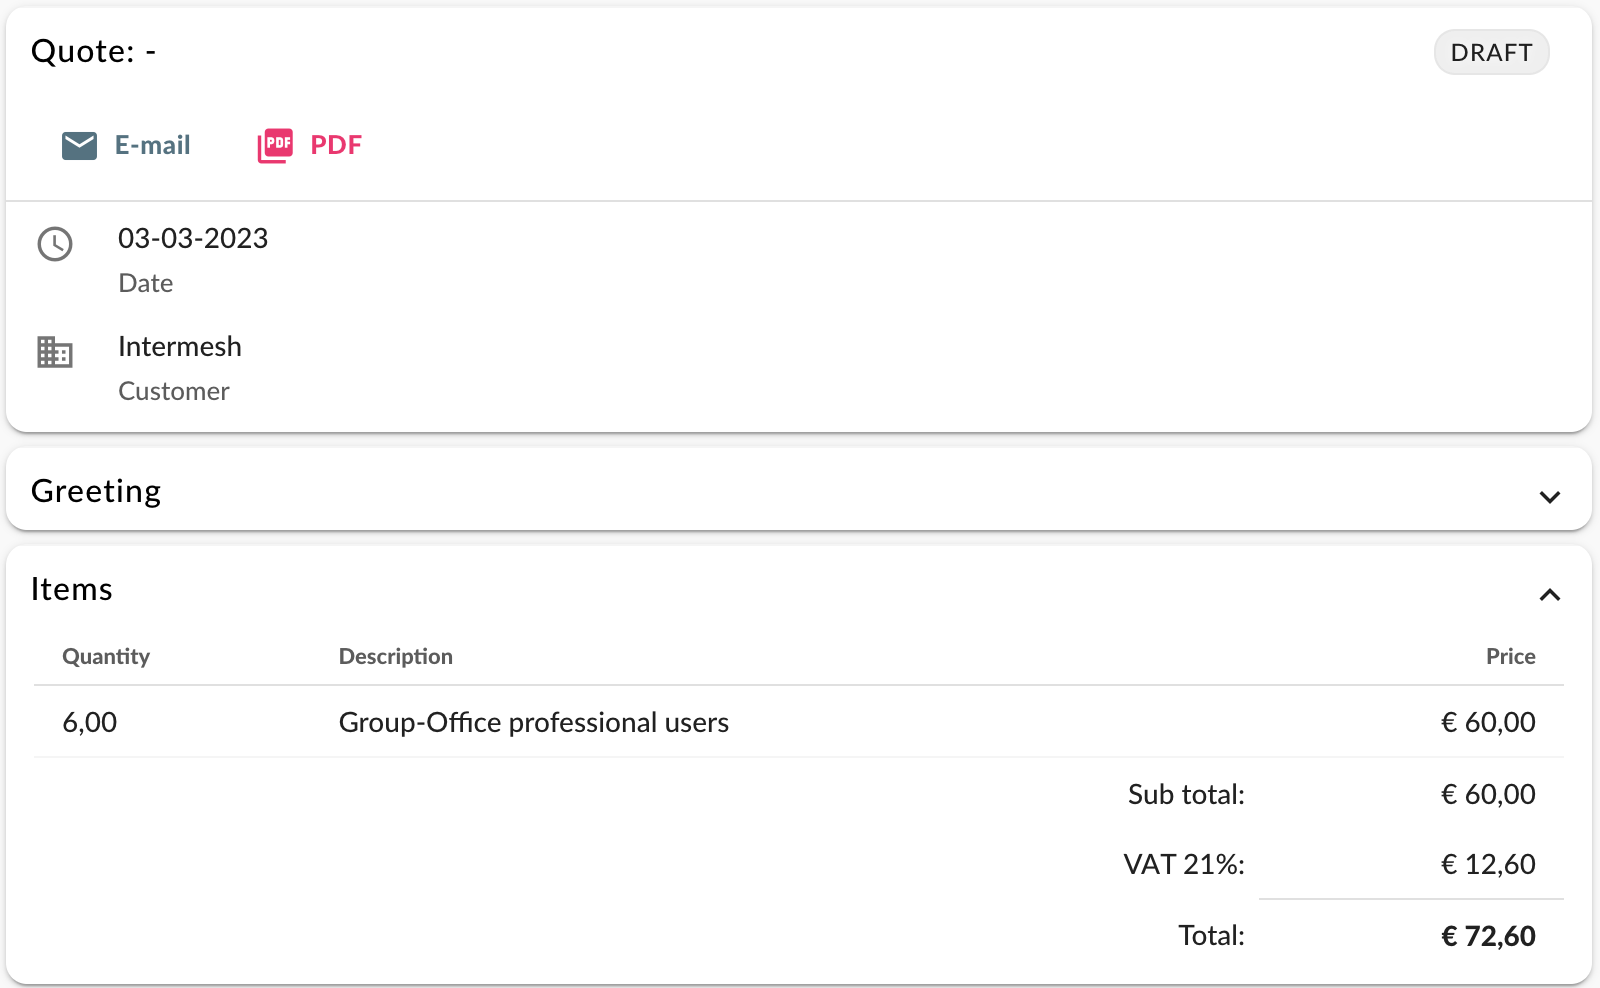
Draft quote
In the e-mail templates you can also add some standard attachments like your general terms and conditions.
The templates are very flexible. Perhaps you just want to upload your logo or stationary paper, you can also fully customize the display of the data using HTML and template tags.
A typical quote e-mail template might look like this:
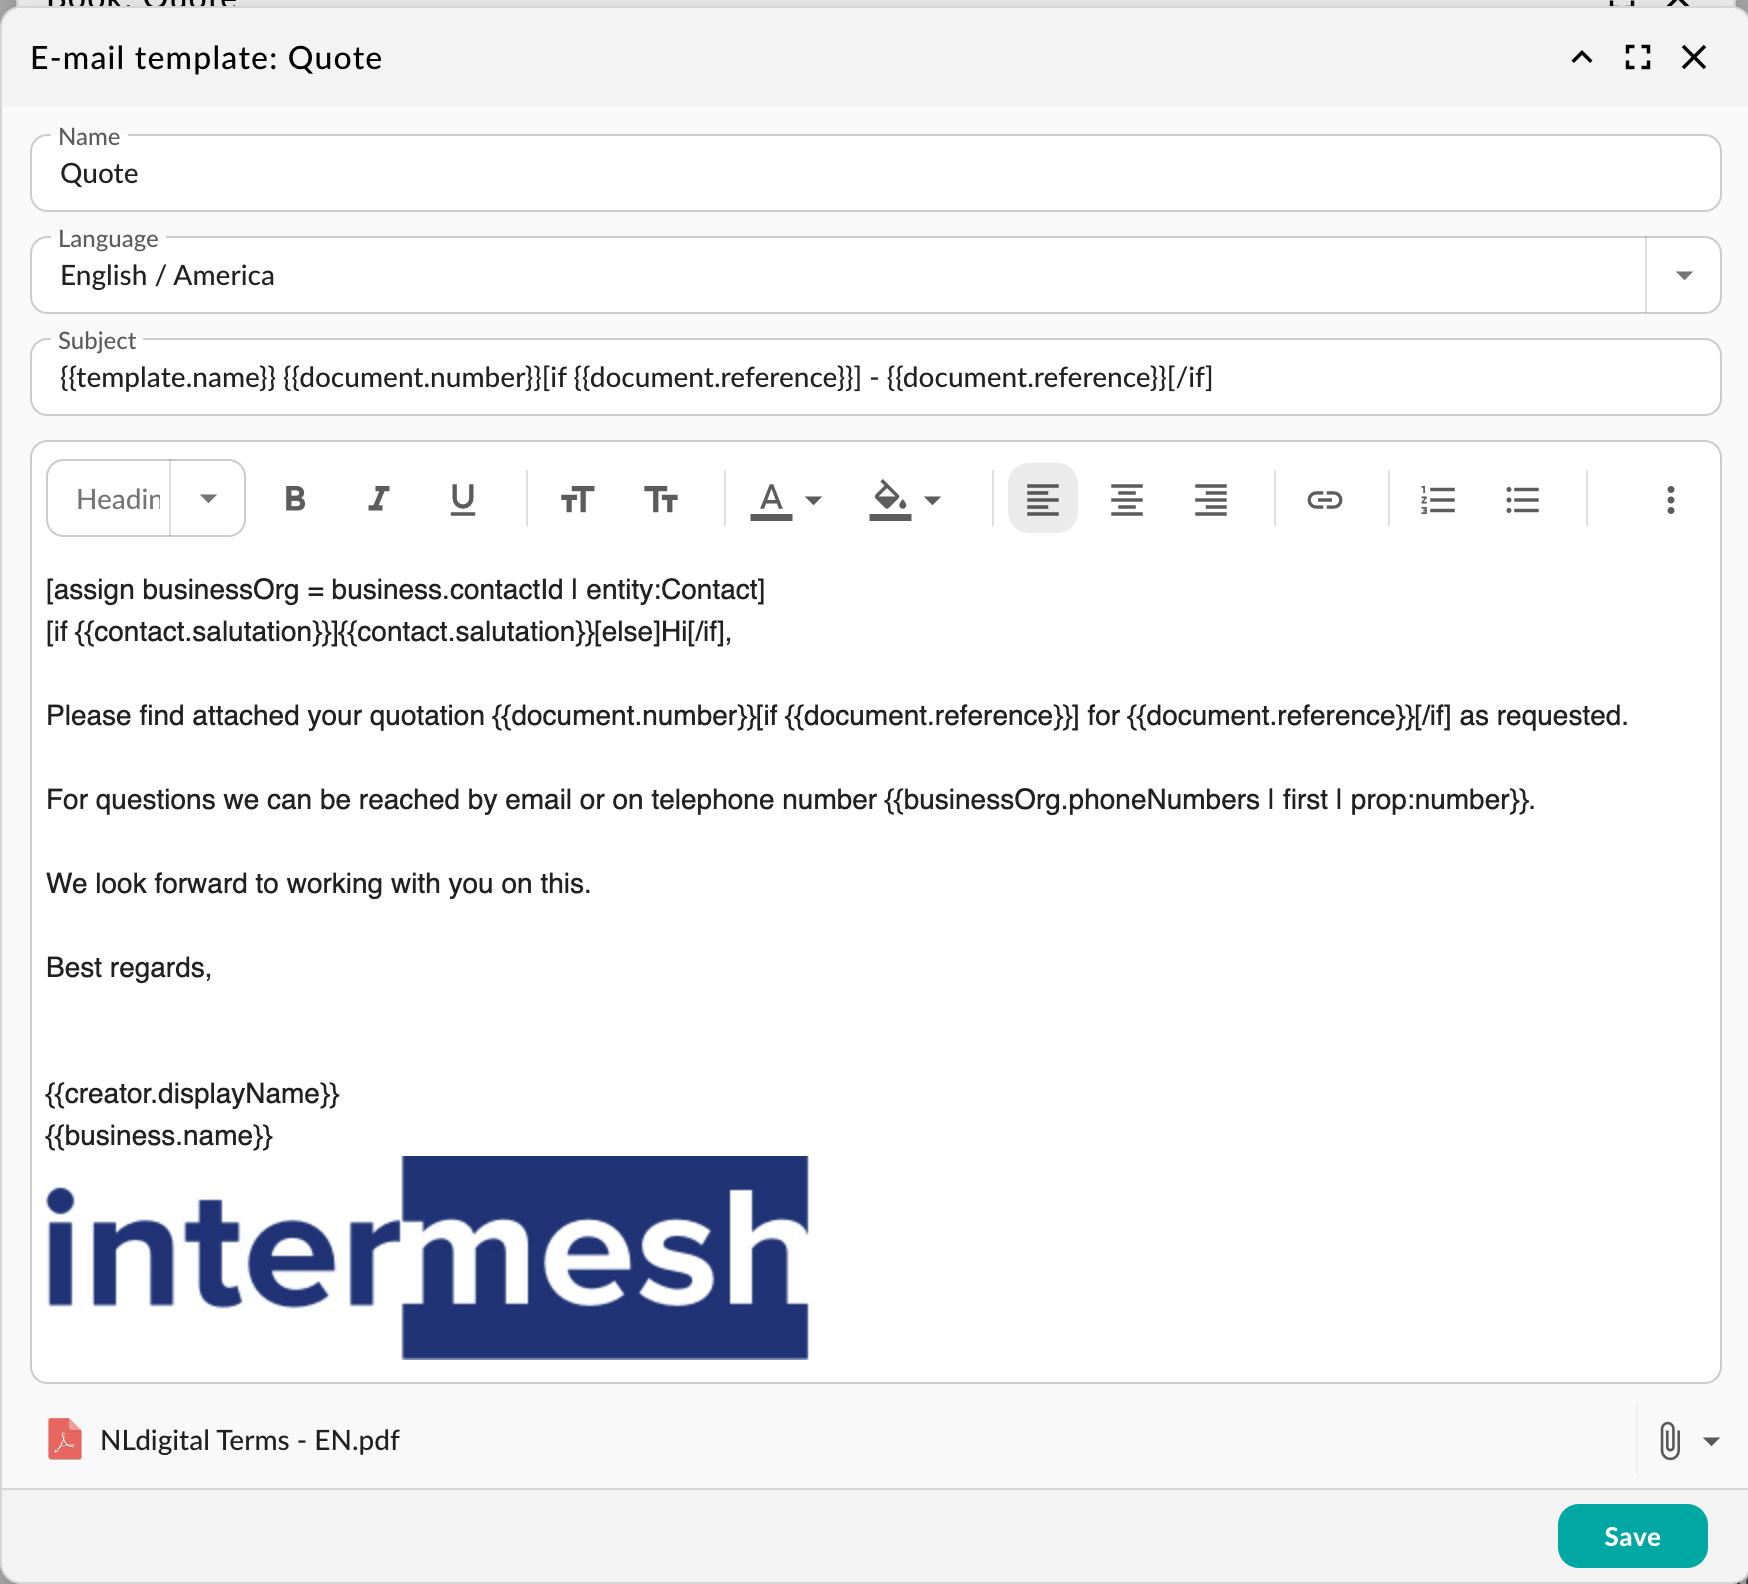
E-mail template
Additional templates
The additional E-mail/PDF templates become available after the quote or order has been accepted. You can add extra documents and e-mails for your workflow like shipping manifests or work orders.
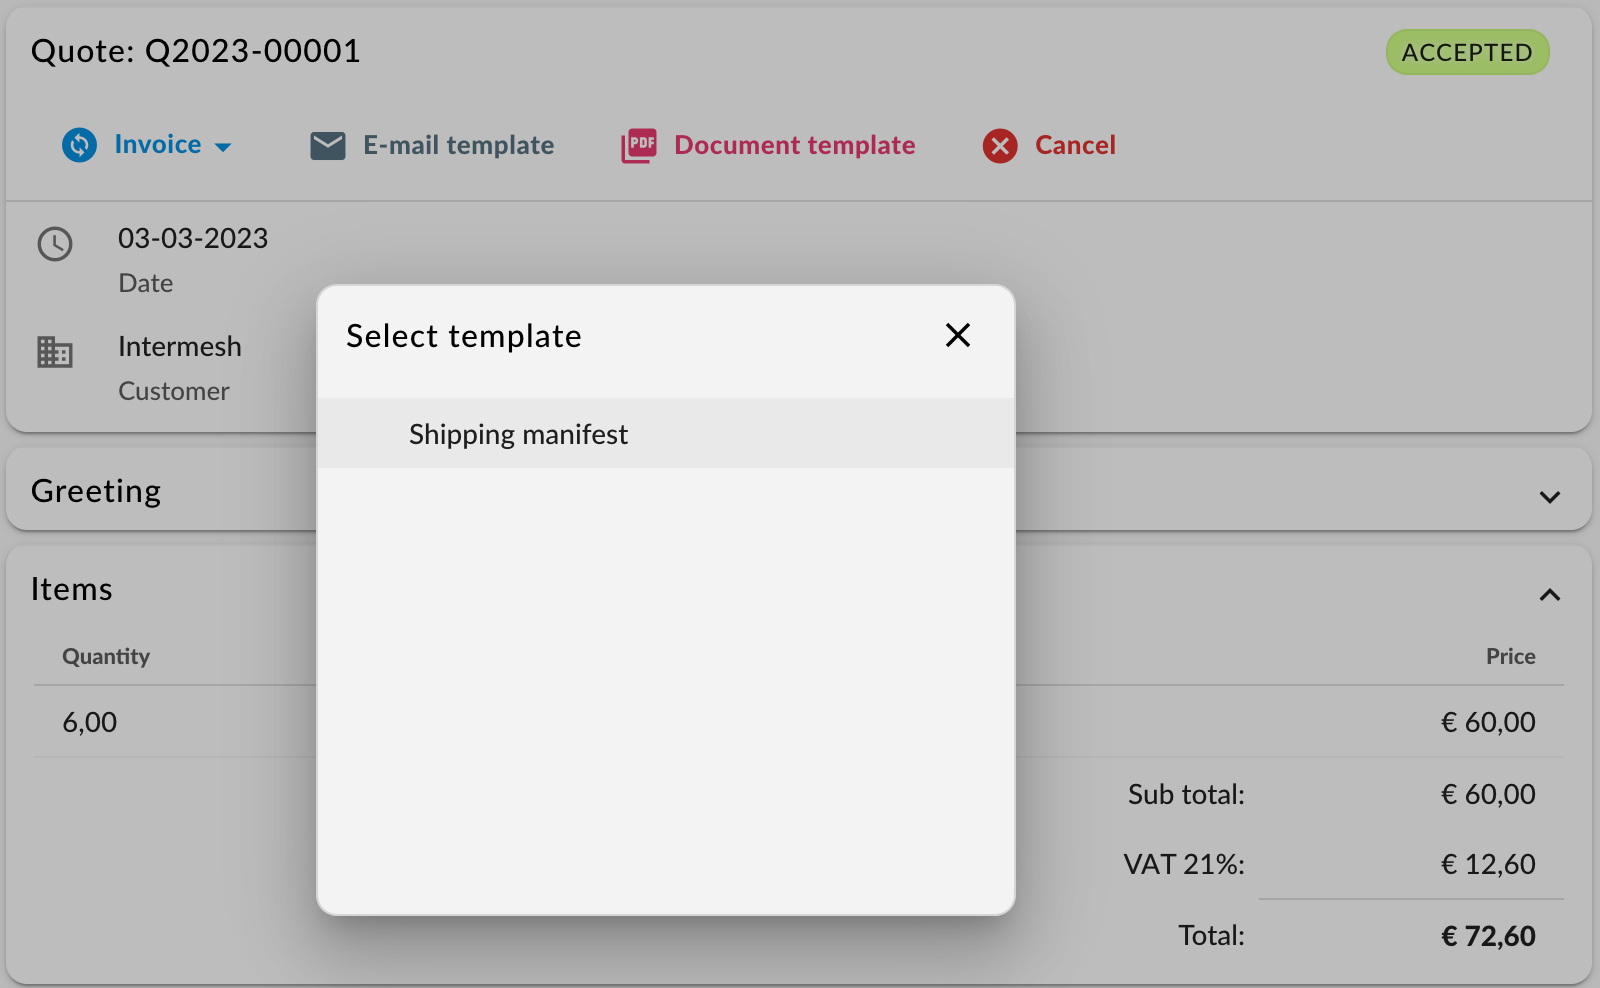
Draft quote
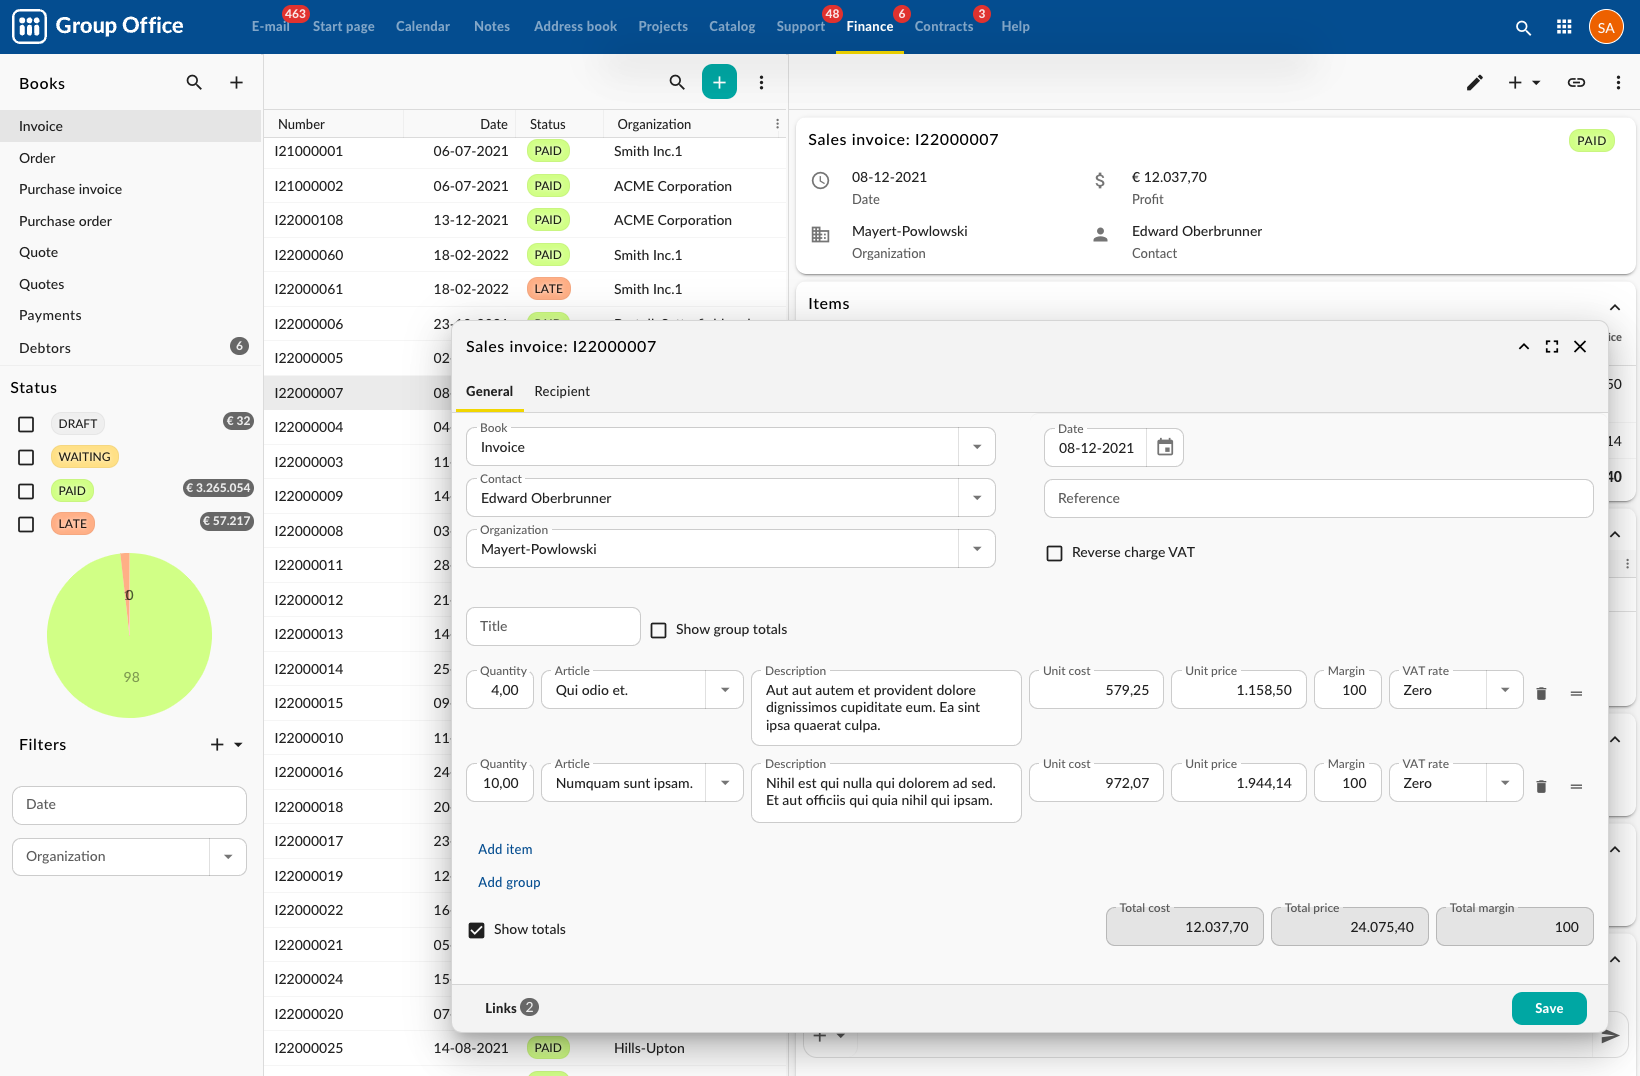
Using the finance module
Now that you’ve got your business and books setup you can start using it. We’ll explain it using a typical workflow.
Quote workflow
It starts with creating a contact. Create a contact with an organisation and make sure to enter an address, e-mail address so it will look nice on the quote. From the contact detail panel click the add(+) button and select “Quote”:
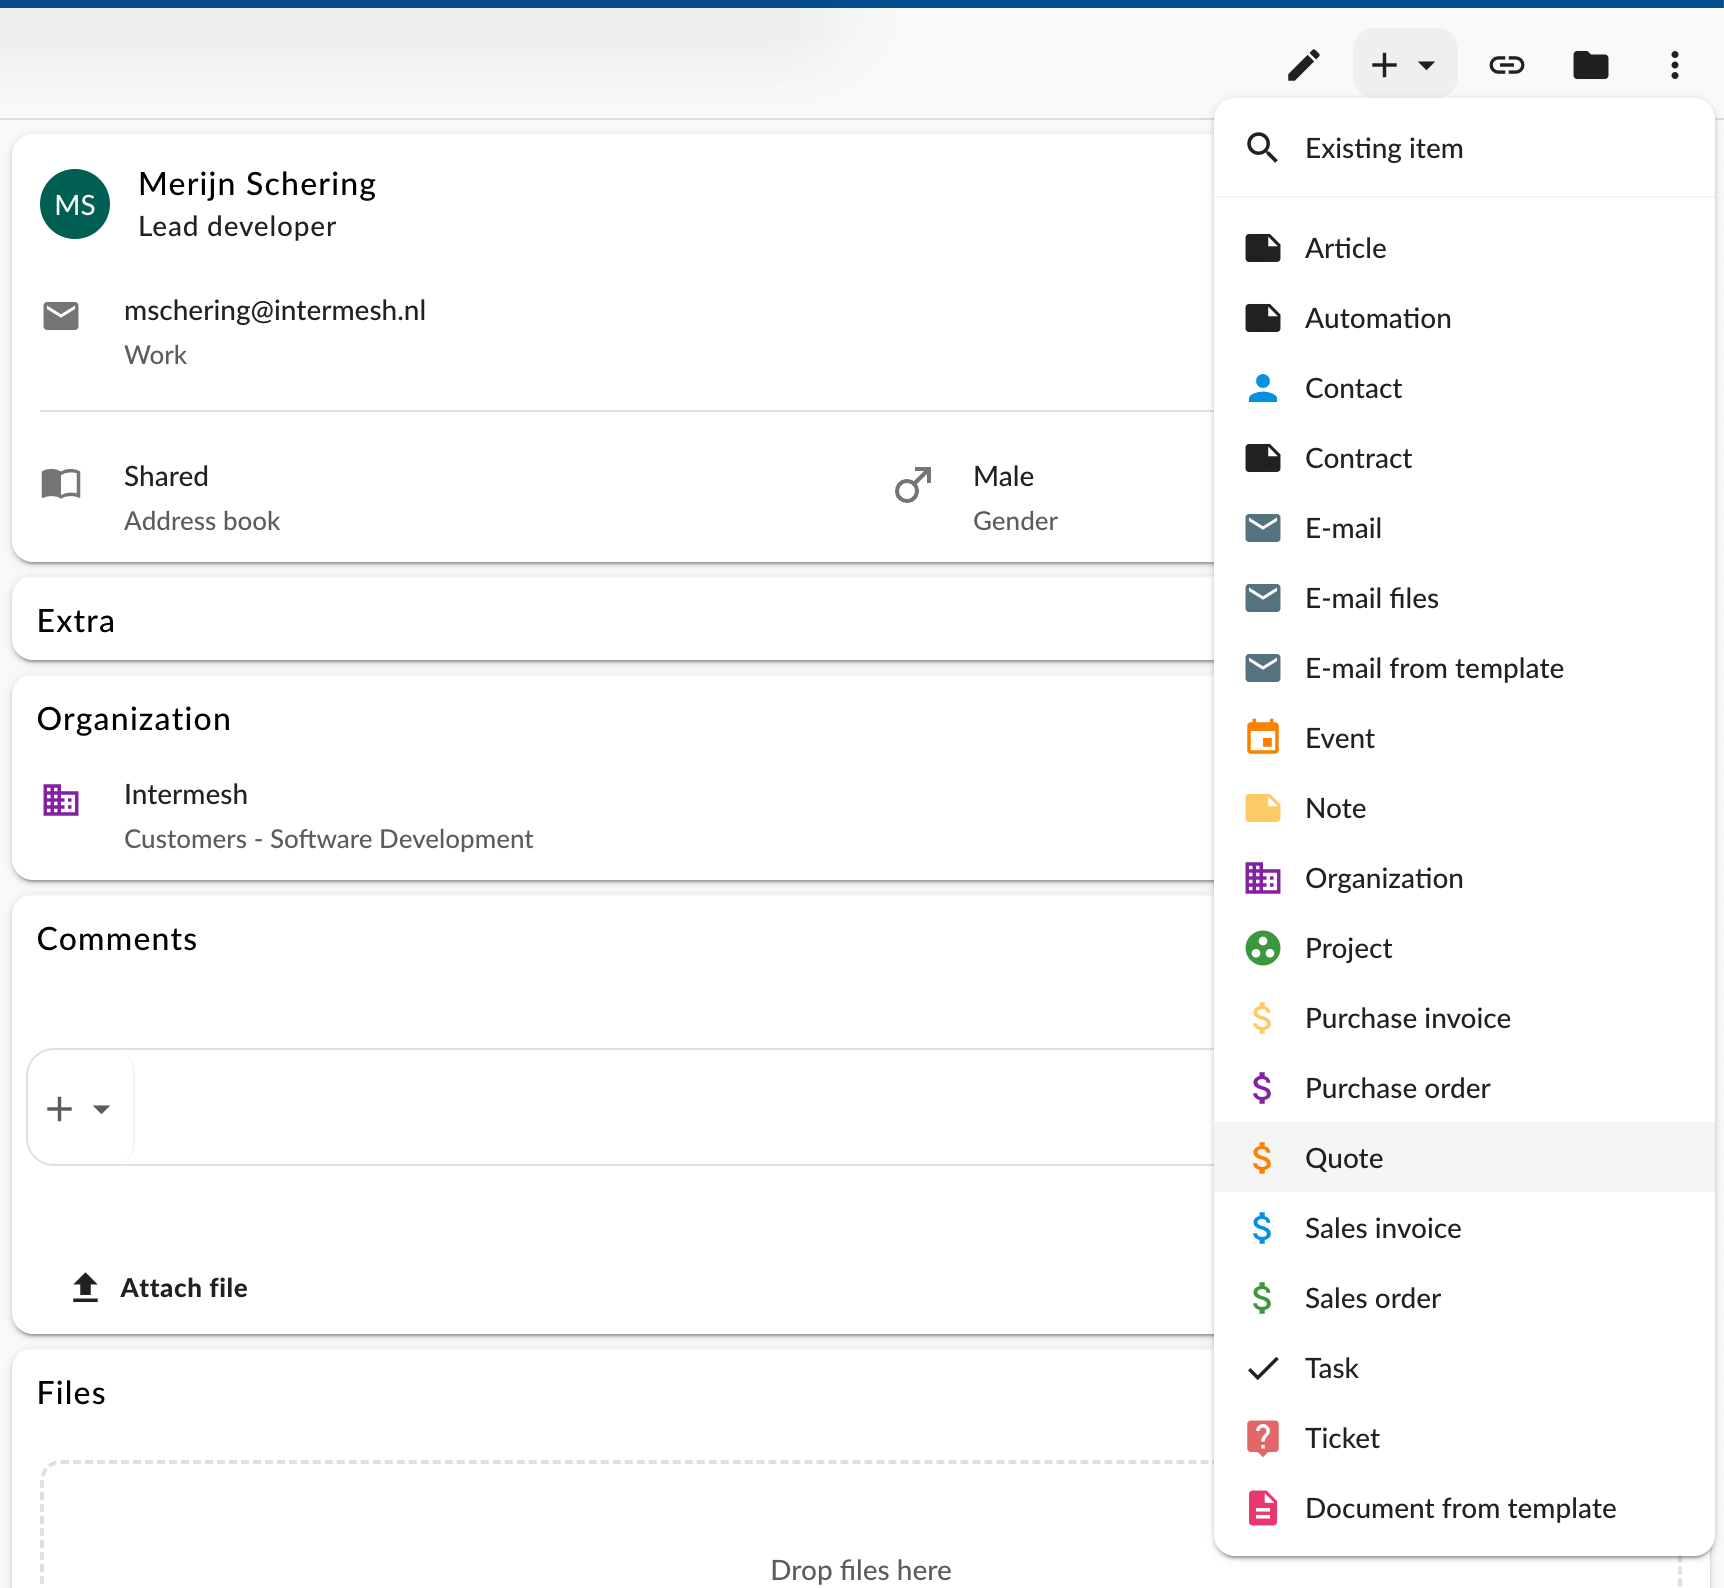
Draft quote
This will open the edit dialog for the quote. It will select the first available book that has the type quote set:
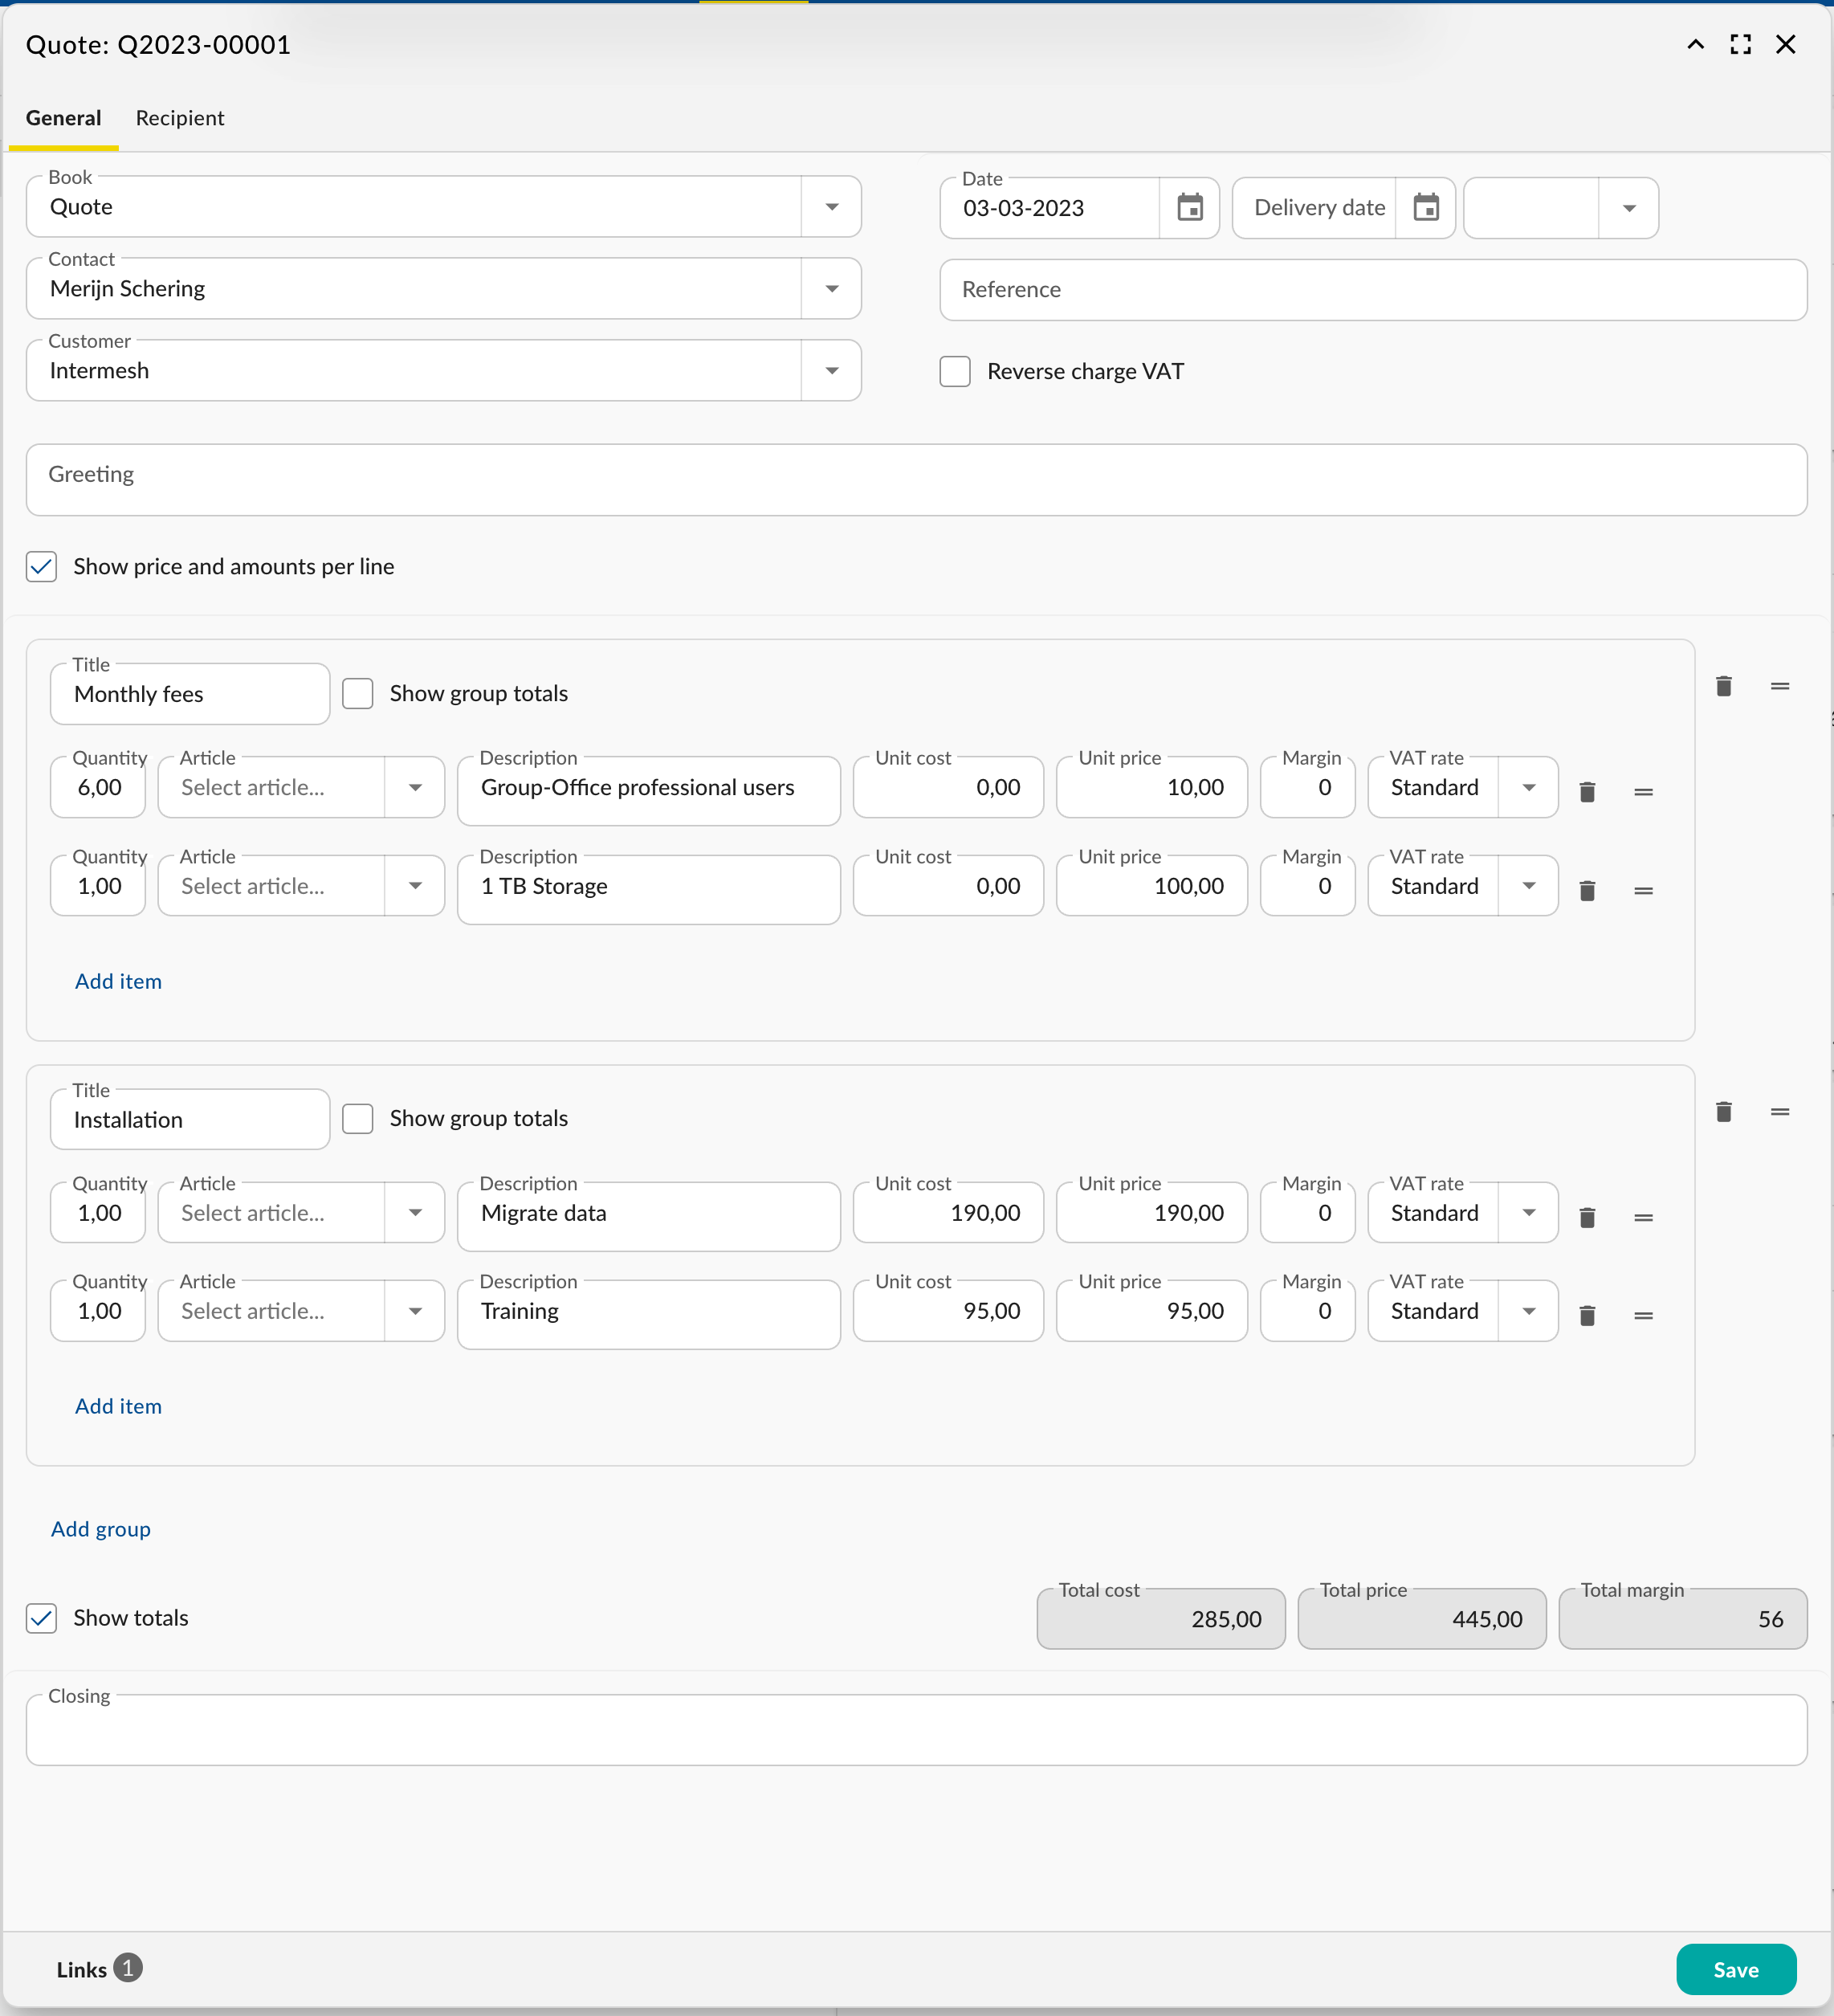
Edit quote
You can add a greeting on top of the items table and closing. Defaults for these fields can be configured in the Books.
The items can be grouped or it can just be a flat list. How these items are presented to the customer can be customized in the PDF templates. Maybe you don’t want to show line prices or only want to show the group totals and keep the items private. The templates are very flexible.
Save the document and it will close showing the detail panel:
Draft quote
Review PDF
Click the “PDF” button to review it. By default it looks like this:
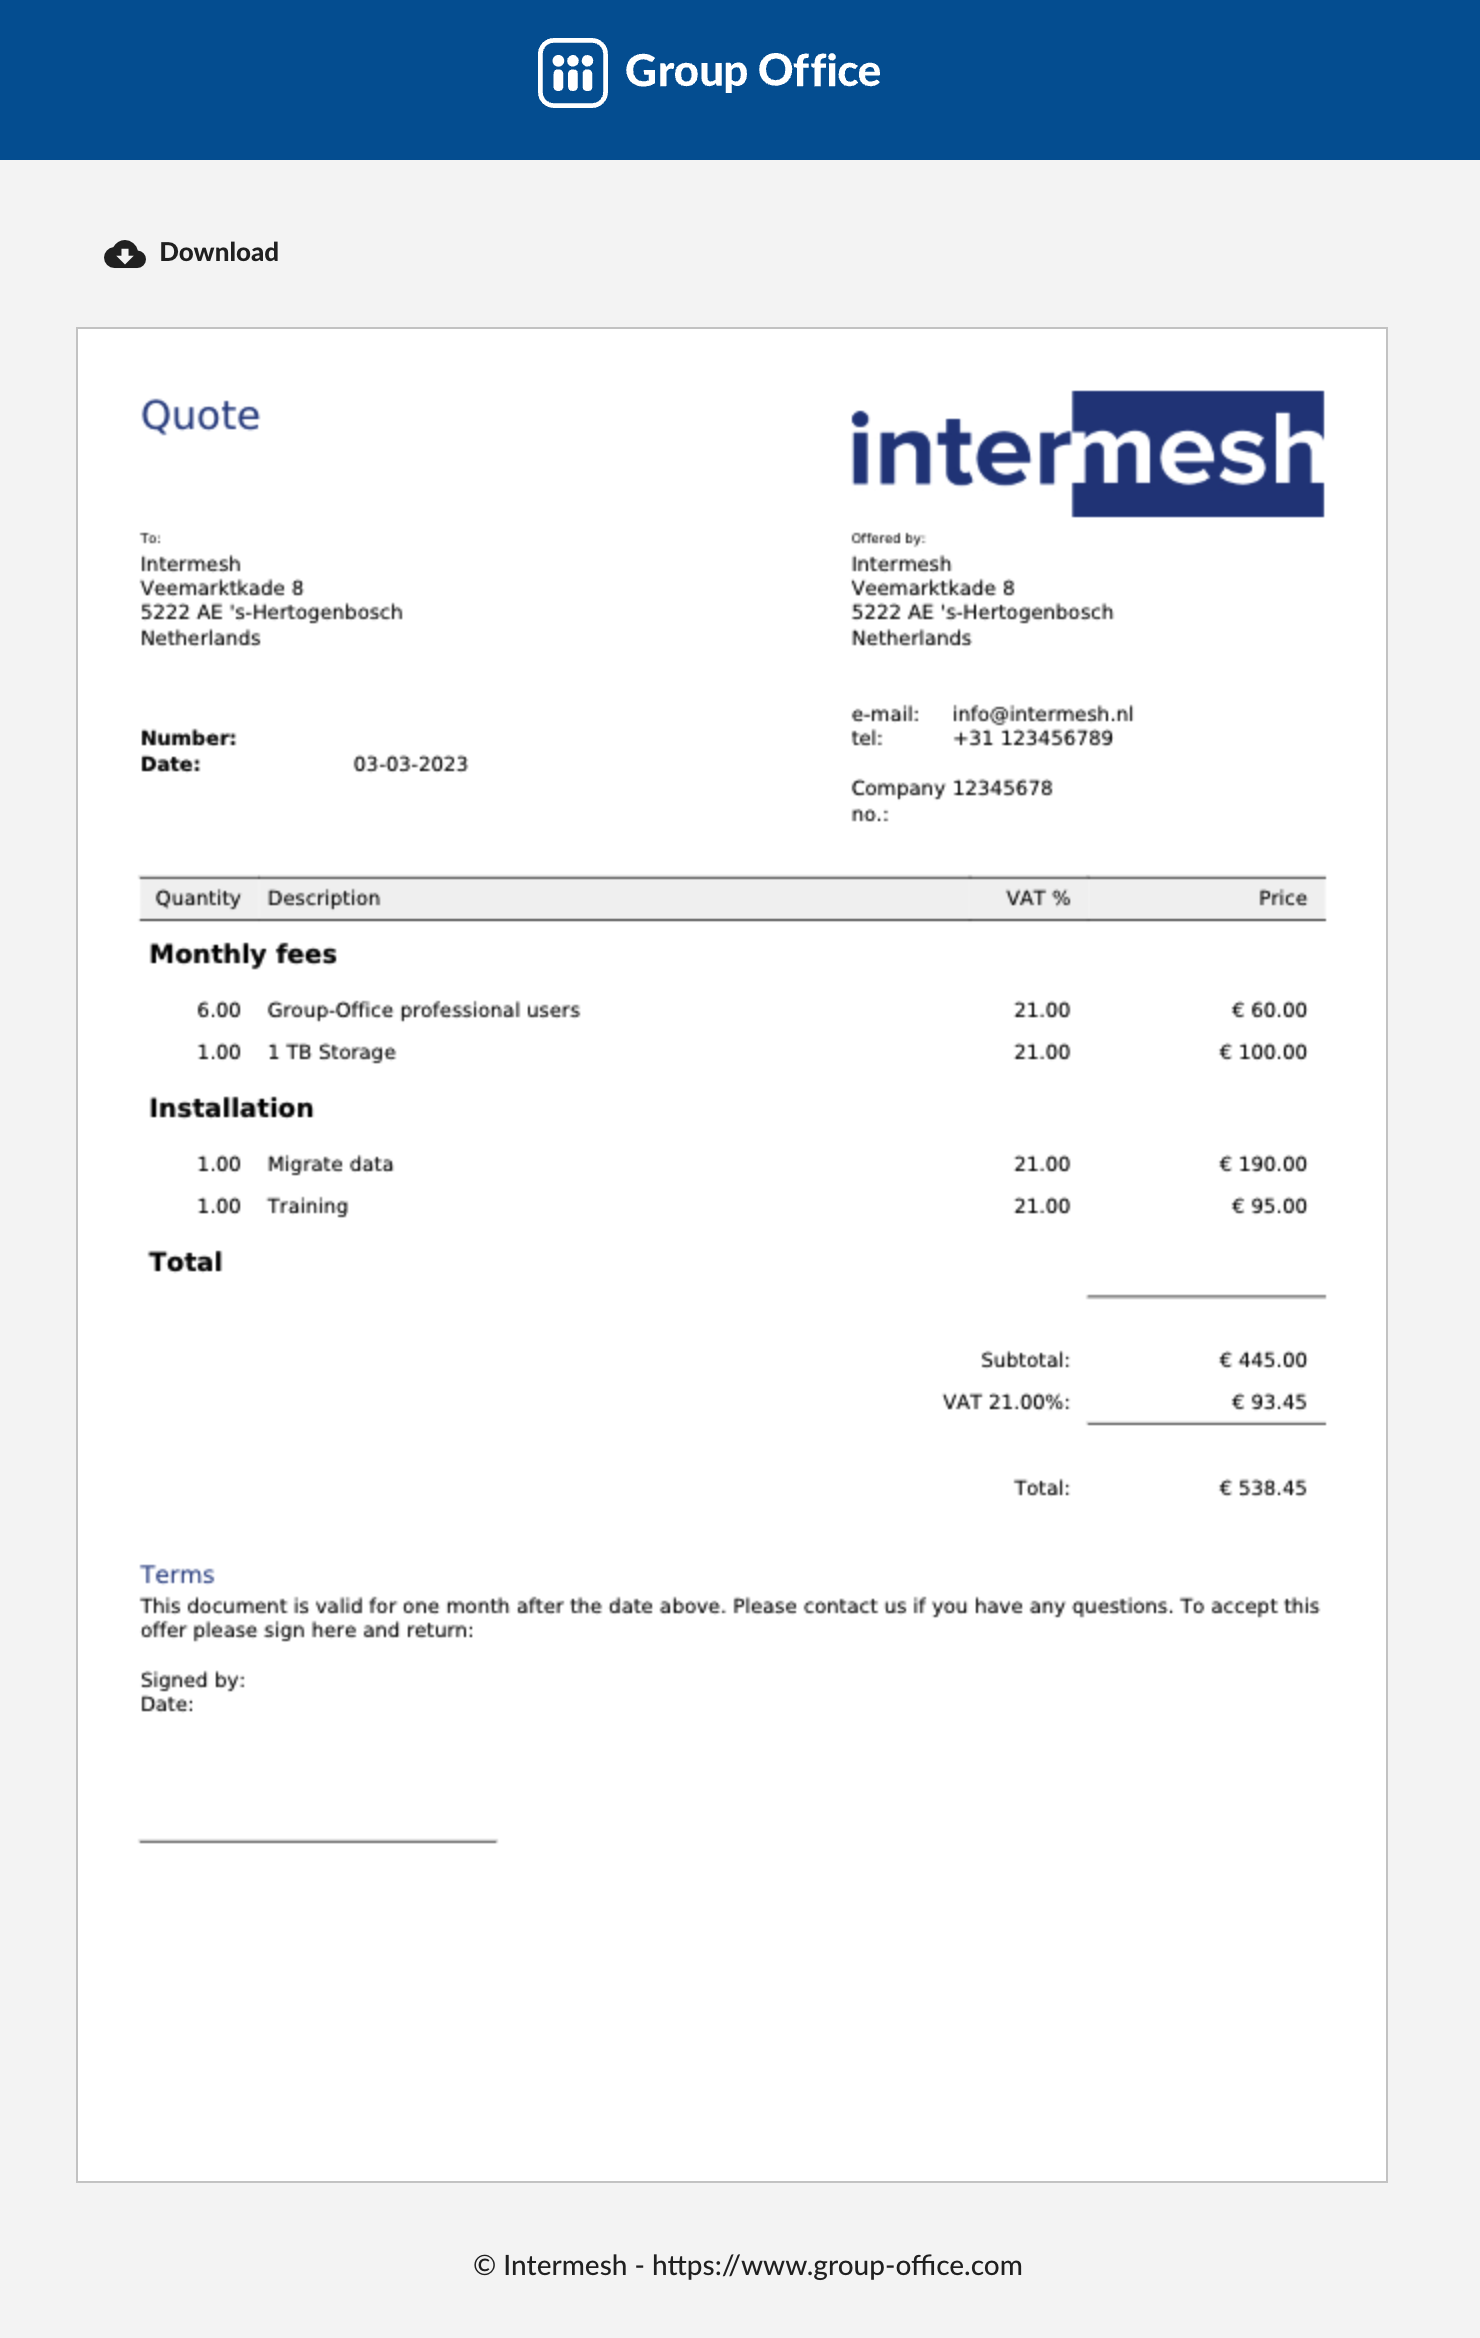
Quote PDF
Note
If the template is not ready yet, you might want to leave this page open. You can make changes to the PDF template and reload this preview to see the changes immediately.
Send quote
If the PDF looks good then it’s ready for sending. Click the “E-mail” button to send it. Make sure your e-mail account has been setup. The quote will now get a number. When you send the e-mail it’s status will automatically change to “Sent”.
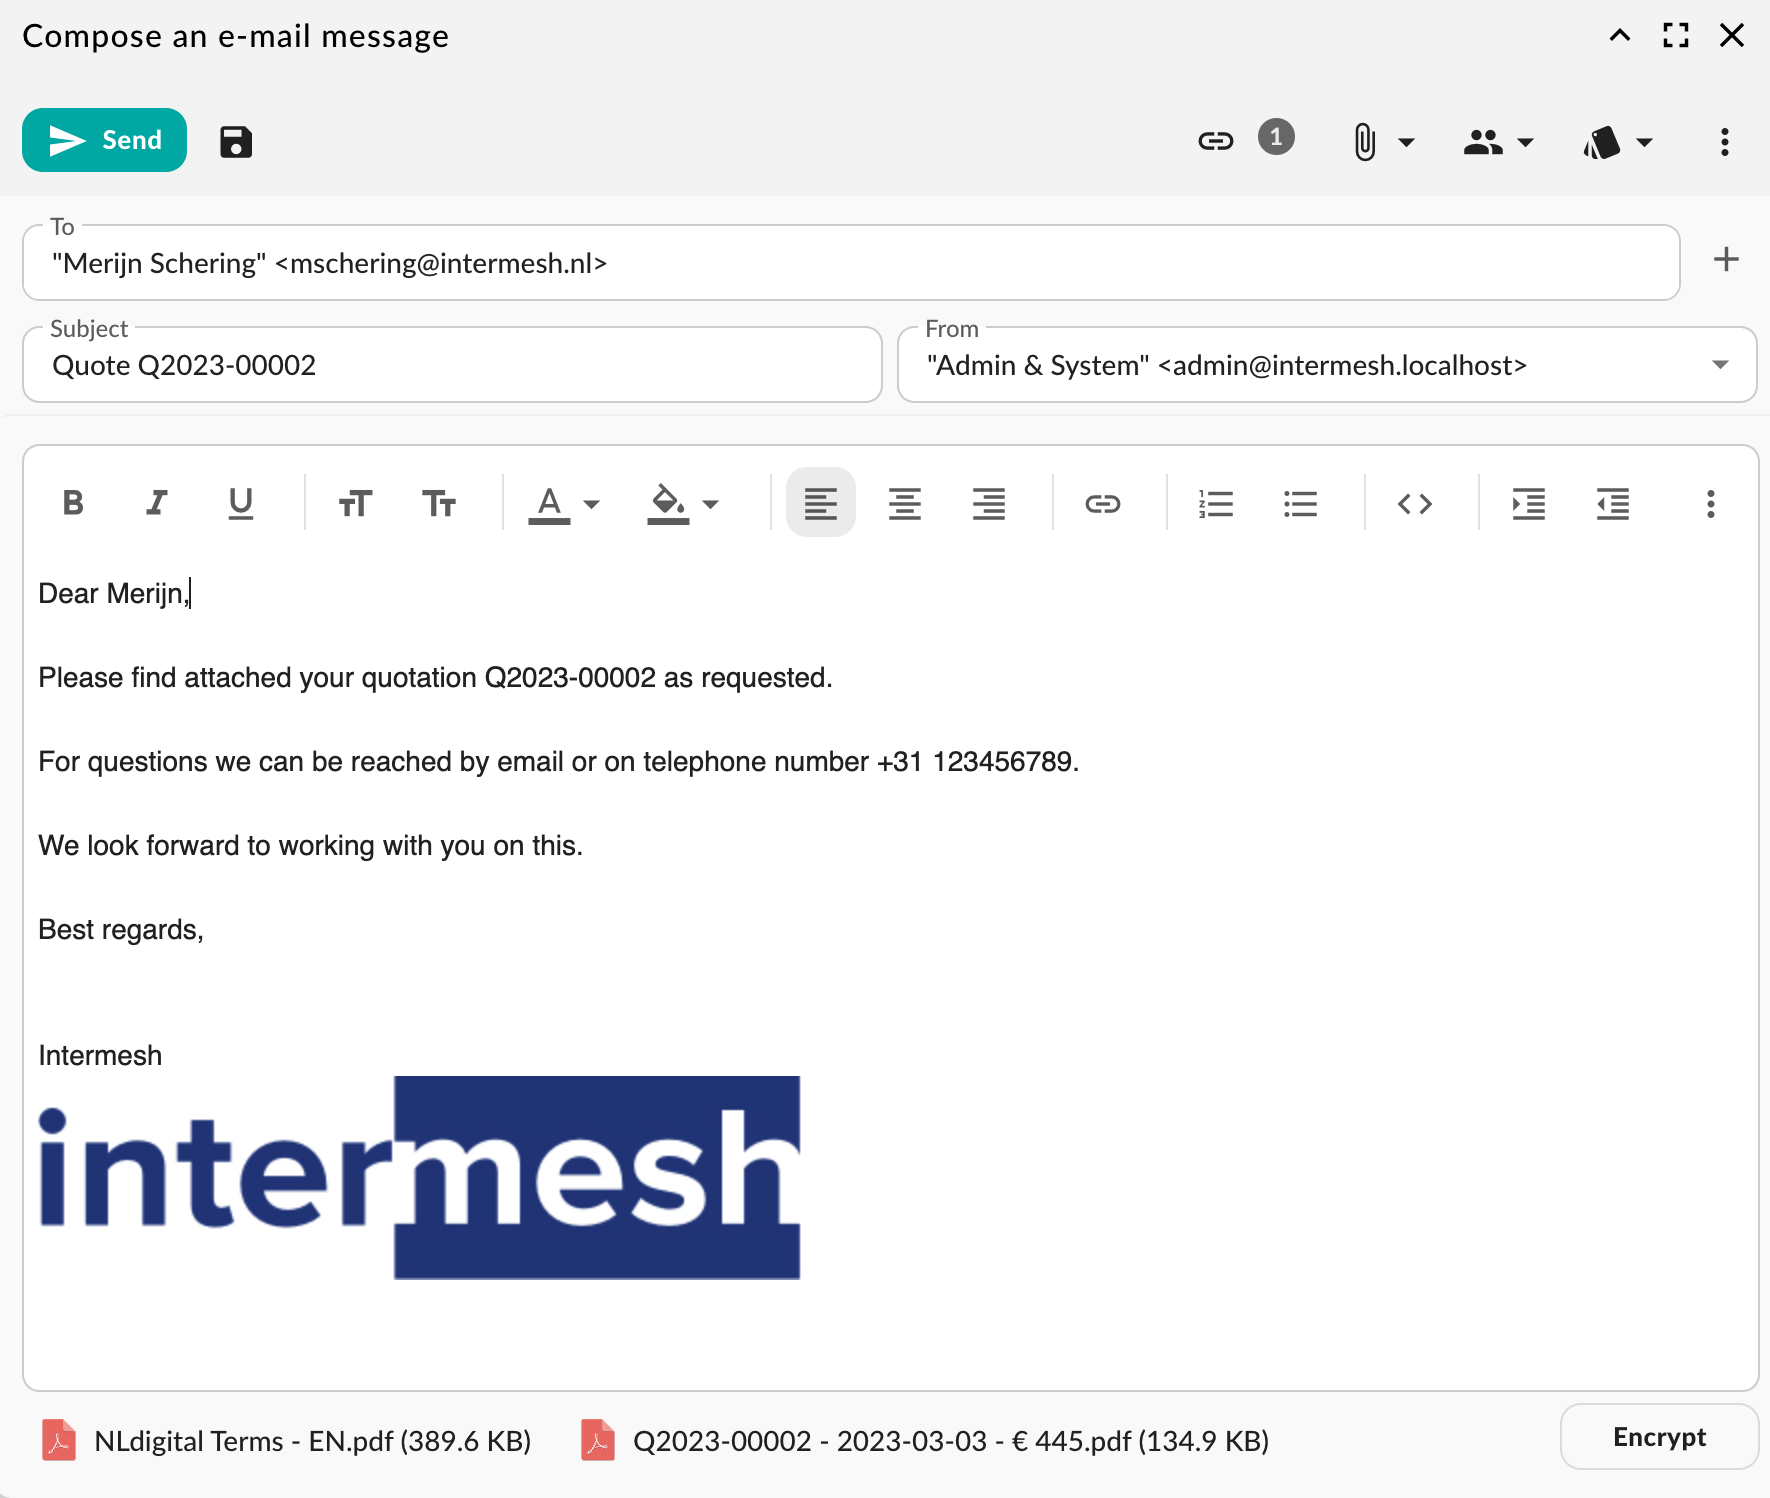
E-mail quote
The sent e-mail will be attached to the quote. When the customer replies to your e-mail it will automatically be linked to the quote too.
Accepted quote
When the customer replies you can use the “Accept” or “Reject” button to update the status.
The toolbar will change:

Accepted quote
From here on you can use custom statuses and documents that suit your workflow. You may want to create a project from here to track time, or sent a partial invoice using the invoice button. When the quote is invoiced in full it will automatically update it’s status to “Completed”.
Invoice
When you create an invoice from a quote the invoice progress is shown with a progress bar:
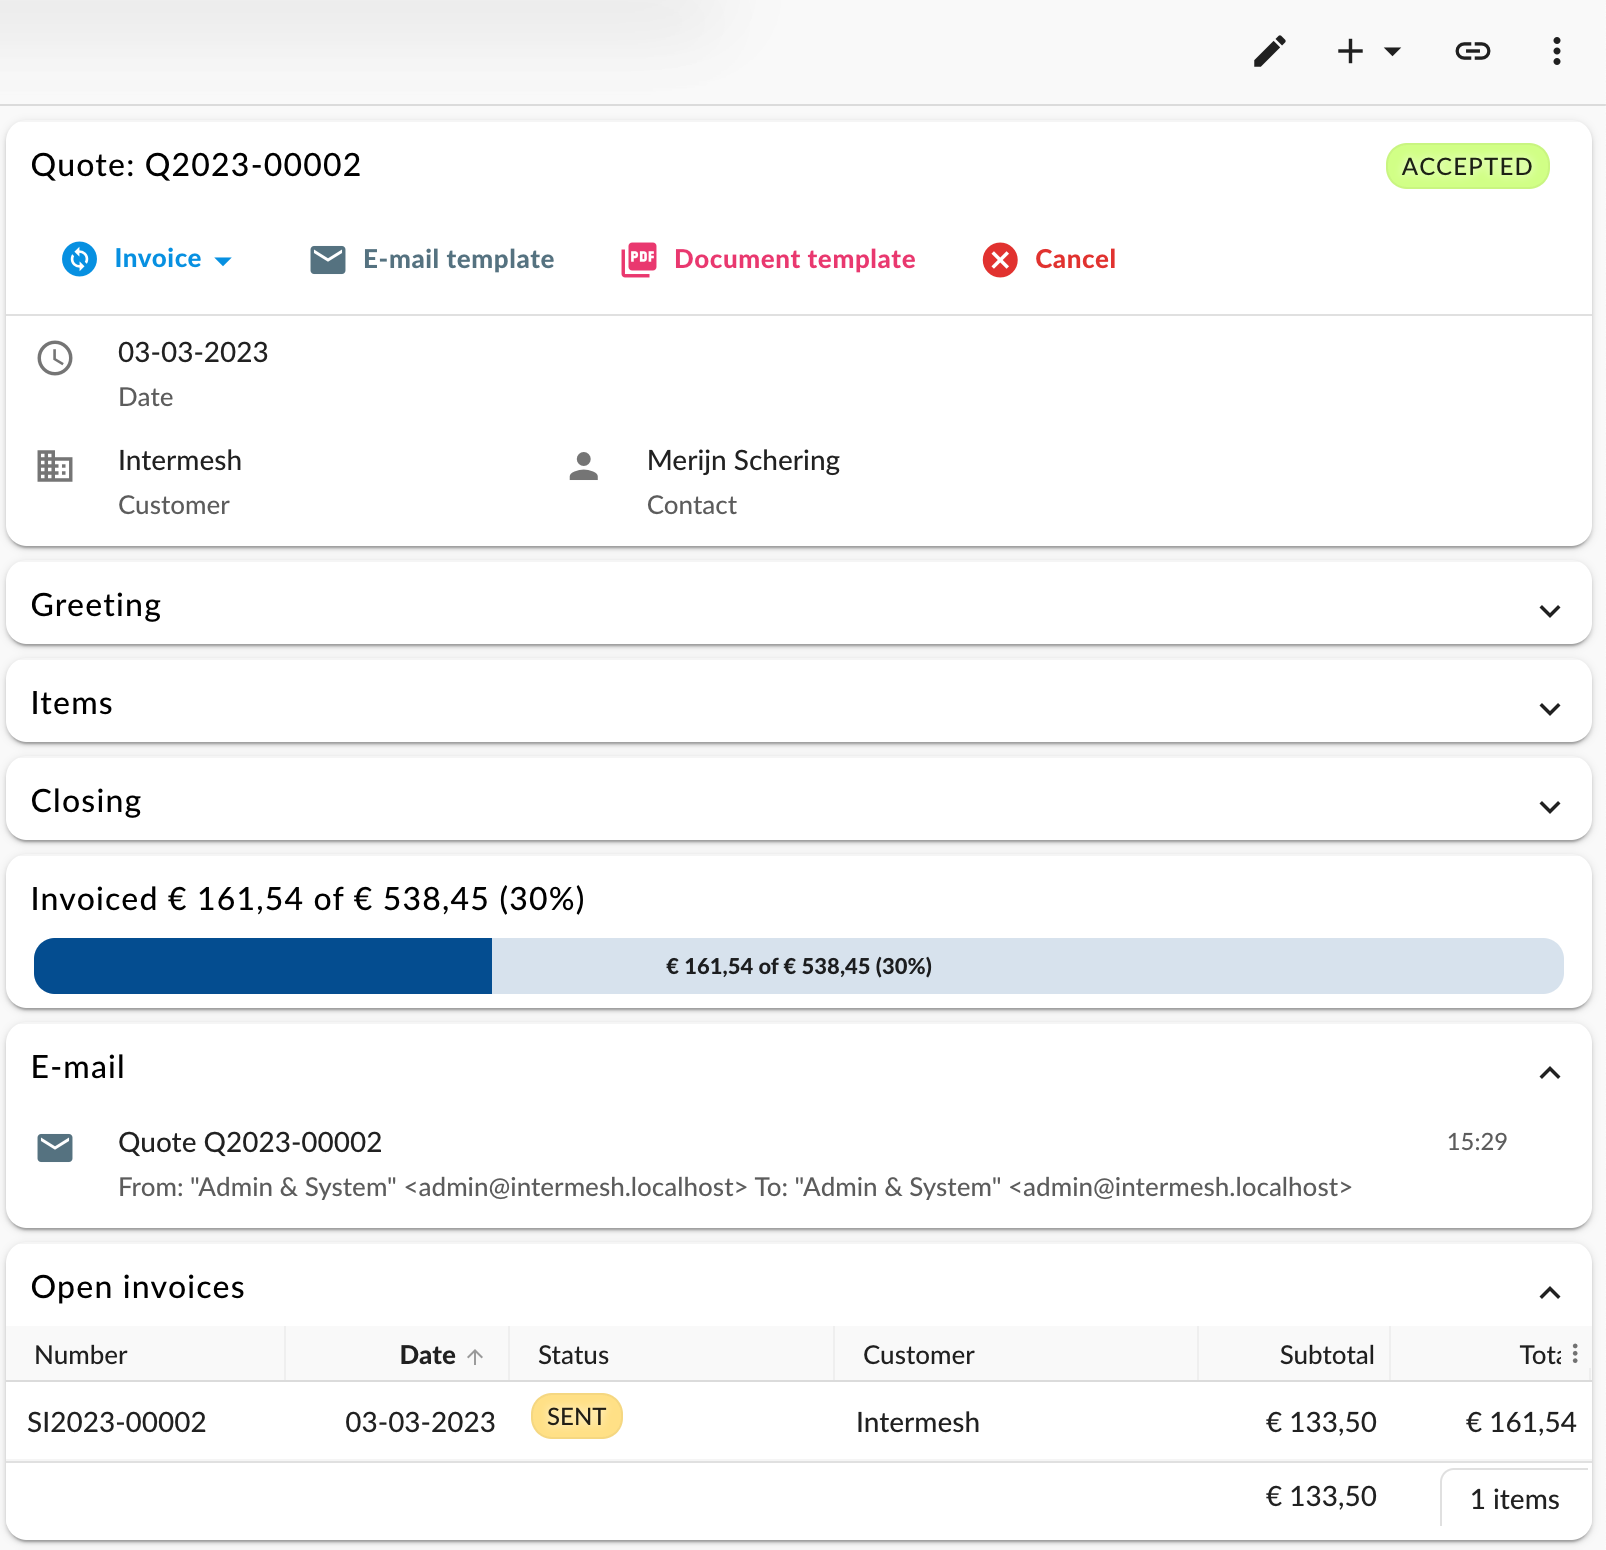
Invoice progress
You can also see the open and paid invoices in the panel.
You can of course also create manual invoices without creating a quote first. This works similar to creating quotes.
Purchase orders & invoices
You can also generate purchase orders from quotes or orders. You need to setup products with a supplier in the catalog first:
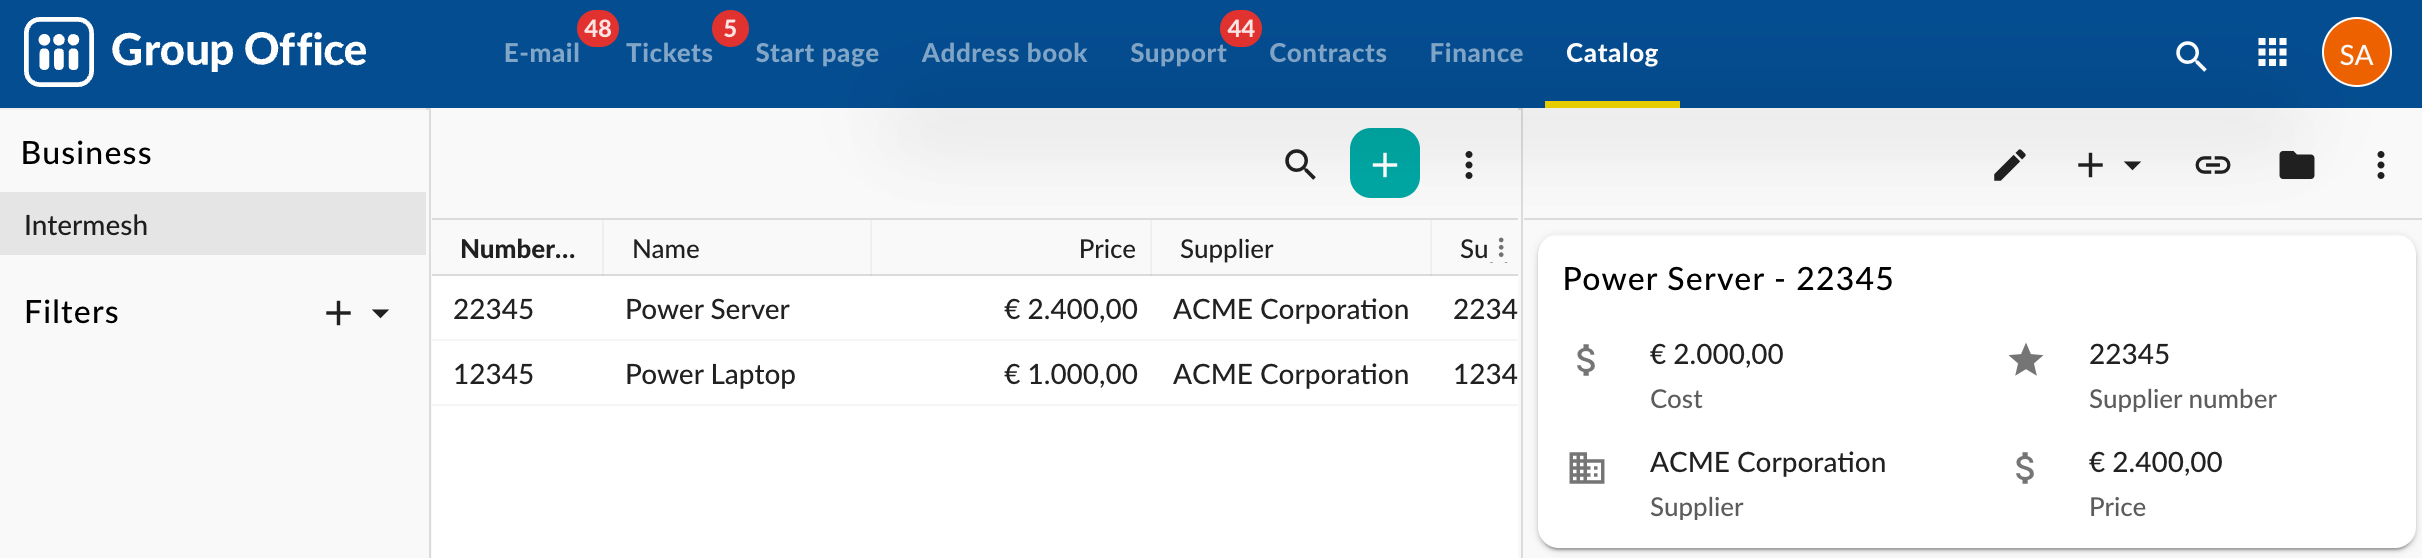
Catalog
Now repeat the quote process above and add some catalog items with the supplier set. A panel with “Purchased items” and a “Create purchase orders” button will appear.
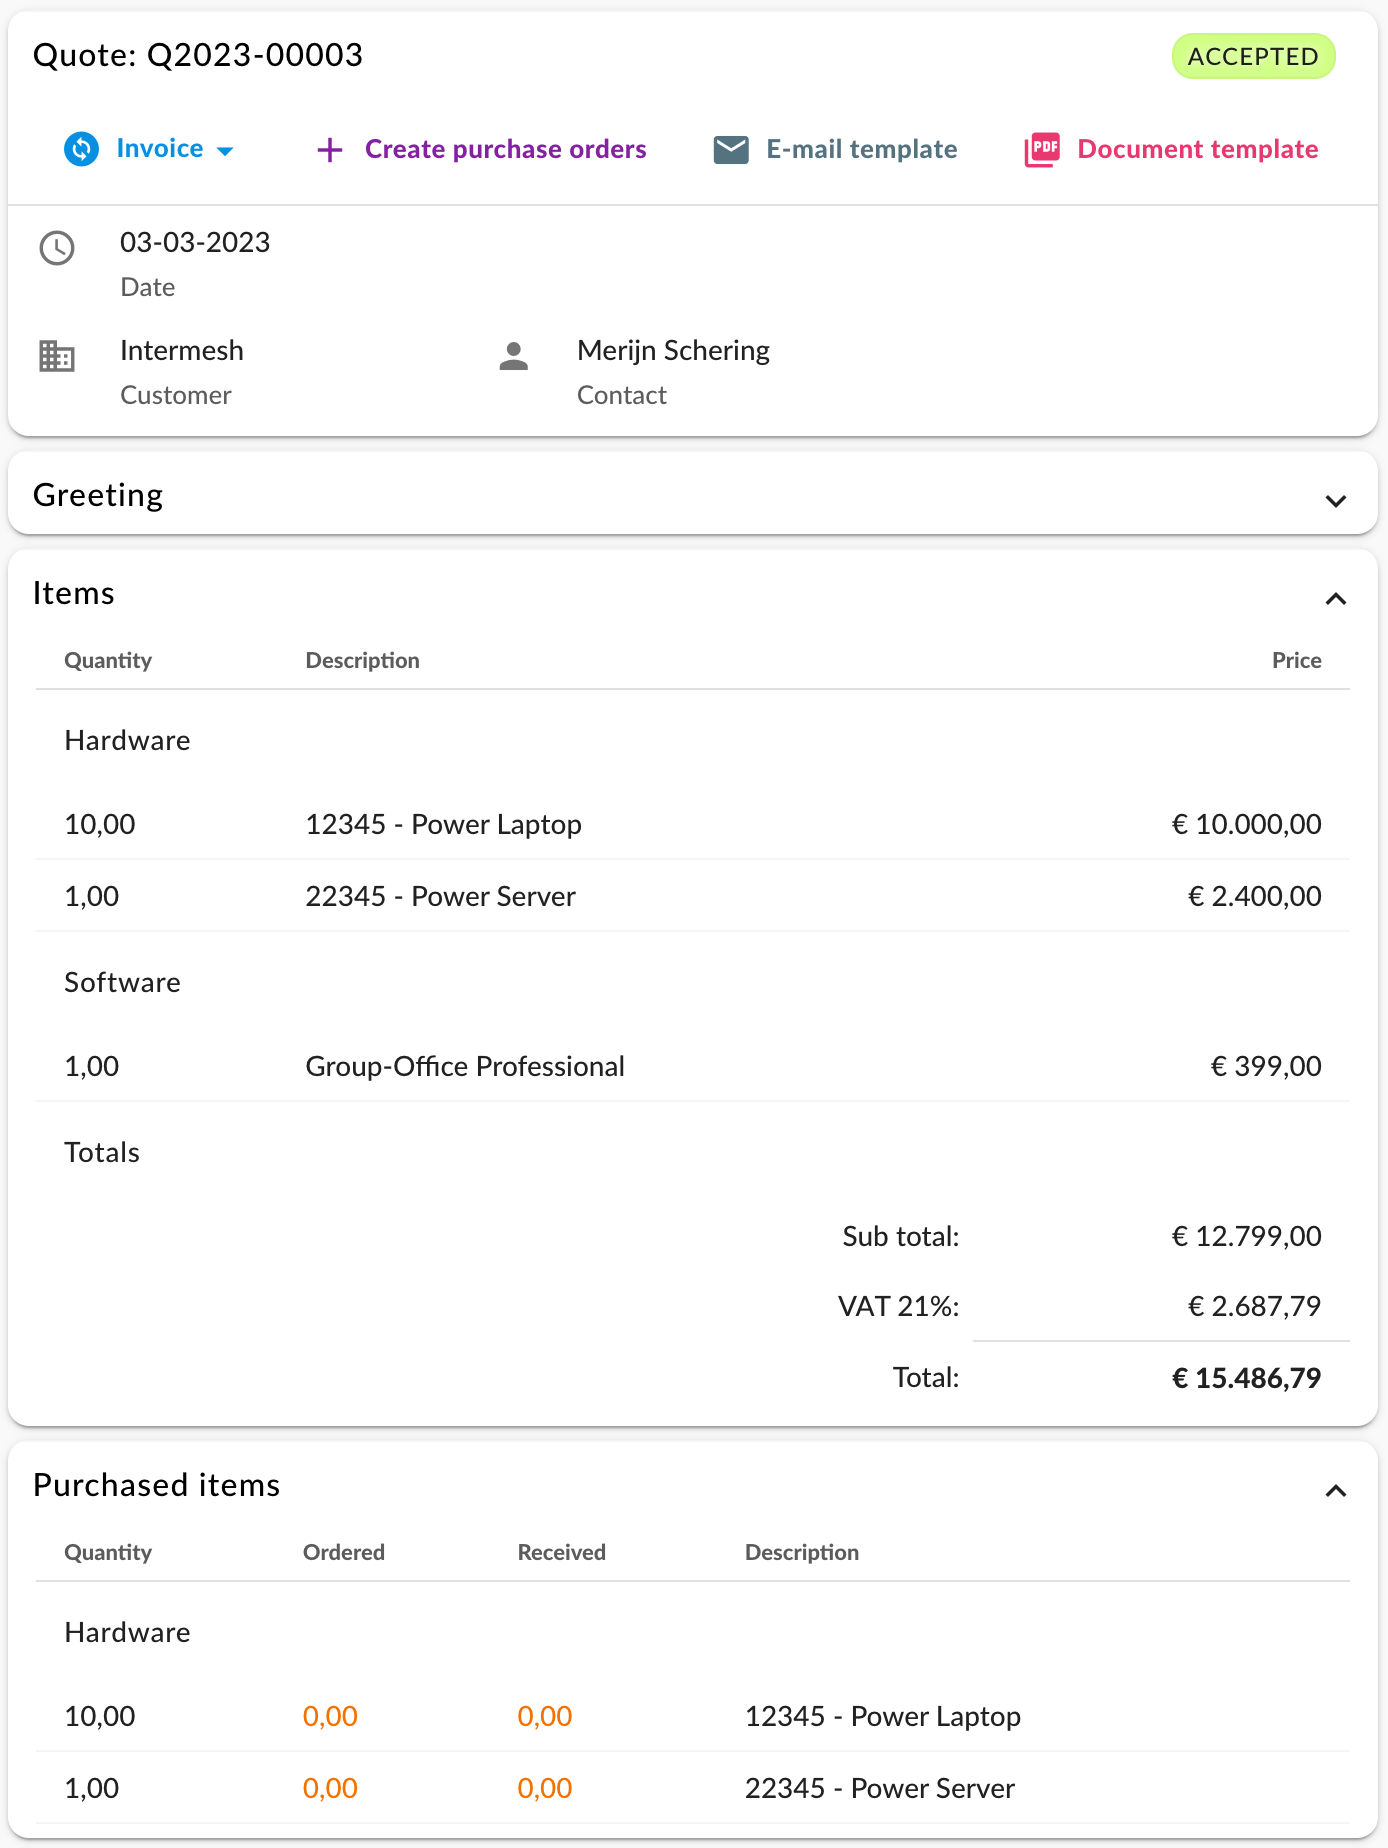
Purchase orders from a quote
When you click the button it will generate purchase orders for each supplier. You can send those and when you receive them you can add the supplier purchase invoice and it will show as delivered in the quote or order.
Payments
You can manually add payments to the invoices but you can also import them using a CSV or MT940 file. It’s also possible to connect a payment provider like PayPal, Mollie, MultiSafePay or any other that we can integrate for you.
Debtors
Click “Debtors” to view debtors and their outstanding invoices. With the “Actionable” filter you can view only those that need to be reminded. You can control that in the Debtor management.
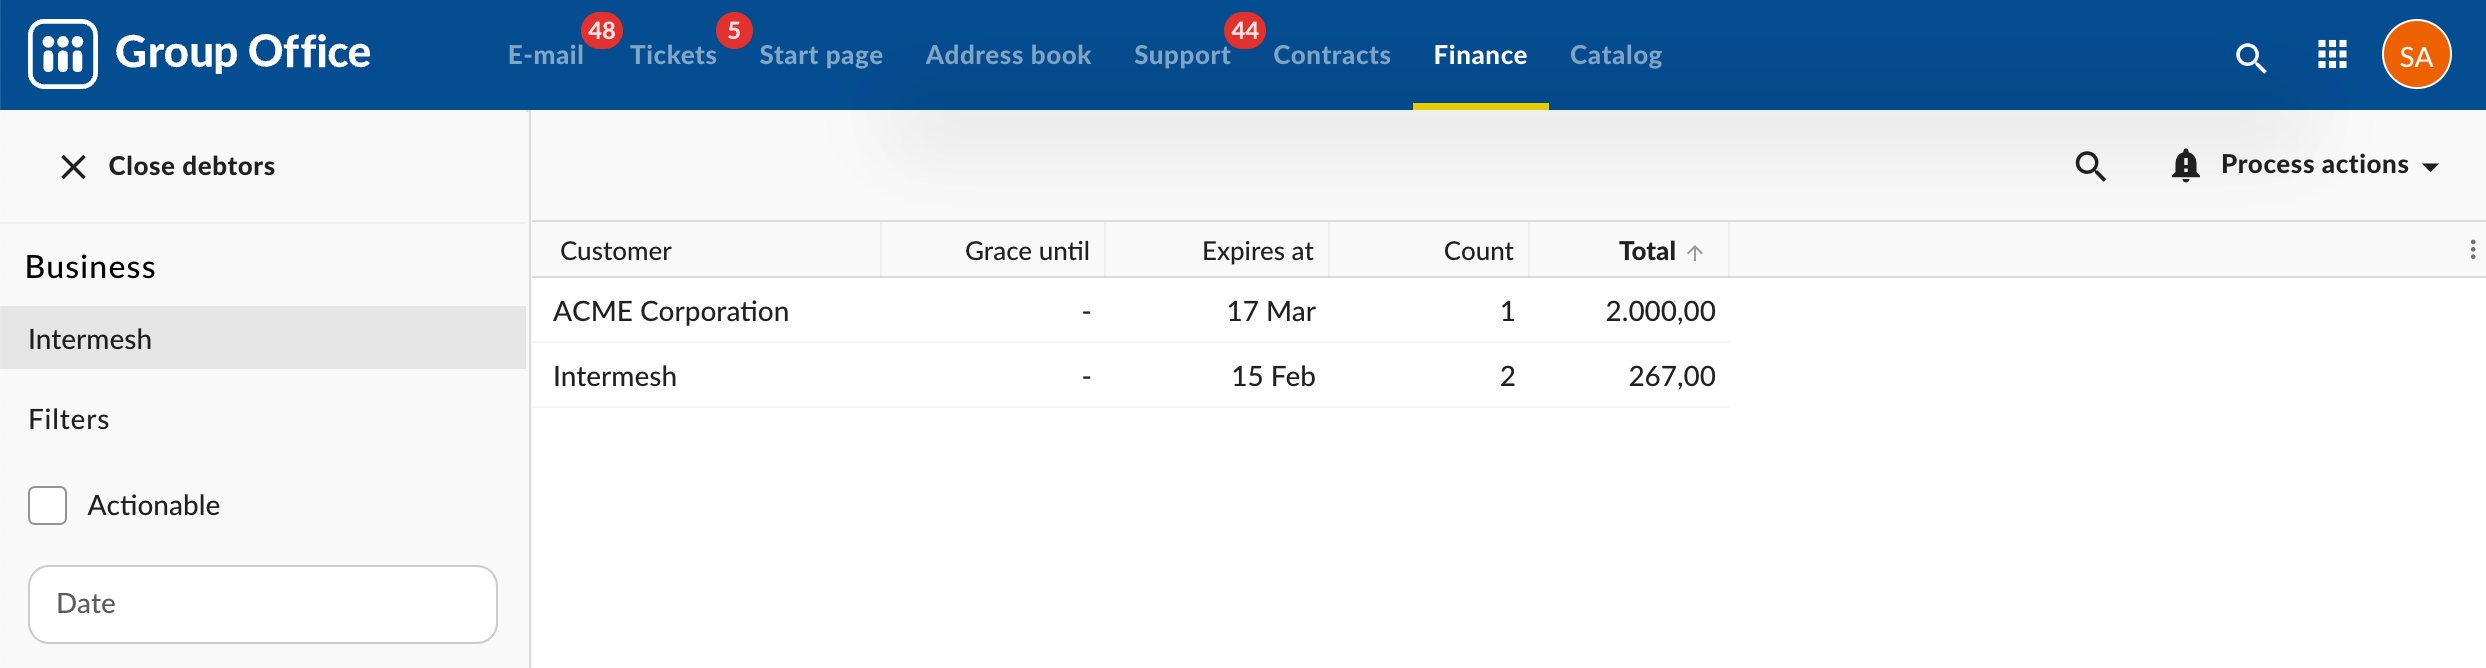
Debtors
From the “Process actions” menu you can choose a real or test run. With the test run it will be sent to the account used for sending out reminders configured in the Business.
The outstanding invoices statement looks like this by default:
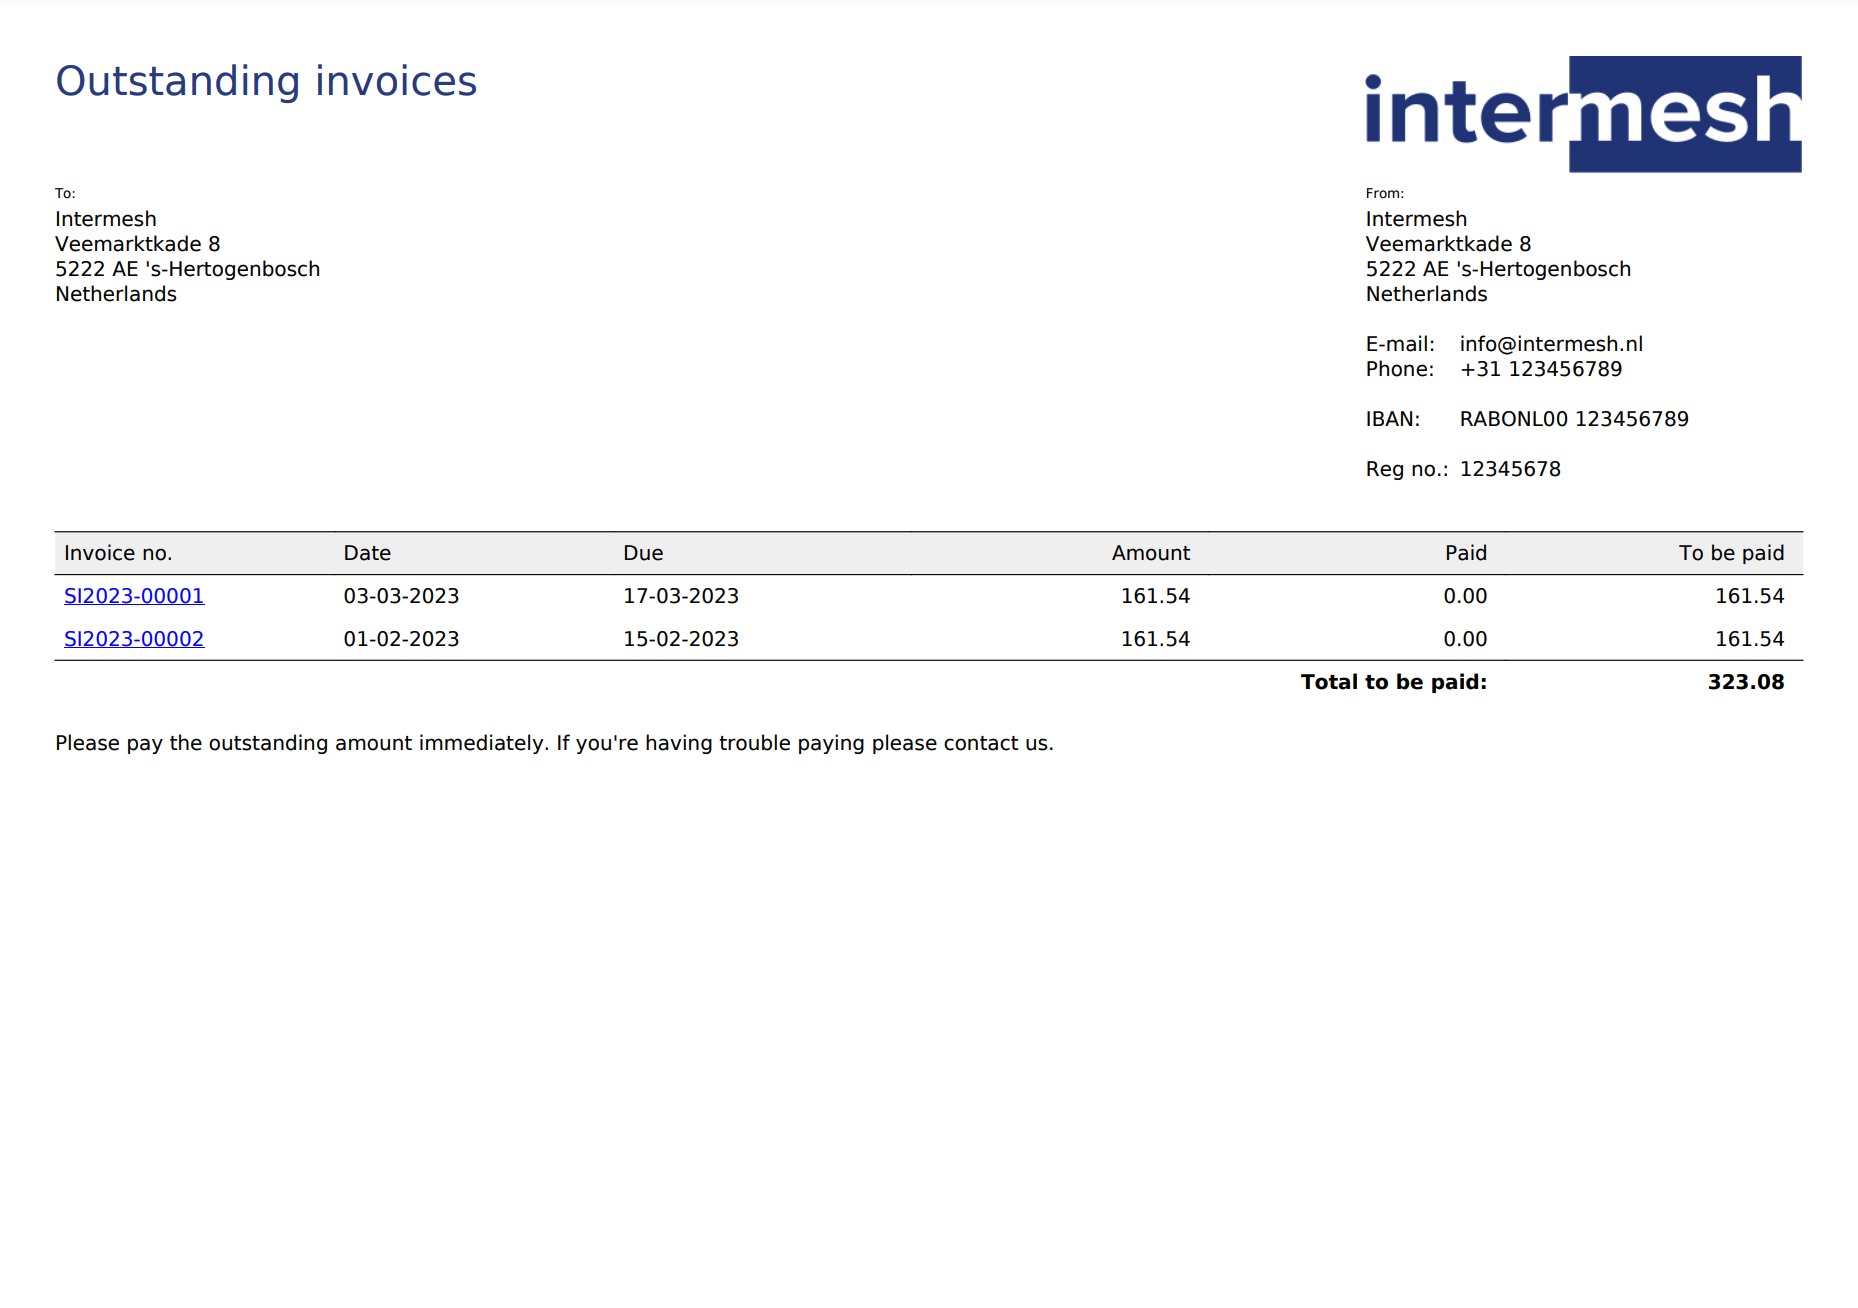
Outstanding invoices
When there are debtors to be notified you are reminded with a badge in the menu:
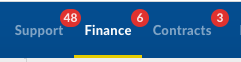
Menu badges
Reports
You can view a yearly and monthly turnover report from the more menu in the main grid:
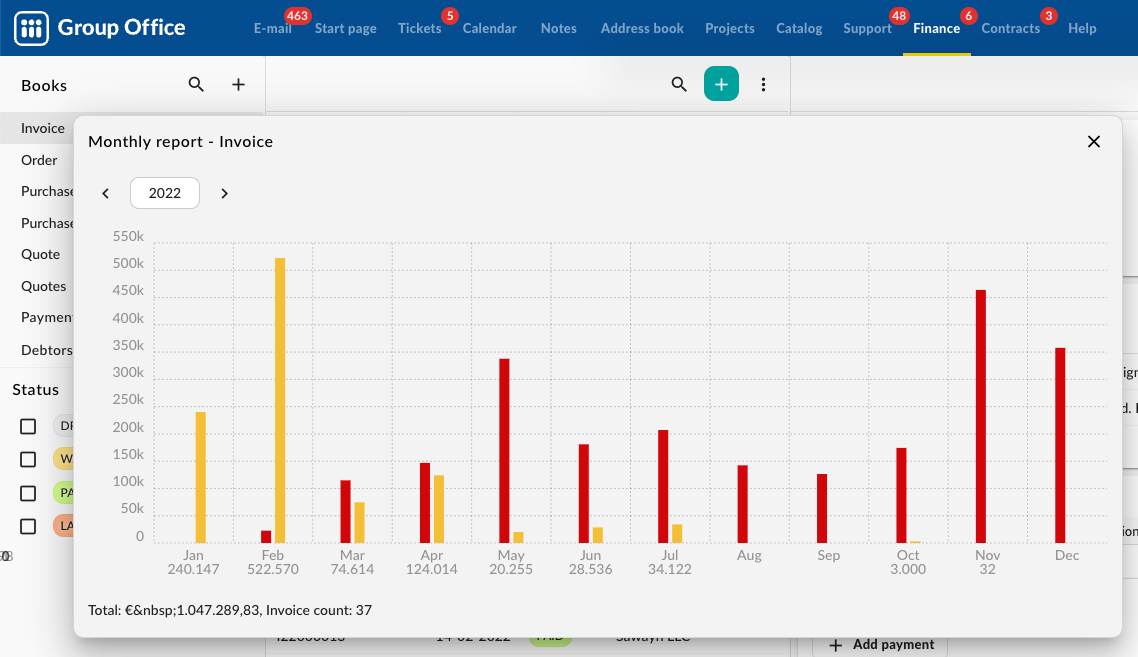
Monthly report
You can also export to excel or CSV
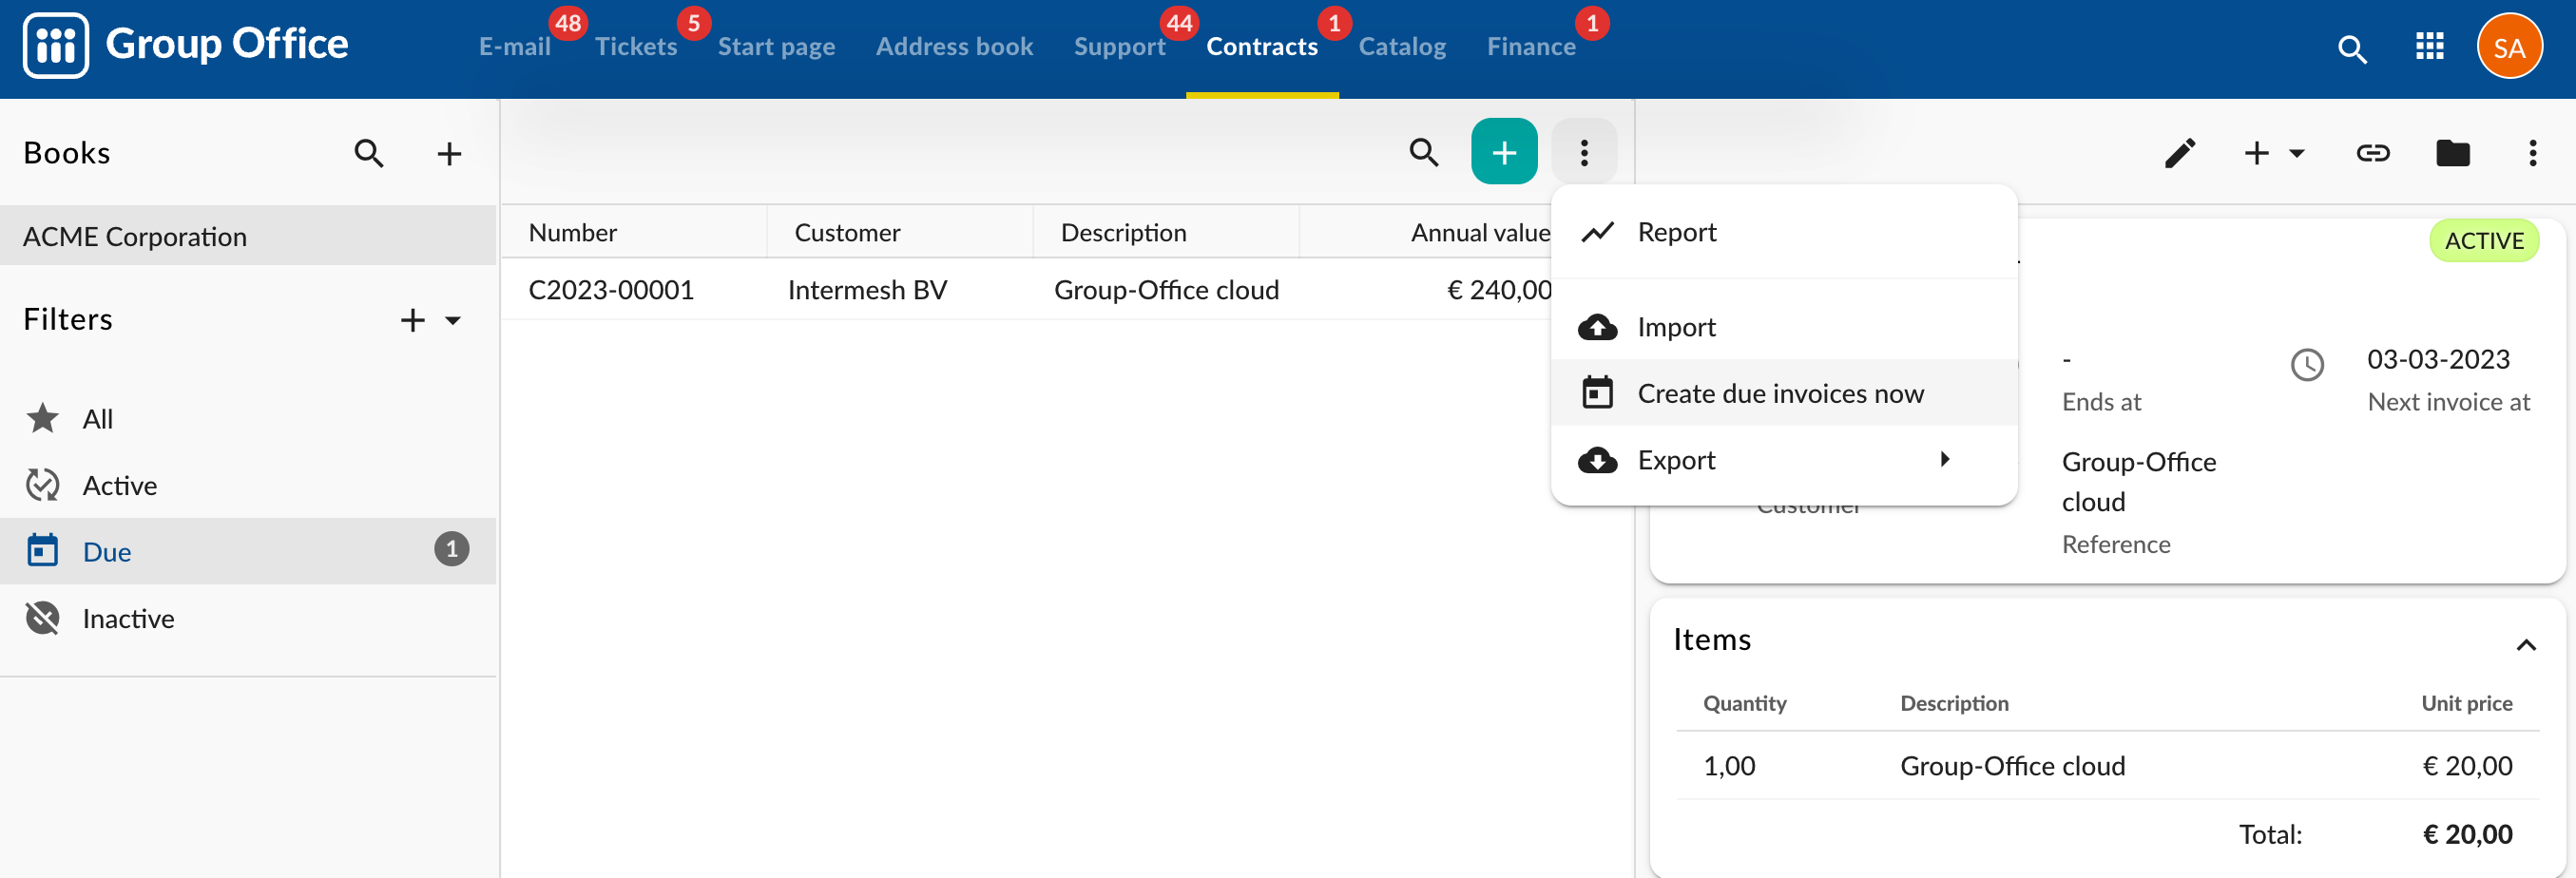
Contracts
With contracts you can create recurring invoices or orders. When they are due for sending you’re notified with a badge (see above). You can filter to show only the contracts due for sending. Then via the menu choose “Create due invoices now” and they will all be created and optionally sent out via e-mail.
Contracts
Recurring payments
It’s also possible for customers to give mandates for recurring payments via direct debit. The process for customers is simple and user-friendly. They can now click the “Direct Debit” button instead of “Pay” and follow the same payment process to set up their first recurring payment. Once the next invoice is generated in GroupOffice, a background payment will be automatically created using the mandate provided by the customer.
Our recurring payments feature is compatible with:
SEPA Direct debit
Credit Card
Paypal
At the moment the only payment provider that implements this is mollie.com. Contact us if you desire to use another payment provider. We can implement this for you.
Templates
You can setup templates For documents, emails and statements. The general template syntax is described in the document templates section here.
Available variables
You can use the following variables in these templates:
business
The business the item belongs to.
name
contactId
hourlyRevenue
book
The book of a document.
name
businessId
currency
document
The invoice, quote, order, po.
document.number
document.date
document.nextContractDate (If the invoice belongs to a contract this will be set to the next contract date)
document.sentAt
document.expiresAt
document.acceptedAt
document.createdBy
document.createdAt
document.modifiedBy
document.modifiedAt
document.customerTo
document.customerStreet
document.customerZipCode
document.customerCity
document.customerState
document.customerCountryCode
document.vatReverseCharge
document.greeting
document.closing
document.showTotals
document.showPricePerLine
document.itemGroups[]
title
showTotals
items[]
quantity
description
unitPrice
unitCost
vatRate
discount
articleId
customer
The organization or contact of the customer
customer.salutation
customer.name
customer.prefix
customer.firstName
customer.middleName
customer.lastName
customer.suffix
customer.jobTitle
customer.gender
customer.organizations: Array(same properties as contact)
customer.dates: Array (type, date)
customer.emailAddresses: Array(type, email)
customer.phoneNumbers: Array(type, number)
customer.addresses: Array(type, street, street2, zipCode, city, state, country, countryCode)
customer.urls: Array(type, url)
customer.debtorNumber
customer.IBAN
customer.vatNo
customer.registrationNumber
contact
The contact set for the document if it’s book’s business model is set to B2B. Same fields as customer above but prefixed with “contact”.
creator
The user who created the document.
creator.displayName
creator.username
creator.profile (Contact from address book)
Examples
Example quote
    <table border="0">
    <tr>

        <td width="60%">
            <div style="font-size: 200%; color: #2d4386">{{template.name}}</div>
            <br />
        </td>
        <td width="40%">
            [if {{logo}}]
            <img src="{{logo}}" />
            [/if]
        </td>
    </tr>
    <tr>

        <td >

            <small>To:</small>

            <p>
                {{document.customerTo}}<br />
                {{document.formattedAddress|nl2br}}

                [if {{customer.vatNo}}]
                <br />
                VAT no.: {{customer.vatNo}}
                [/if]

                <br /><br /><br />

            </p>

            <table>

                <tr>
                    <td width="30%"><b>Number:</b></td> <td>{{document.number}}</td>
                </tr>

                <tr>
                    <td><b>Date:</b></td> <td>{{document.date|date:d-m-Y}}</td>
                </tr>

                [if {{document.reference}}]
                <tr><td><b>Reference:</b></td> <td>{{document.reference}}</td></tr>
                [/if]

            </table>


        </td>


        <td>

            <small>Offered by:</small>

            [assign businessOrg = business.contactId | entity:Contact]

            <p>
                {{businessOrg.name}}<br />
                [assign bAddress = businessOrg.addresses | filter:type:"postal" | first]
                [if !{{bAddress}}]
                [assign bAddress = businessOrg.addresses | first]
                [/if]
                {{bAddress.formatted|nl2br}}

                <br />

                <br />
            </p>

            <table border="0">

                [assign orgEmail = businessOrg.emailAddresses | sort:type:"work" | first | prop:email]
                [if {{orgEmail}}]
                <tr><td width="20%">e-mail:</td><td width="80%"> {{orgEmail}}</td></tr>
                [/if]

                [assign orgNumber = businessOrg.phoneNumbers | sort:type:"work" | first | prop:number]
                [if {{orgNumber}}]
                <tr><td width="20%">tel:</td><td width="80%"> {{orgNumber}}</td></tr>
                [/if]

                <tr><td colspan="2"><br /></td></tr>
                <tr><td width="20%">Bank:</td><td width="80%"> {{businessOrg.nameBank}}</td></tr>
                <tr><td>IBAN:</td><td> {{businessOrg.IBAN}}</td></tr>
                <tr><td>BIC:</td><td> {{businessOrg.BIC}}</td></tr>

                <tr><td colspan="2"><br /></td></tr>
                <tr><td>VAT no.:</td><td> {{businessOrg.vatNo}}</td></tr>
                <tr><td>Company no.:</td><td> {{businessOrg.registrationNumber}}</td></tr>

            </table>

        </td>

    </tr>
</table>

<br />
[if {{document.greeting}}]
<p>{{document.greeting}}
    <br />
    <br />
</p>
[/if]
<br />

<table cellspacing="0" cellpadding="4">
    <thead>
    <tr style=" background-color: #f1f1f1;">
        [if {{document.showPricePerLine}}]
            <th style="border-bottom: 0.5px solid black;border-top: 0.5px solid black;" width="10%" align="right">Quantity</th>
            <th style="border-bottom: 0.5px solid black;border-top: 0.5px solid black;" width="70%">Description</th>
        [else]
            <th colspan="2" style="border-bottom: 0.5px solid black;border-top: 0.5px solid black;" width="80%">Description</th>
        [/if]
        <th style="border-bottom: 0.5px solid black;border-top: 0.5px solid black;" width="20%" align="right">[if {{document.showPricePerLine}}]Price[/if]</th>

    </tr>
    </thead>
    <tbody>


    [each itemGroup in document.itemGroups]

        [if {{itemGroup.showAs}} != "hidden"]

            [if {{itemGroup.showAs}} == "single"]
                <tr>
                    [if {{document.showPricePerLine}}]
                        <td align="right" width="10%">1</td>
                        <td width="70%">{{itemGroup.title}}</td>
                        <td align="right" width="20%">{{book.currency}} {{itemGroup.subTotalPrice|number}}</td>
                    [else]
                        <td colspan="3">{{itemGroup.title}}</td>
                    [/if]
                </tr>

            [else]
                [if {{itemGroup.title}}]
                    <tr><td colspan="3" style="line-height: 200%;font-size:1.3em;font-weight:bold">{{itemGroup.title}}</td></tr>
                [/if]

                [each item in itemGroup.items]
                    [if {{item.description}} == "__PAGEBREAK__"]
                        <br pagebreak="true">
                    [else]
                        <tr nobr="true">
                            [if {{document.showPricePerLine}}]
                                <td align="right" width="10%">{{item.quantity|number}}</td>
                                <td width="70%">{{item.description|nl2br}}</td>
                                [assign rowTotal = {{item.unitPrice}} * {{item.quantity}} ]
                                <td align="right" width="20%">{{book.currency}} {{rowTotal|number}}</td>
                            [else]
                                <td colspan="3">{{item.description|nl2br}}</td>
                            [/if]
                        </tr>
                    [/if]
                [/each]

                [if {{itemGroup.showAs}} == "groupwithtotal"]
                    <tr>
                        <td colspan="2" align="right">
                            [if {{document.showPricePerLine}}]Total[else]Price[/if]:
                        </td>
                        <td align="right" style="border-top: 0.5px solid black">
                            {{book.currency}} {{itemGroup.subTotalPrice|number}}
                        </td>
                    </tr>
                [/if]
            [/if]
        [/if]

    [/each]


    [if {{document.showTotals}}]


    [if {{document.vatTotals|count}} > 0]
    [if {{document.showPricePerLine}}]
        <tr>
            <td colspan="2">
            </td>
            <td align="right">
            </td>
        </tr>
    [/if]
    <tr>
        <td colspan="2" align="right">
            Subtotal:
        </td>
        <td align="right">
            {{book.currency}} {{document.subTotalPrice|number}}
        </td>
    </tr>
    [/if]


    [if {{document.vatReverseCharge}}]
        <tr>
            <td colspan="2" align="right">
                VAT Reverse charge (0%):
            </td>
            <td align="right">
                {{book.currency}} 0.00
            </td>
        </tr>
    [else]
        [each vatTotal in document.vatTotals]
            <tr>
                <td colspan="2" align="right">
                    VAT {{vatTotal.rate|number}}%:
                </td>
                <td align="right">
                    {{book.currency}} {{vatTotal.price|number}}
                </td>
            </tr>
        [/each]
    [/if]

    <tr>
        <td colspan="2">
        </td>
        <td align="right" style="border-top: 0.5px solid black">
        </td>
    </tr>

    <tr>
        <td colspan="2" align="right">
            Total:
        </td>
        <td align="right">
            {{book.currency}} {{document.totalPrice|number}}
        </td>
    </tr>

    [/if]
    </tbody>

</table>


<br />

[if {{document.closing}}]
<p>{{document.closing}}
    <br />
    <br />
</p>
[/if]


<p>
<div style="font-size: 120%; color: #2d4386">Terms</div>
This document is valid for one month after the date above. Please contact us if you have any questions.


To accept this offer please sign here and return:
<br />
<br />
Signed by:
<br />
Date:
<br />
<br />
<br />
<br />
<br />
<hr width="30%" />

</p>
Example with article
Within the items block:
[each item in itemGroup.items]
Add:
[assign article = item.articleId | entity:Article]
Then you could print:
{{article.number}}
Example paid stamp
Create a new content block with type HTML, x = 20 and y=70 and put this code in:
`
[if {{outstanding}} <= 0 ]
<img width="140"  src="/go/modules/business/finance/views/extjs3/themes/default/resources/paid-stamp.png" />
[/if]
```
This will put a red PAID stamp on the PDF when it’s paid.
Example statement
<table>
    <tr>

            <td width="75%">
                    <div style="font-size: 200%; color: #2d4386">{{template.name}}</div>
                    <span color="grey">{{date|date:d-m-Y}}</span>
                    <br />
            </td>
            <td width="25%">
                    [if {{logo}}]
                            <img src="{{logo}}" />
                    [/if]
            </td>
    </tr>

    <tr>
            <td>

                    <small>To:</small>

                    <p>
                            {{customer.name}}<br />
                            [assign address = customer.addresses | filter:type:"postal" | first]
                            [if !{{address}}]
                            [assign address = customer.addresses | first]
                            [/if]
                            {{address.formatted|nl2br}}
                    </p>


            </td>


            <td>

                    <small>From:</small>

                    [assign businessOrg = business.contactId | entity:Contact]

                    <p>
                            {{businessOrg.name}}<br />
                            [assign bAddress = businessOrg.addresses | filter:type:"postal" | first]
                            [if !{{bAddress}}]
                            [assign bAddress = businessOrg.addresses | first]
                            [/if]
                            {{bAddress.formatted|nl2br}}

                            <br />

                            <br />

                    <table border="0">

                            [assign orgEmail = businessOrg.emailAddresses | sort:type:"work" | first | prop:email]
                            [if {{orgEmail}}]
                            <tr><td width="20%">E-mail:</td><td width="80%"> {{orgEmail}}</td></tr>
                            [/if]

                            [assign orgNumber = businessOrg.phoneNumbers | sort:type:"work" | first | prop:number]
                            [if {{orgNumber}}]
                            <tr><td width="20%">Phone:</td><td width="80%"> {{orgNumber}}</td></tr>
                            [/if]

                            <tr><td colspan="2"><br /></td></tr>
                            [if {{businessOrg.nameBank}}]
                                    <tr><td width="20%">Bank:</td><td width="80%"> {{businessOrg.nameBank}}</td></tr>
                            [/if]
                            <tr><td width="20%">IBAN:</td><td width="80%"> {{businessOrg.IBAN}}</td></tr>
                            [if {{businessOrg.BIC}}]
                                    <tr><td>BIC:</td><td> {{businessOrg.BIC}}</td></tr>
                            [/if]
                            <tr><td colspan="2"><br /></td></tr>
                            [if {{businessOrg.vatNo}}]
                                    <tr><td>VAT no.:</td><td> {{businessOrg.vatNo}}</td></tr>
                            [/if]
                            [if {{businessOrg.registrationNumber}}]
                                    <tr><td>Reg no.:</td><td> {{businessOrg.registrationNumber}}</td></tr>
                            [/if]

                    </table>
                    </p>


            </td>


    </tr>
</table>

<br />
<br />

<table cellspacing="0" cellpadding="4">
    <tr style=" background-color: #f1f1f1;">
        <th style="border-bottom: 0.5px solid black;border-top: 0.5px solid black;" width="16%">Invoice no.</th>
        <th style="border-bottom: 0.5px solid black;border-top: 0.5px solid black;" width="16%">Date</th>
        <th style="border-bottom: 0.5px solid black;border-top: 0.5px solid black;" width="17%">Due</th>
        <th style="border-bottom: 0.5px solid black;border-top: 0.5px solid black;" width="17%" align="right">Amount</th>
        <th style="border-bottom: 0.5px solid black;border-top: 0.5px solid black;" width="17%" align="right">Paid</th>
        <th style="border-bottom: 0.5px solid black;border-top: 0.5px solid black;" width="17%" align="right">To be paid</th>
    </tr>

    [assign total = 0]

    [each invoice in invoices]
    <tr>
        <td><a href="{{invoice.customerUrl}}">{{invoice.number}}</a></td>
        <td>{{invoice.date|date:d-m-Y}}</td>
        <td>{{invoice.expiresAt|date:d-m-Y}}</td>
        <td align="right">{{book.currency}} {{invoice.totalPrice|number}}</td>
        <td align="right">{{book.currency}} {{invoice.paidAmount|number}}</td>
        [assign balance = {{invoice.totalPrice}} - {{invoice.paidAmount}} ]
        [assign parent.total = {{parent.total}} + {{balance}}]
        <td align="right">{{book.currency}} {{balance|number}}</td>
    </tr>
    [/each]

    <tr>
        <td colspan="5" style="border-top: 0.5px solid black;font-weight: bold" align="right">
            Total to be paid:
        </td>
        <td align="right" style="border-top: 0.5px solid black; font-weight: bold">
            {{book.currency}} {{total|number}}
        </td>
    </tr>

</table>


<br />

<p>
    Please pay the outstanding amount immediately. If you're having trouble paying please contact us.
</p>
Payment Providers
We have integrated some payment providers. If you need another one feel free to contact us!
PayPal
Go to the PayPal developer portal and setup credentials. You can setup sandbox credentials for testing and live credentials:
https://developer.paypal.com/dashboard/applications
Make sure the PayPal module is installed and fill in the PayPal credentials at System Settings -> Paypal:
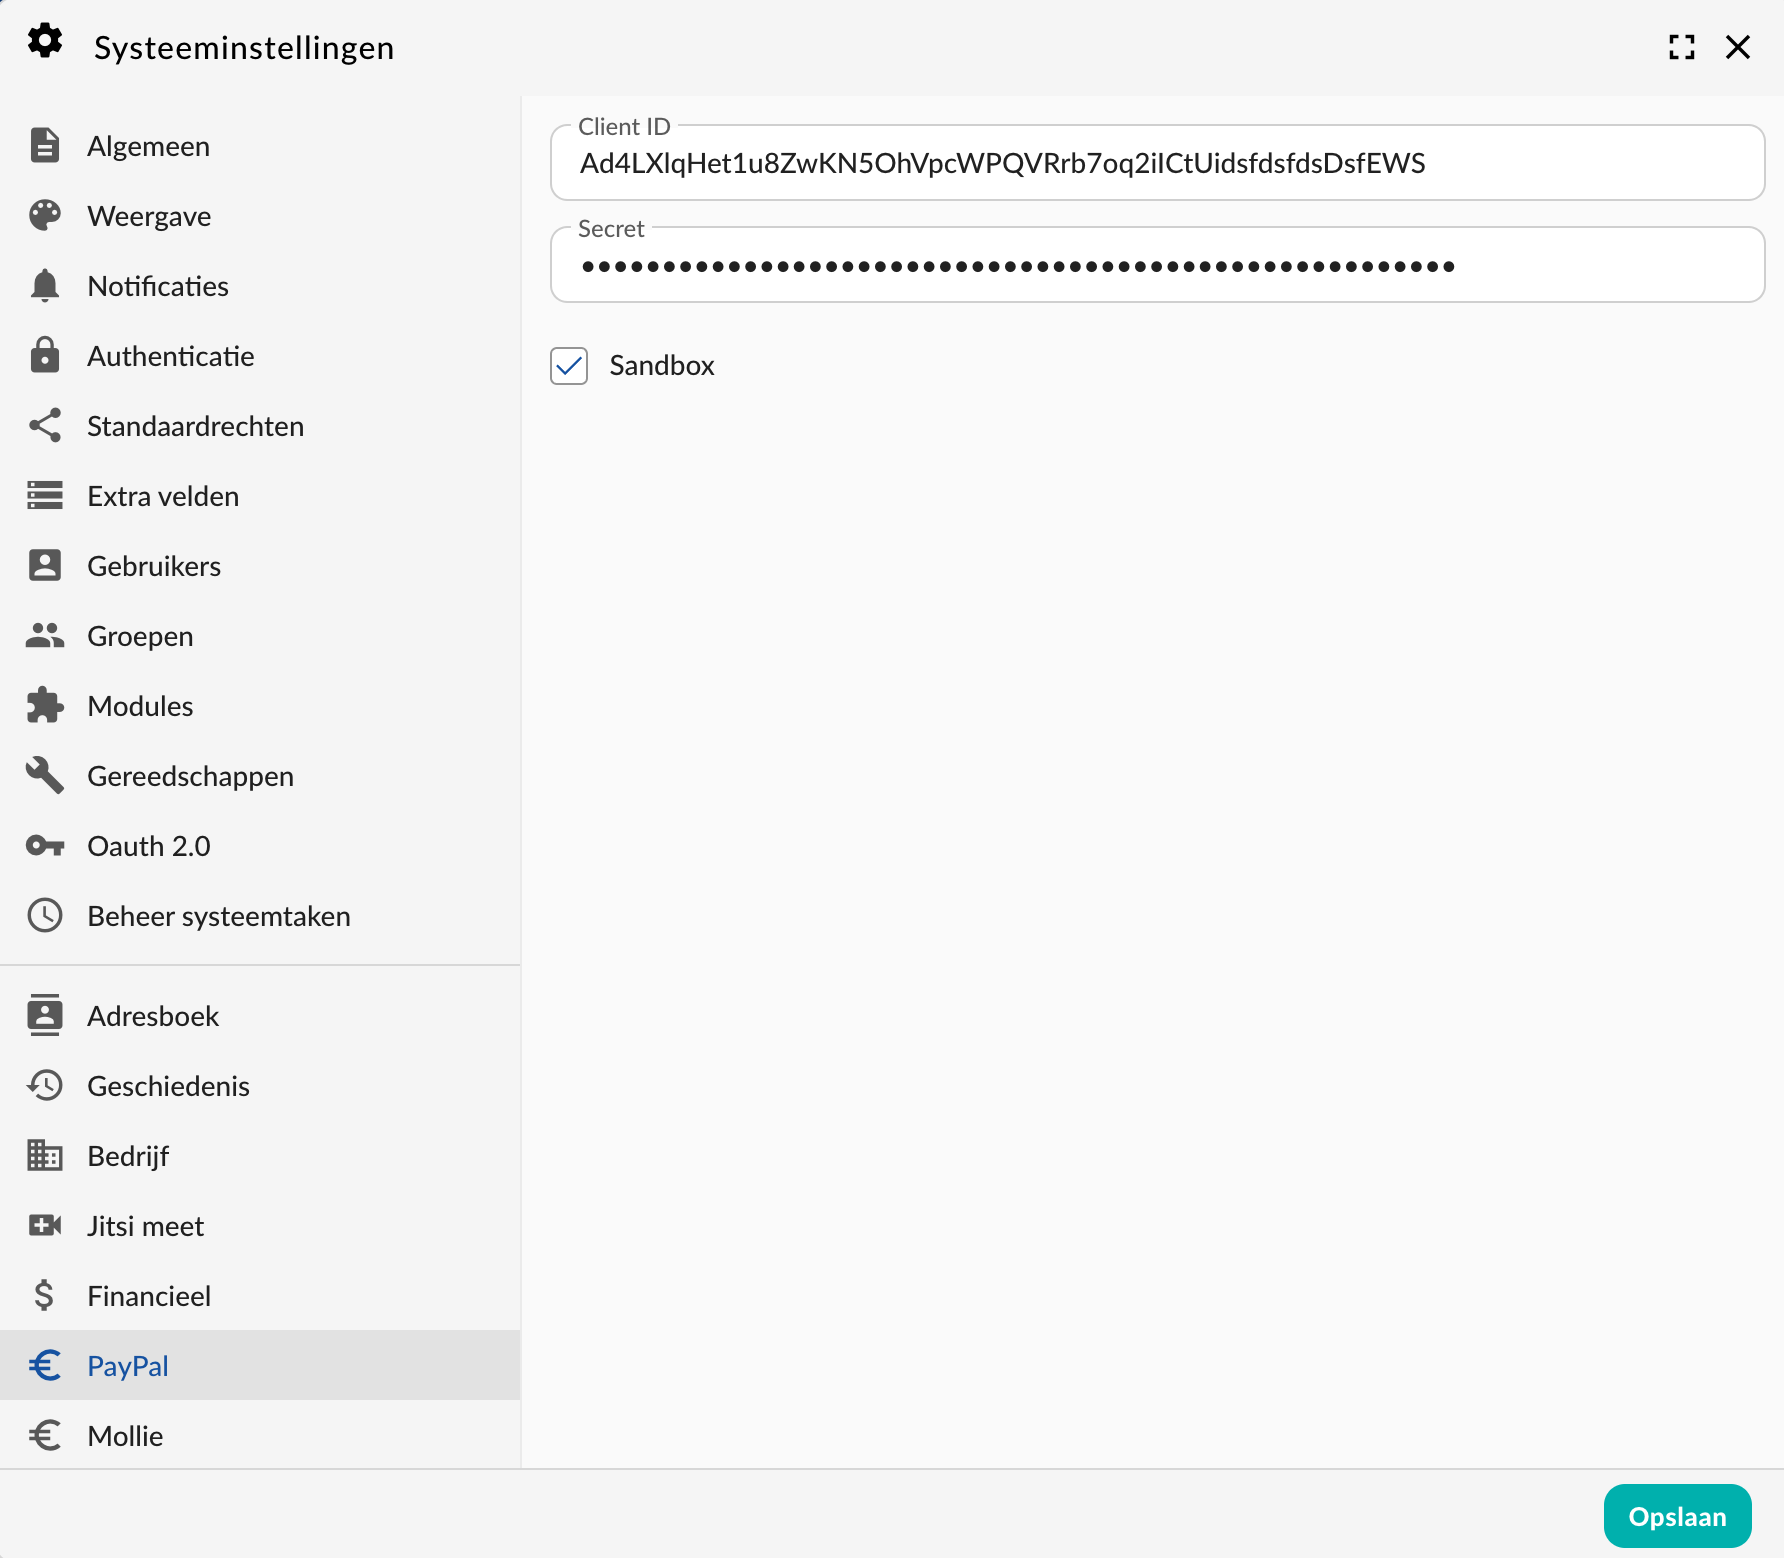
PayPal system settings
When this is setup the “Pay with paypal” button will appear on the invoice page:
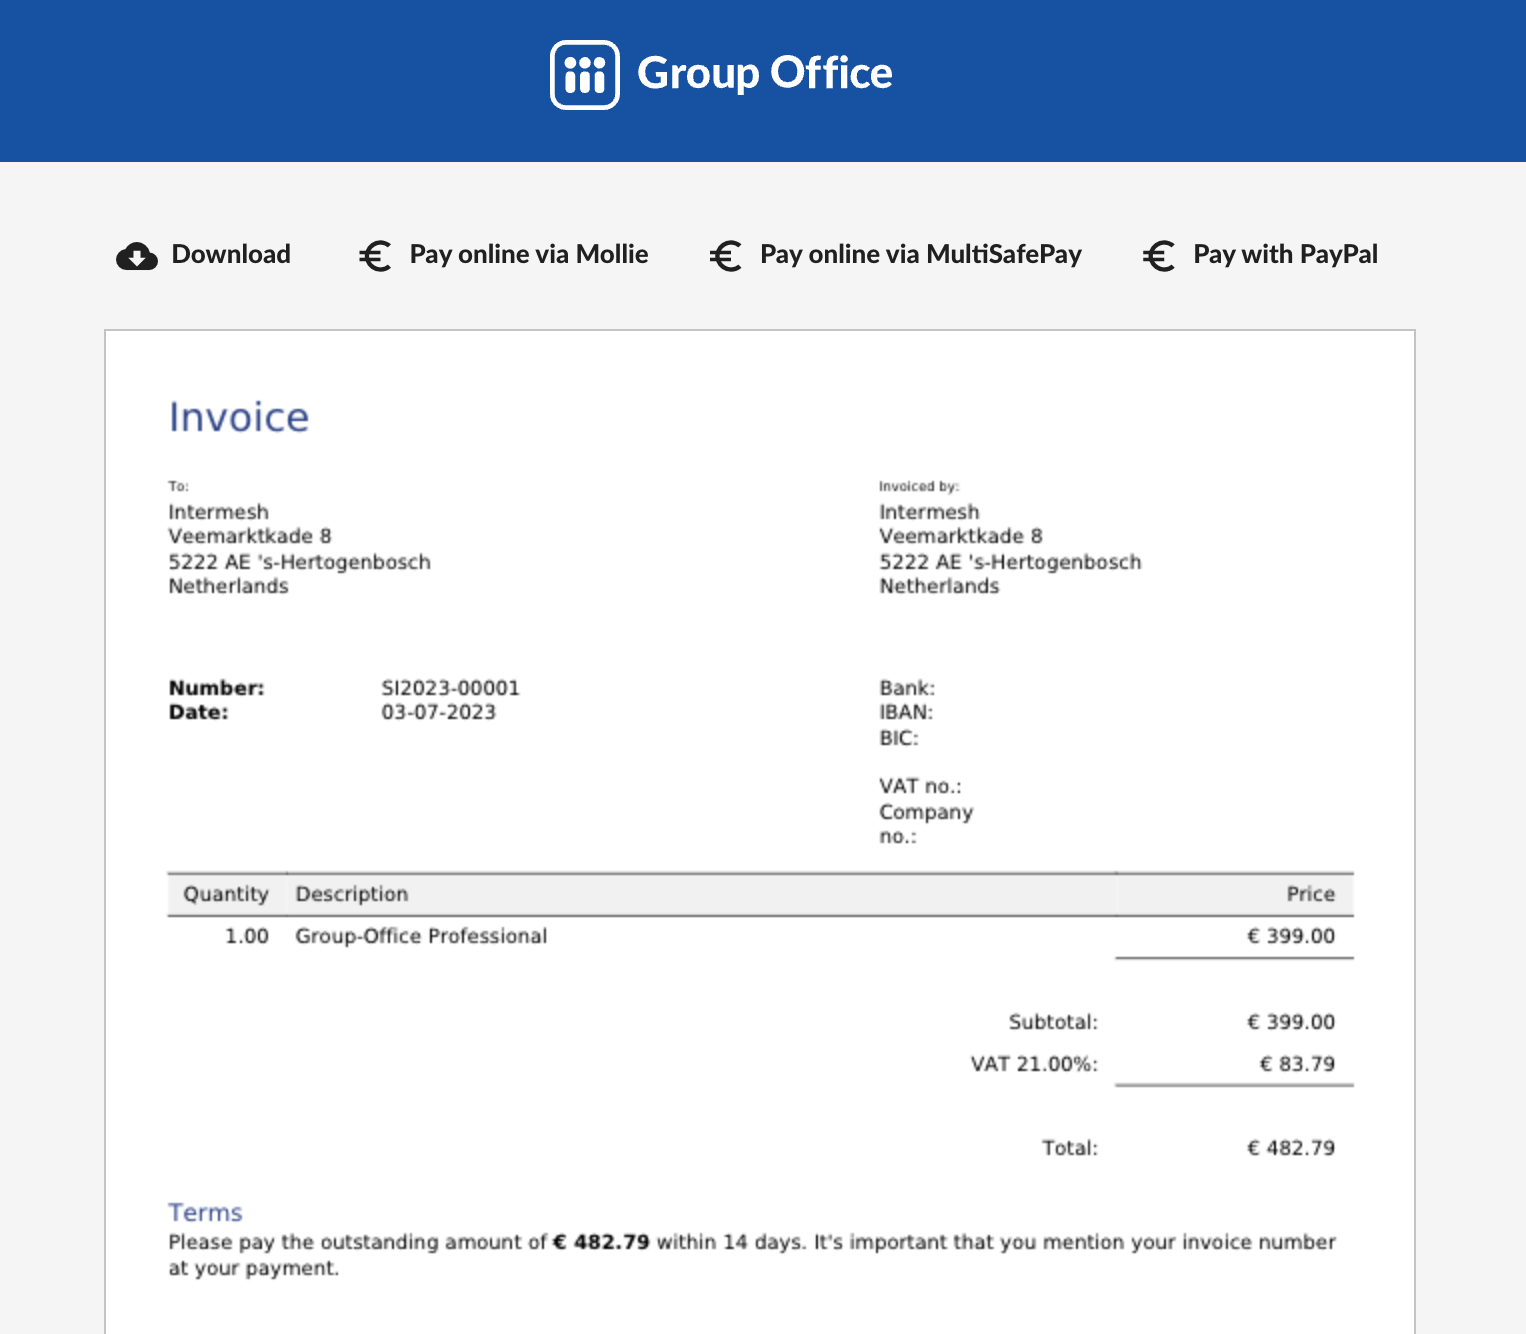
Invoice page
Mollie
The setup for https://mollie.com is very similar to PayPal:
Login to your Mollie account
Go to Developers -> API keys
Copy the key
Now in GroupOffice install the Mollie module and enter the key in System Settings -> Mollie
MultiSafePay
The setup for https://www.multisafepay.com is very similar to PayPal:
Login to your MultiSafePay account
Go to Developers -> API keys
Copy the key
Now in GroupOffice install the MultiSafePay module and enter the key in System Settings -> MultiSafePay