E-mail
The administration of the e-mail module is pretty straight forward. You can setup multiple IMAP accounts for each user. There are however some advanced topics that we’ll describe here.
E-mail module
Linking and saving e-mails
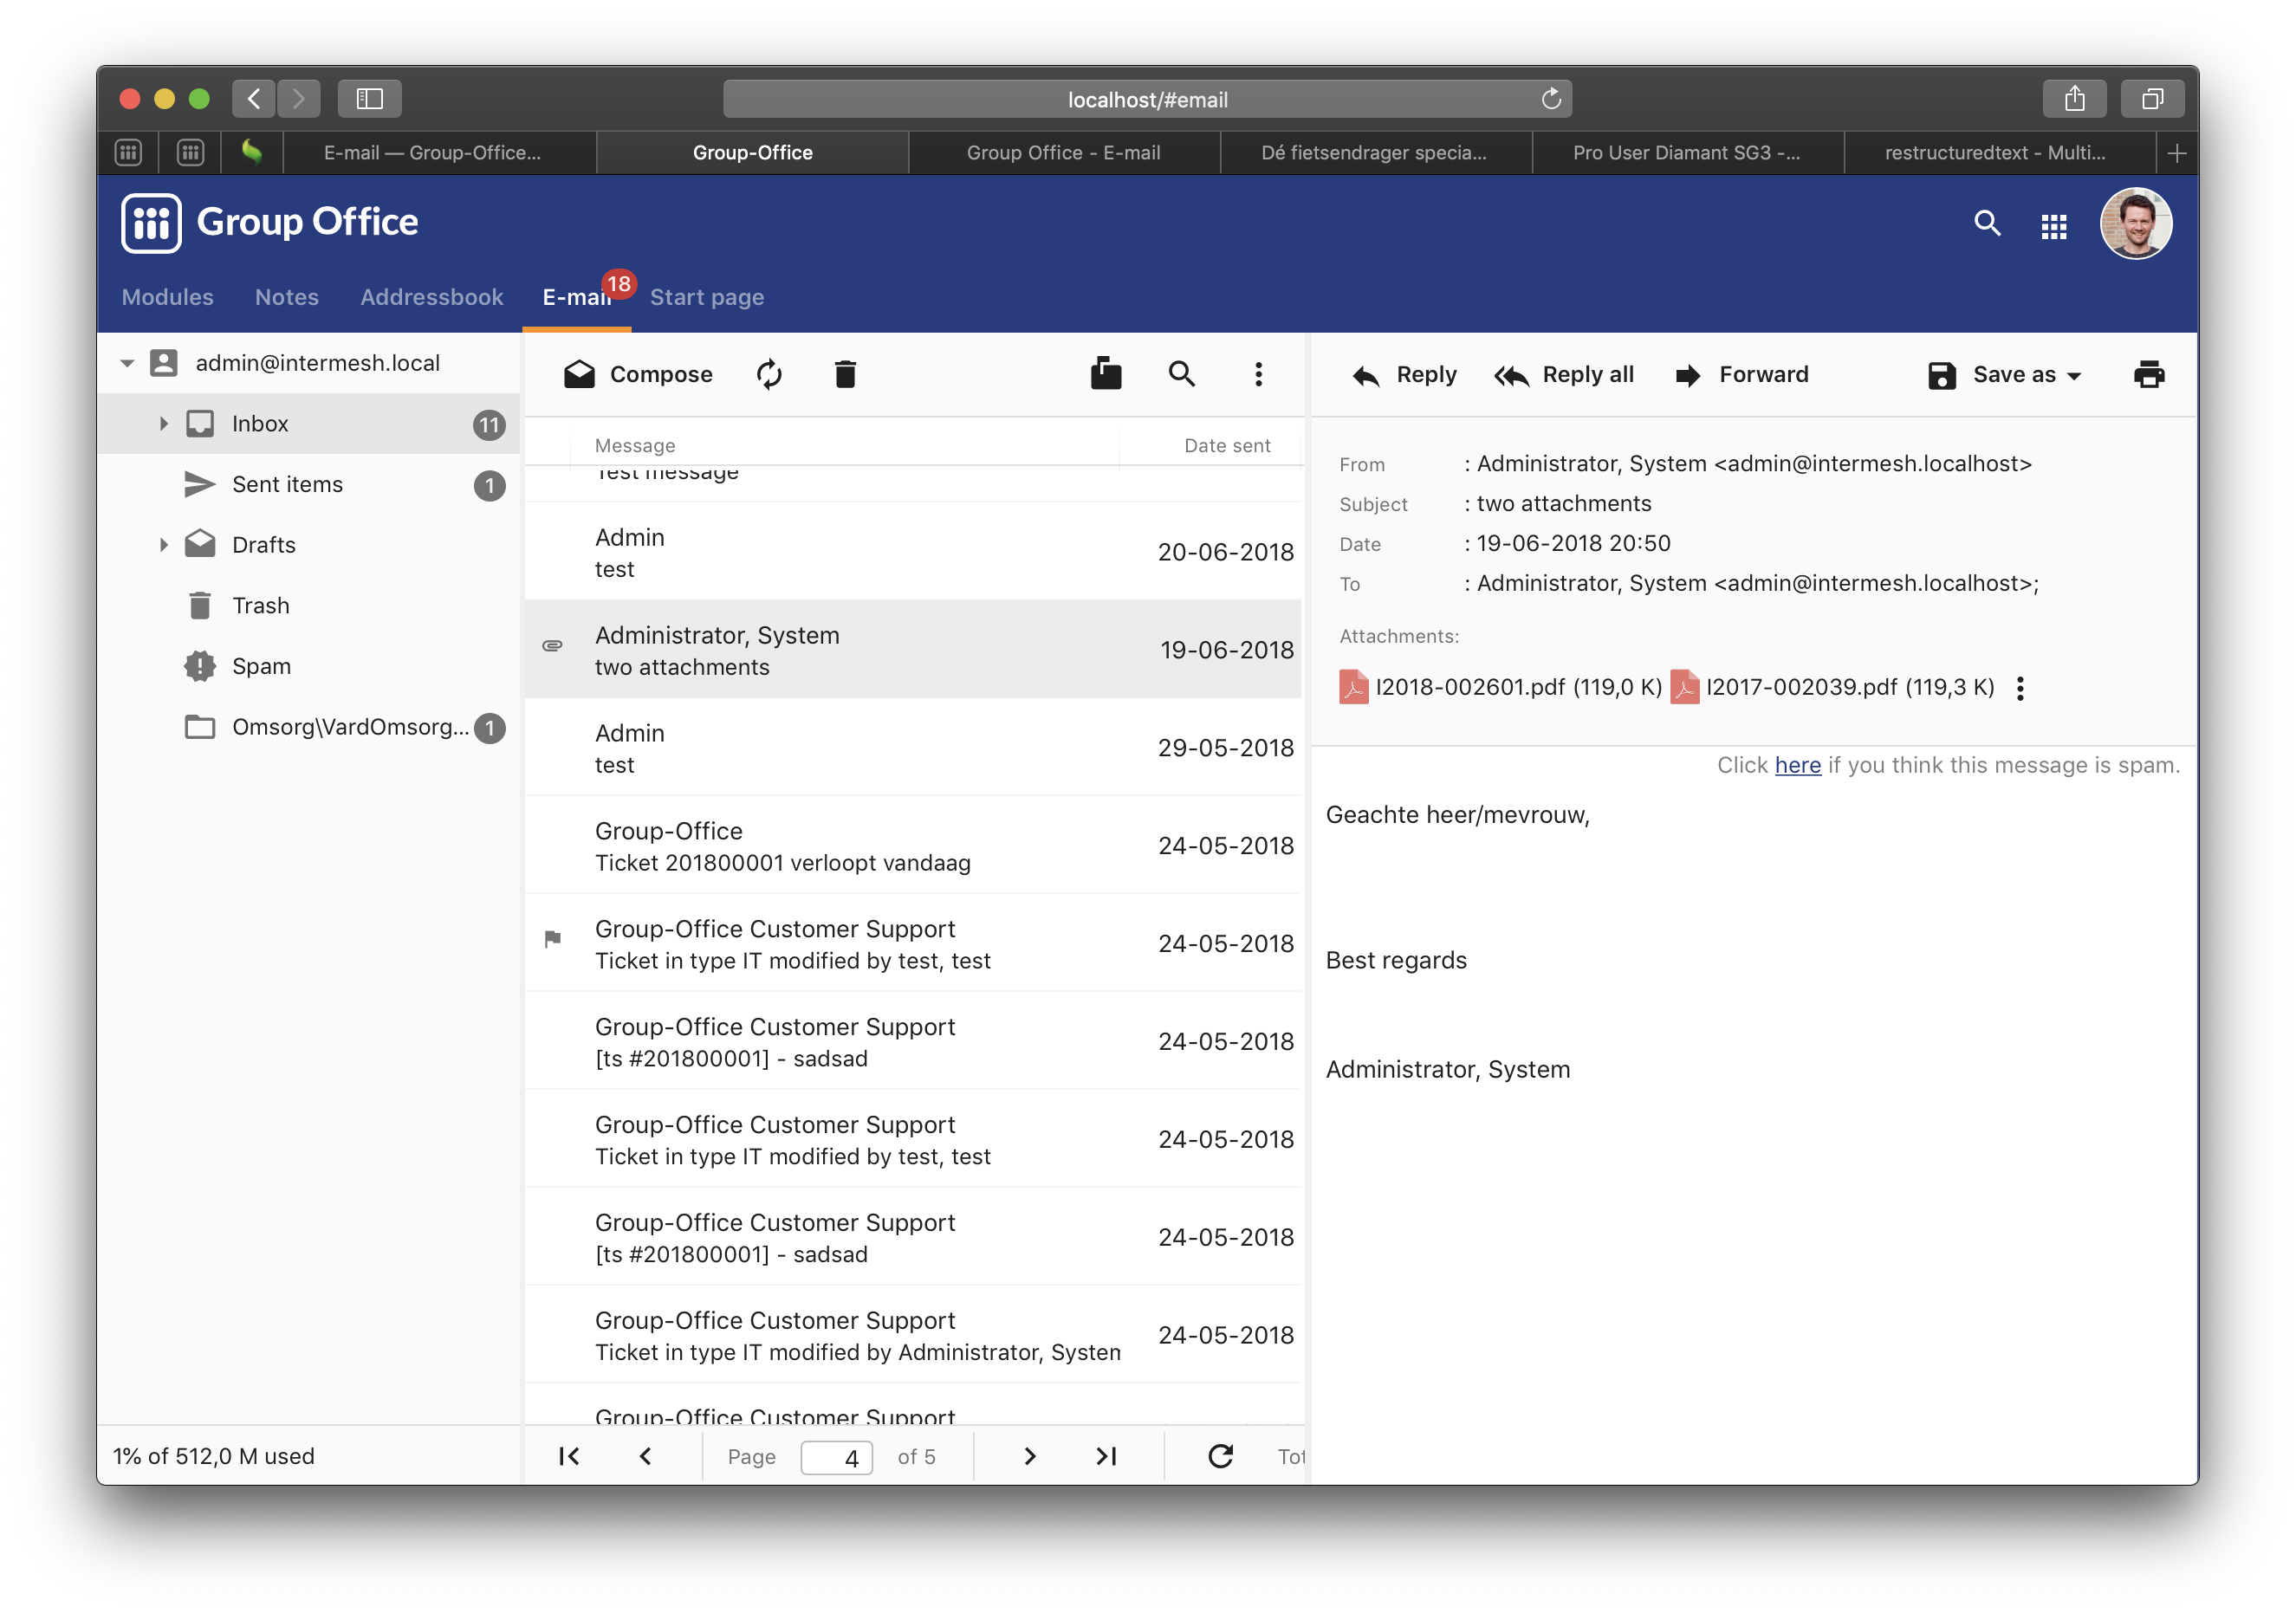
When the professional module “Save mail as” is installed, you can link and save e-mails.
You can do this via the save as menu:
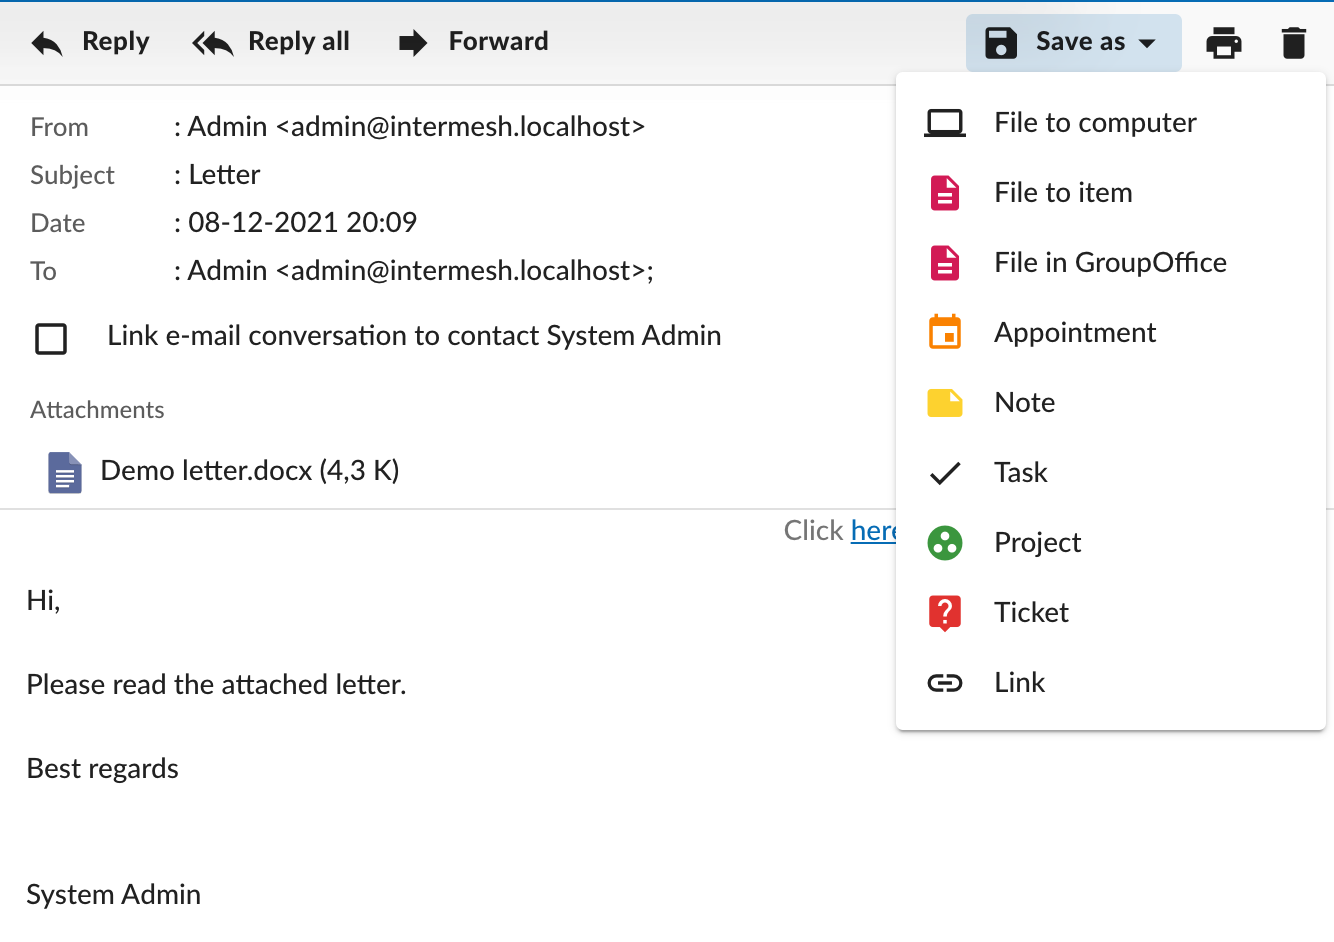
Link or save an e-mail via the save as menu.
or via right click on email in the message grid.
When you link an e-mail it is copied from the mail server and stored in the GroupOffice database. So when you delete mail from the mail server the linked e-mails will be preserved.
Note
When linking an email, the copy inherits the permissions of the target item. So by linking the e-amil you are sharing it with anybody who can see the project, contact or whatever item you are linking it to.
Creating accounts
User name and password
Only users with manage permissions for the e-mail module can create e-mail accounts. If you don’t have manage permissions then you can only edit your e-mail address, sender name and signature if you have one pre-configured.
Go to:
E-mail -> Administration -> Accounts
to view your accounts. You can double click one to edit it.
To setup a new account you need some information from your e-mail service provider. You need the following values:
Your e-mail address
The hostname of the incoming mail server (IMAP).
The port (usually 143)
Your username and password
Outgoing SMTP server hostname and port
With this information you can create an account easily. Go to:
E-mail -> Administration -> Accounts -> Add
After that fill in the e-mail address and name that should be associated with this account. If you are an administrator you can also set it up for another user by selecting it here. At last fill in the other values you got from your e-mail service provider. If you get a ‘certificate-failure’ error then tick the ‘Don’t validate certificate’ option.
OAuth2
A secure way to log in to cloud based email is OAuth2. Currently, only Gmail and Azure are supported.
Synchronize e-mail
You can synchronize your mail to your desktop or mobile device. Read more about connecting your device here.
Sharing folders
GroupOffice also supports sharing folders via IMAP. If the mailserver supports it you should see a “Share” option in the right click menu of a folder:
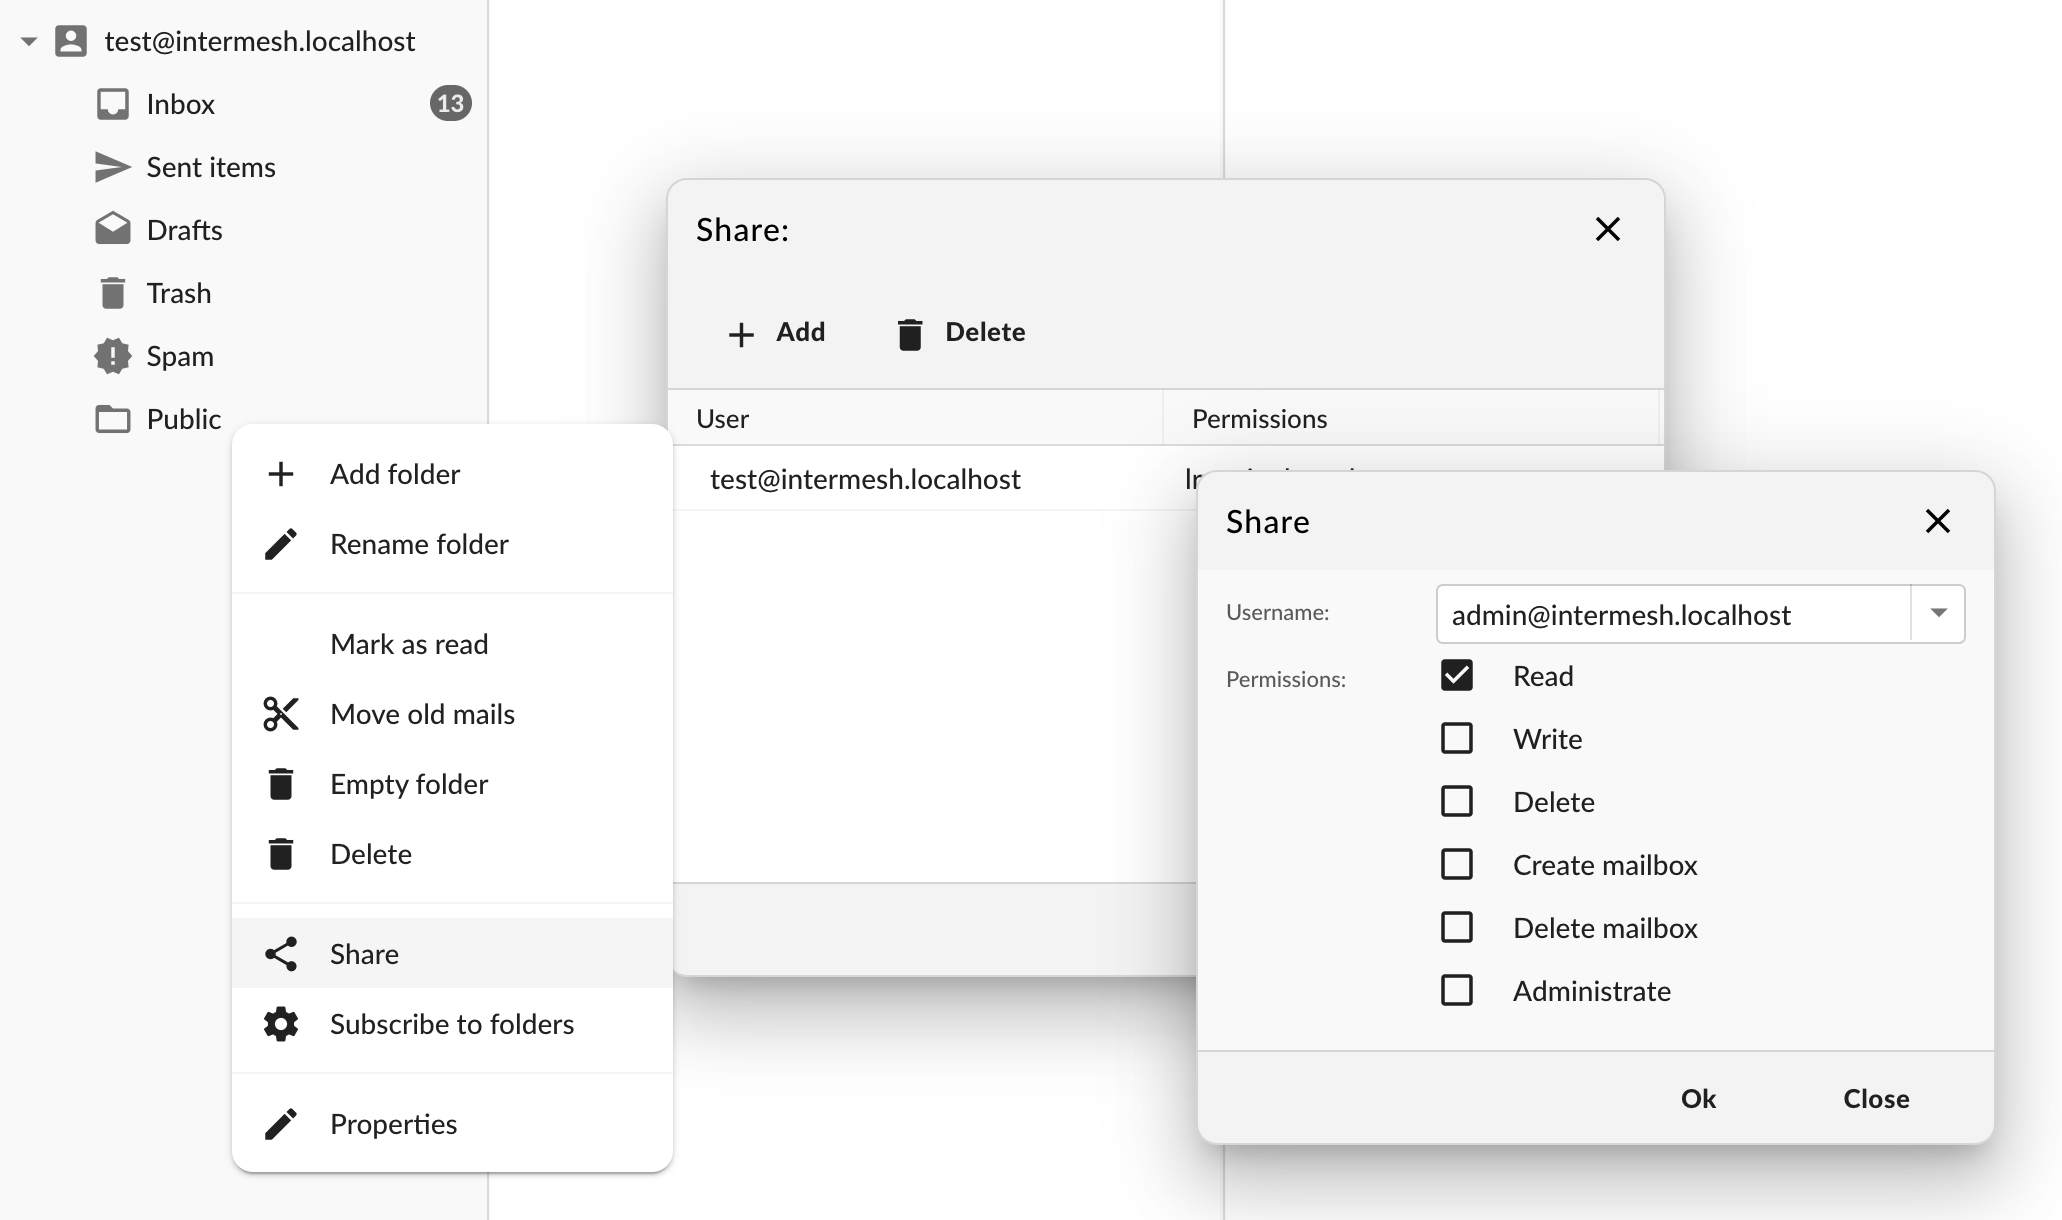
Share folder
Note that the username should be the IMAP username and not the GroupOffice username. When the folder is shared it doesn’t automatically subscribe it for the users. So they have to subscribe to the folder before they can use it. You can read about subscribing in the next chapter.
Note
The mailserver must support this feature too otherwise the share folder button will be hidden. For Dovecot this means the IMAP ACL plugin must be installed. The IMAP server will then report the “ACL” capability.
Subscribing folders
With IMAP mail accounts you can sub- and unsubscribe folders. To do this right click on any account folder and choose “Subscribe to folders”. Enable or disable folders and press “Ok”.
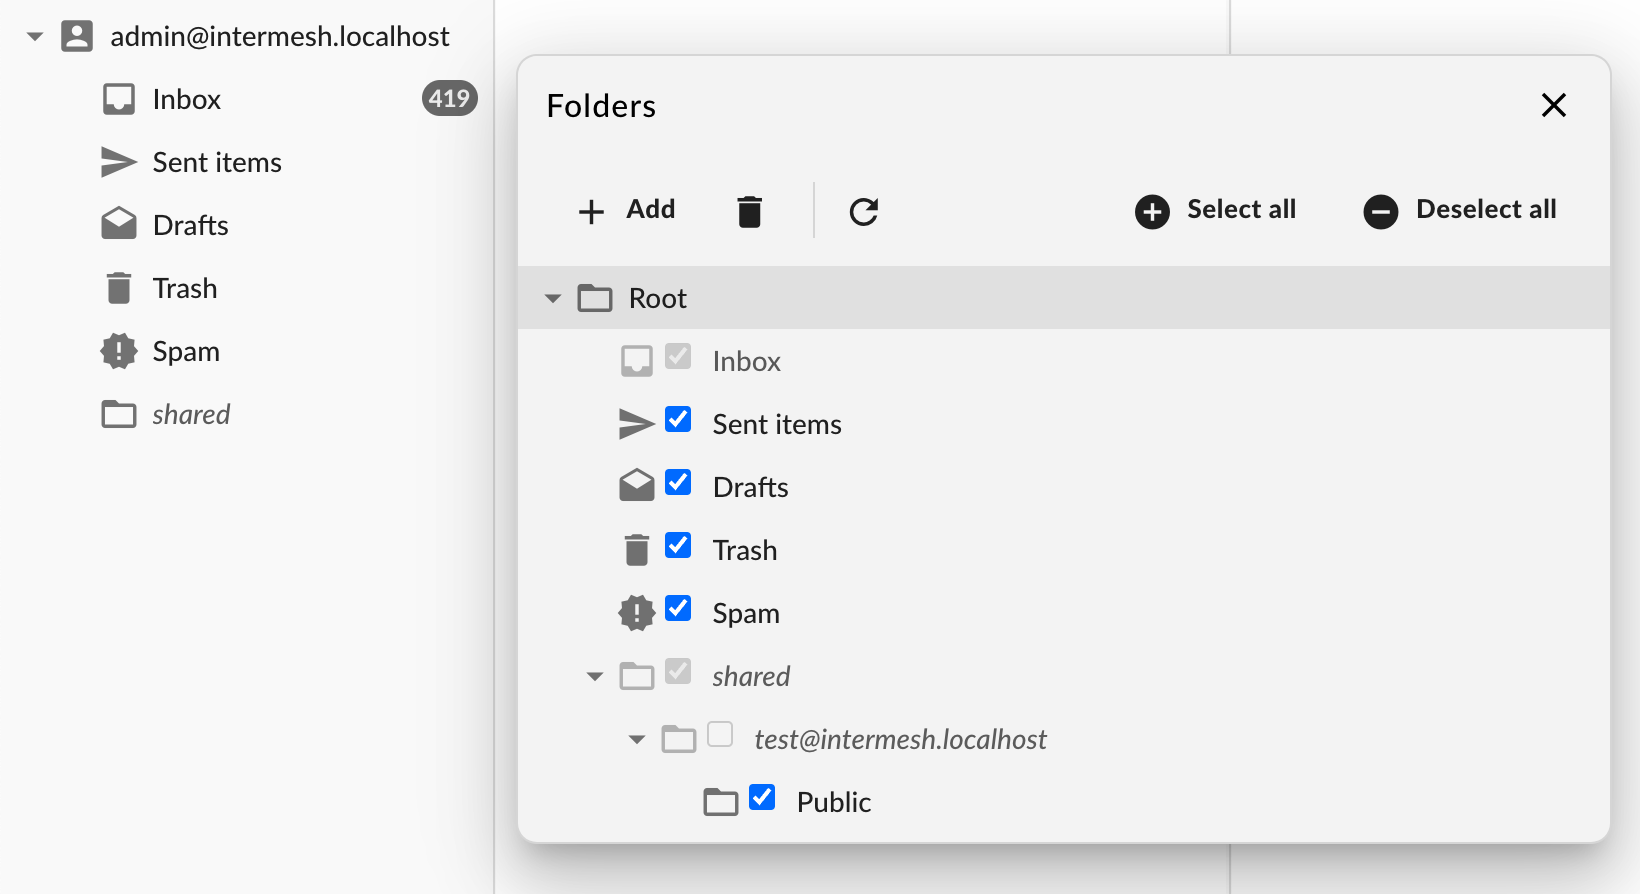
Subscribe folders
Creating e-mail signatures or templates
You can create multiple signatures with e-mail templates. Templates can be shared too. It’s easy to setup a default e-mail template for the whole organization. You can also include automatic data tags that will be replaced with data from the logged in user or recipient.
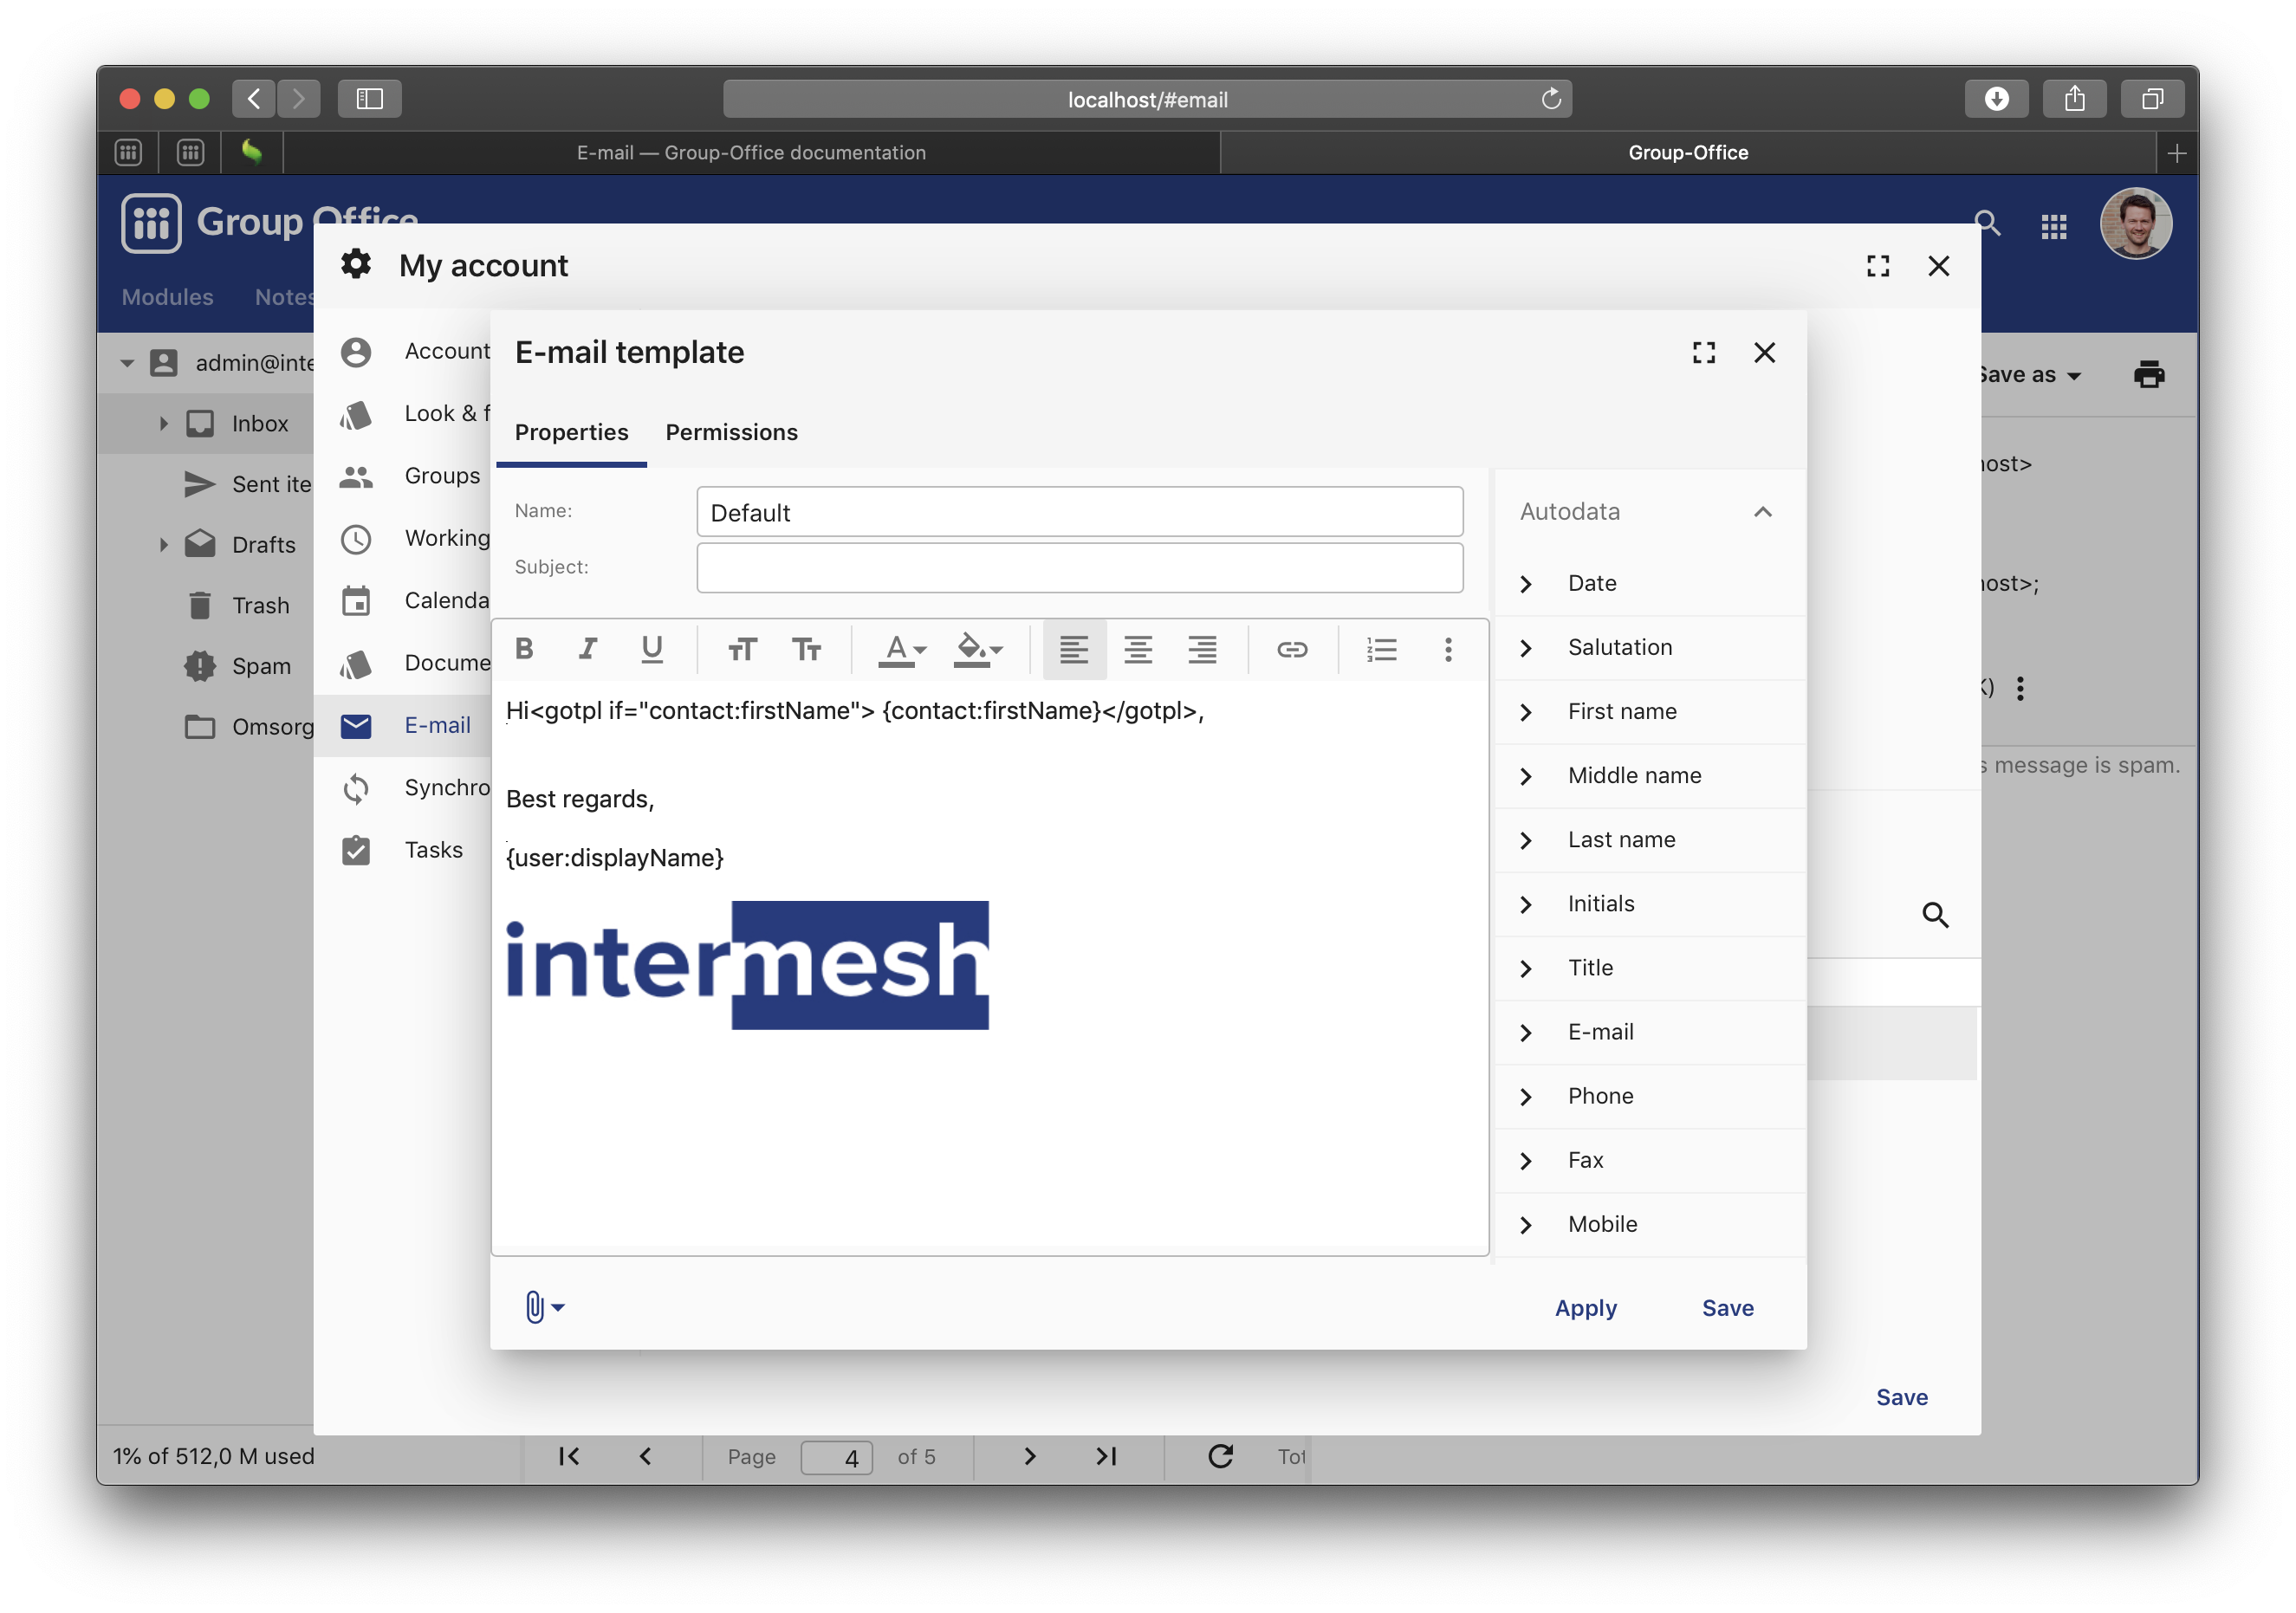
E-mail template
To edit or create templates, go to:
My Account -> E-mail -> Templates.
Double click on a template or create a new one to edit it. If you drafted an HTML document in another program, make sure this HTML only contains inline style. Style sections in the head are not supported.
Images
When you insert an image make sure you don’t copy paste it from another template or web page. Always insert it through the insert image toolbar from the template editor. This way the image will be embedded into the HTML e-mail template and will automatically be sent along with your e-mail messages.
Choose the right signature feature
You can’t use this feature together with the plain text signature at E-mail -> Administration -> Accounts -> Double click account row. Either use the simple plain text signature here or the e-mail templates.
Template variables
You can use the following values in the document:
Note
Variables are typically wrapped in {..} signs but you may also use %..%. This is necessary when using variables inside HTML templates. For example <a href=”mailto:%user:email%”> only works with % signs.
Custom fields
You can use custom fields like this:
{project:databaseName}
{contact:databaseName}
{company:databaseName}
etc.
Common fields
{date} Current date
{filename} The filename of the document.
Fields of the logged in user
{user:displayName}
{user:email}
{user:username}
{user:*} Any contact field listed below can be used if this user has a profile (6.4+).
{usercompany:*} Any company field listed below can be used if this user has a profile (6.4+).
Fields of the contact
{contact:sirmadam} Sir or Madam depending on the gender.
{contact:salutation} The salutation
{contact:formatted_address} Get the full address formatted according to the country standards.
{contact:beginning} Dear sir / madam
{contact:first_name} First name
{contact:middle_name}
{contact:last_name}
{contact:initials}
{contact:title}
{contact:email}
{contact:email2}
{contact:email3}
{contact:home_phone}
{contact:fax}
{contact:cellular}
{contact:address}
{contact:address_no}
{contact:zip}
{contact:city}
{contact:state}
{contact:country}
{contact:department}
{contact:function}
{contact:work_phone}
{contact:work_fax}
{contact:homepage}
{contact:prefixes}
{contact:suffixes}
Fields of the contact
{company:formatted_address} Get the full address formatted according to the country standards.
{company:formatted_post_address} Get the full address formatted according to the country standards.
{company:debtorNumber}
{company:mtime}
{company:ctime}
{company:crn} Company registration number
{company:iban}
{company:vat_no}
{company:bank_no}
{company:comment}
{company:homepage}
{company:email}
{company:fax}
{company:phone}
{company:post_zip}
{company:post_country}
{company:post_state}
{company:post_city}
{company:post_address_no}
{company:post_address}
{company:country}
{company:state}
{company:city}
{company:zip}
{company:address}
{company:address_no}
{company:name2}
{company:name}
{company:id}
{company:invoice_email}
Project fields
{project:name}
{project:customer}
{project:description}
{project:ctime} Creation time
{project:mtime} Modification time
{project:status}
{project:type}
{project:start_time}
{project:due_time}
{project:units_budget}
{project:responsibleUser:name} The manager
Conditions
You can also check if a value is not empty using <gotpl></gotpl> tags:
<gotpl if="user:work_phone">Tel: {user:work_phone}</gotpl>
Note
Microsoft Word automatically changes double quotes (”) into curly quotes. GroupOffice needs the regular quotes to function. You can press Ctrl+Z (Undo) immediately after Word performs the AutoFormat that changes them to “curly” quotes to have an ordinary double quote.
Example template for standard letter
{company:name} {company:formatted_address}
Date: {date} About: {filename}
{contact:salutation},
Best regards,
{user:displayName} <gotpl if=”user:work_phone”>tel: {user:work_phone}</gotpl>
Filtering and out of office
With sieve support
To use advanced filter e-mails, your IMAP server must support ManageSieve and the Sieve e-mail filtering module must be installed and enabled for your account. Also check if the correct sieve port is set at the incoming mail advanced settings. The port is usually 4190 or 2000.
To edit or add e-mail filters go to:
E-mail -> administration -> Accounts -> Double click account row -> Filters
By default there are already a spam filter rule present.
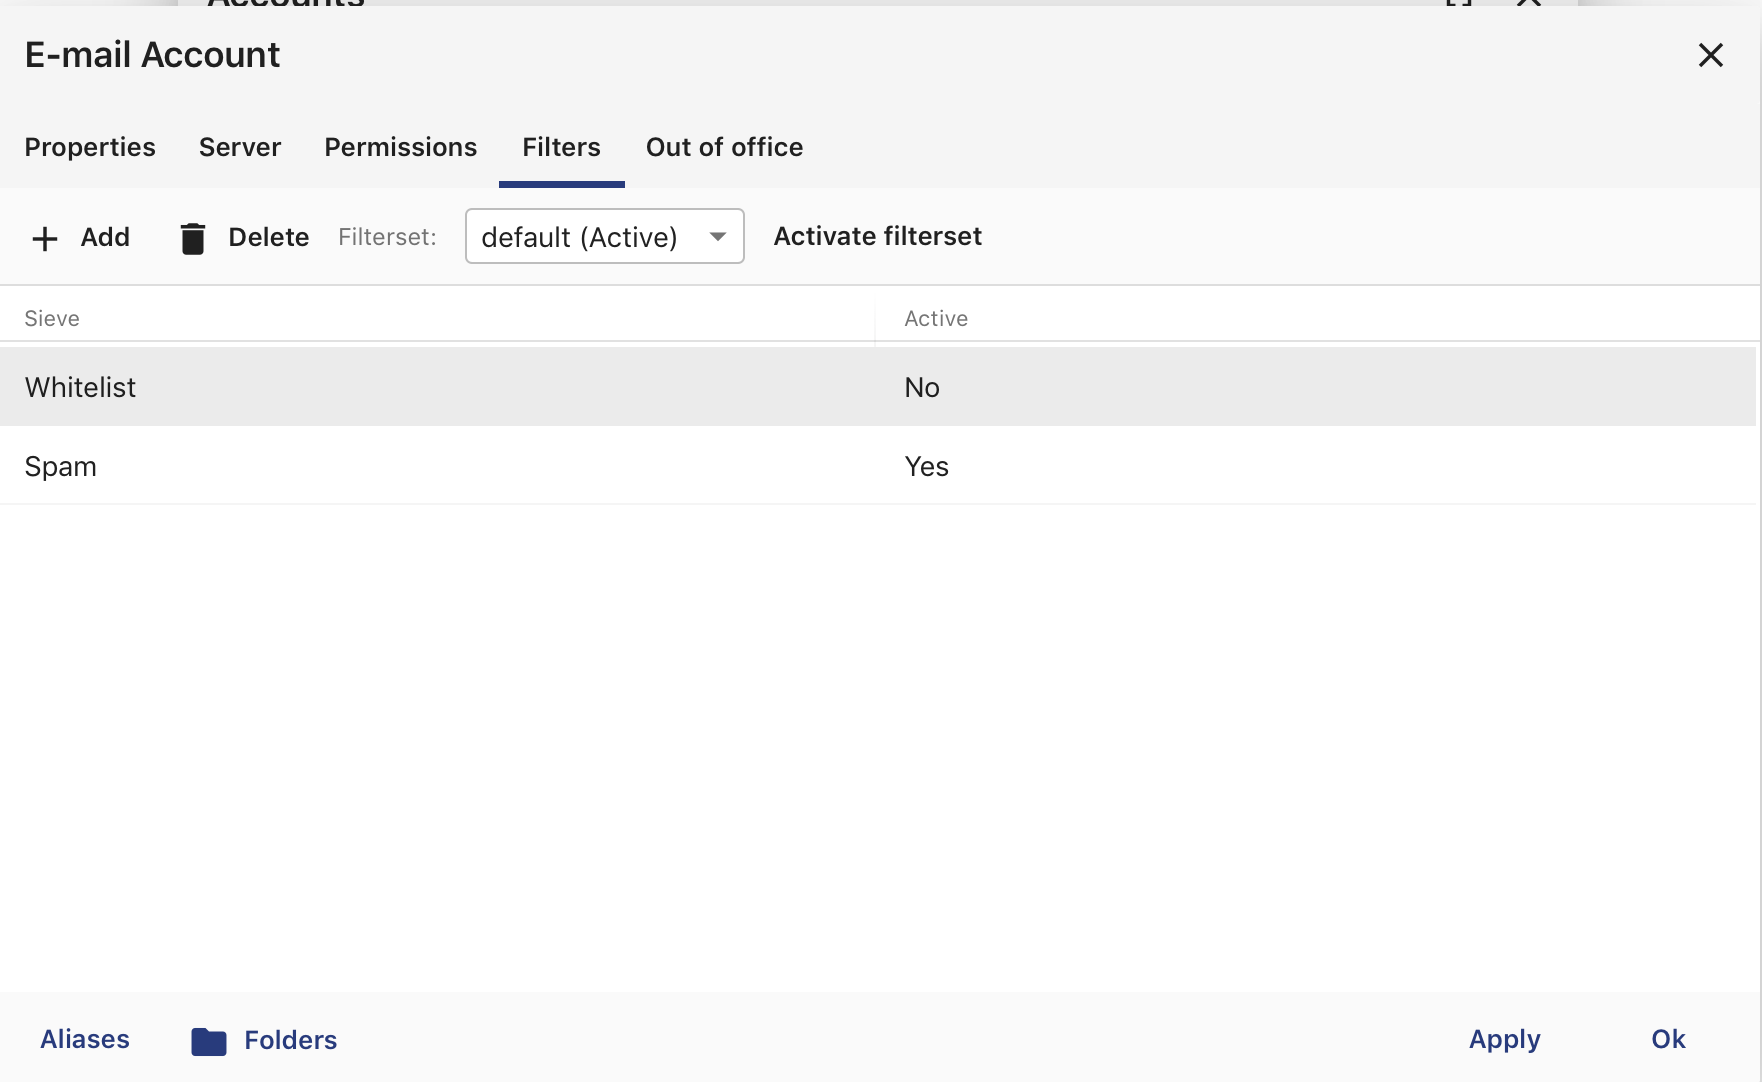
Filters window with sieve support
Edit a filter
Double click on a filter set (A new window opens)
In this window you can add criteria and desired actions for the filter.
Edit filter rule
Spam filter
Most e-mail servers are setup with a spam filter. We use Spamassassin on our hosted services. Spam filters flag messages as spam but you need a mail filtering rule to do something with it. GroupOffice creates one by default but if for some reason it isn’t there you can create it at:
E-mail -> Administration -> Account -> Filters.
Click on “Add” and match the settings like in this screenshot:
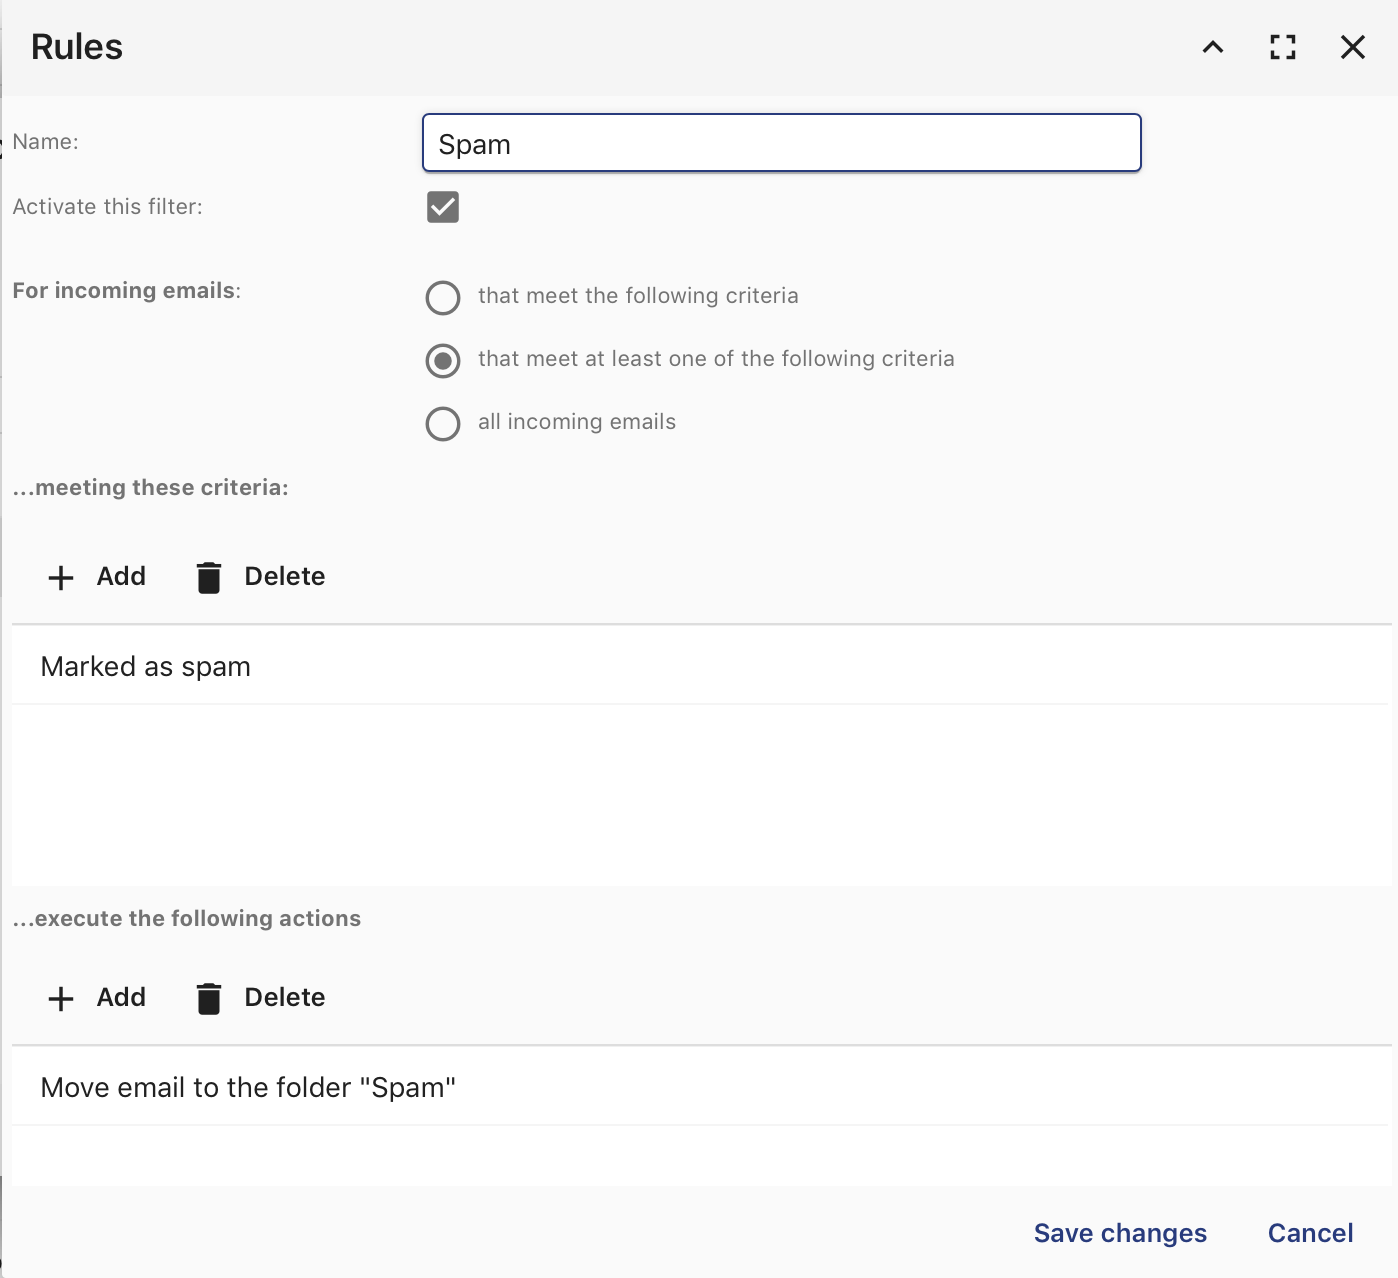
Spam filter
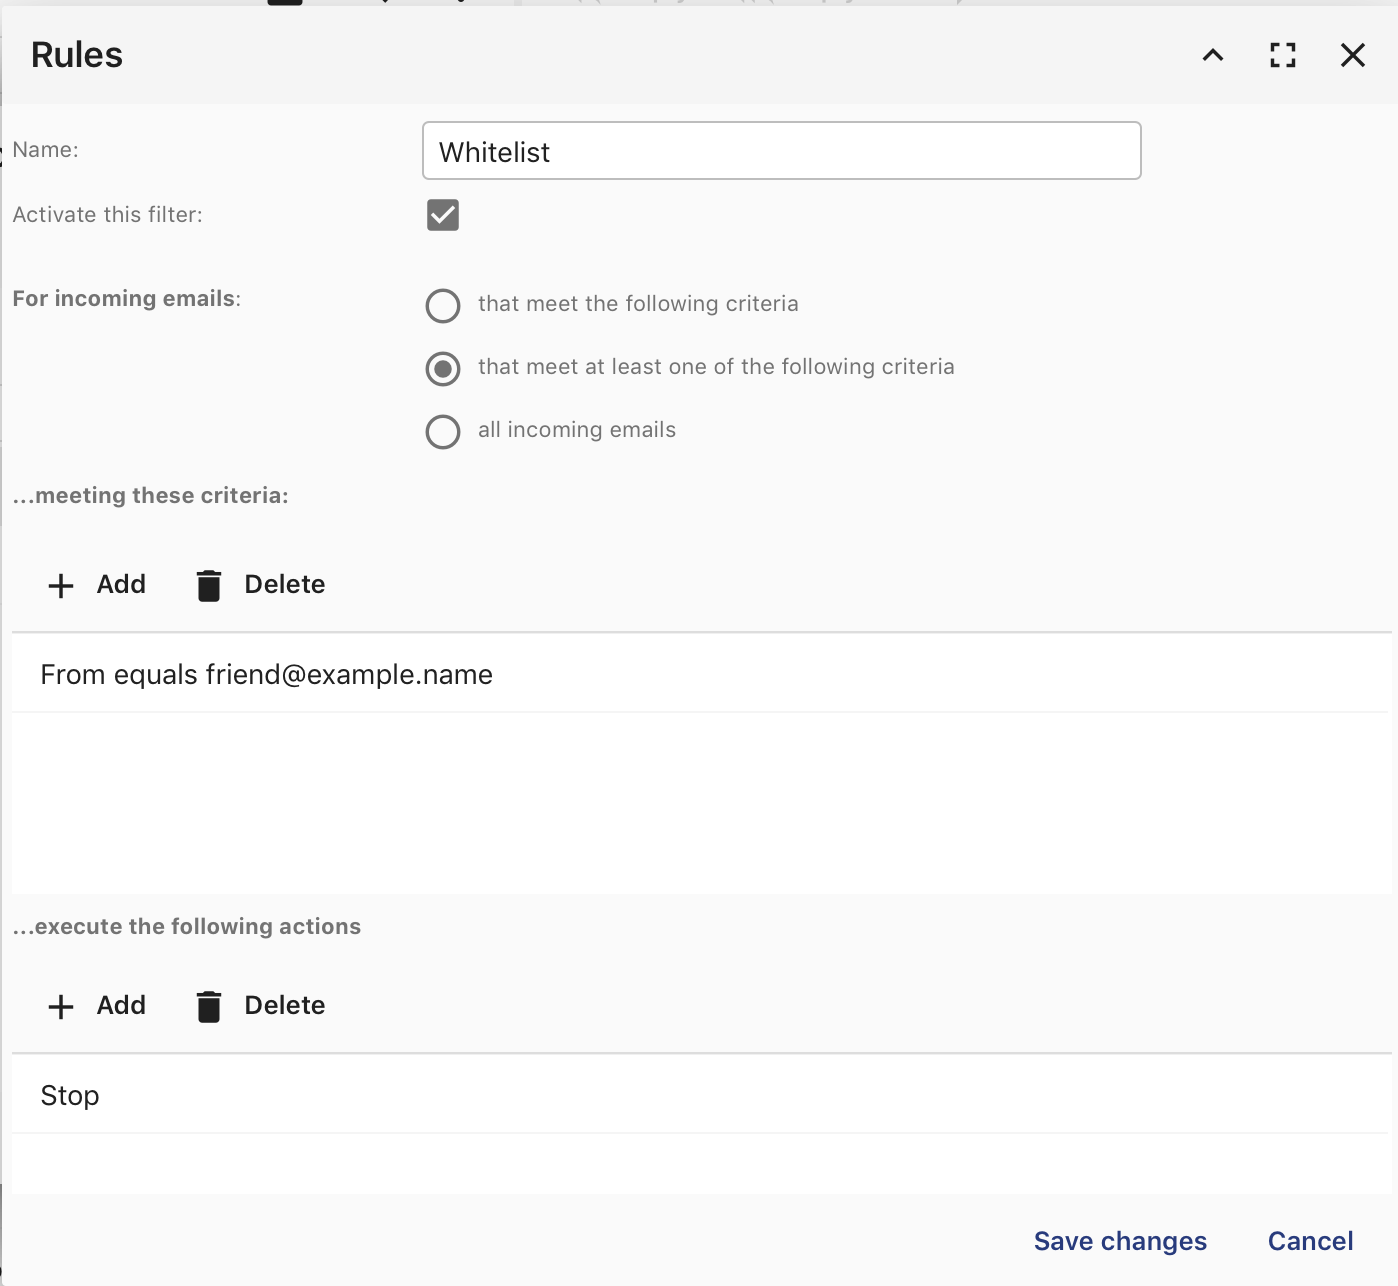
Whitelist
It’s also possible to create a white list. Make sure this rule is sorted above the spam filter rule klike in the screenshot above.
Click on “Add” and match the settings like in this screenshot:
Whilelist filter rule
Out of office
GroupOffice allows you to configure an out of office message easily. Go to:
E-mail -> Administration -> Accounts -> Double click your account -> Out office.
Select a period and configure a message and activate the filter.
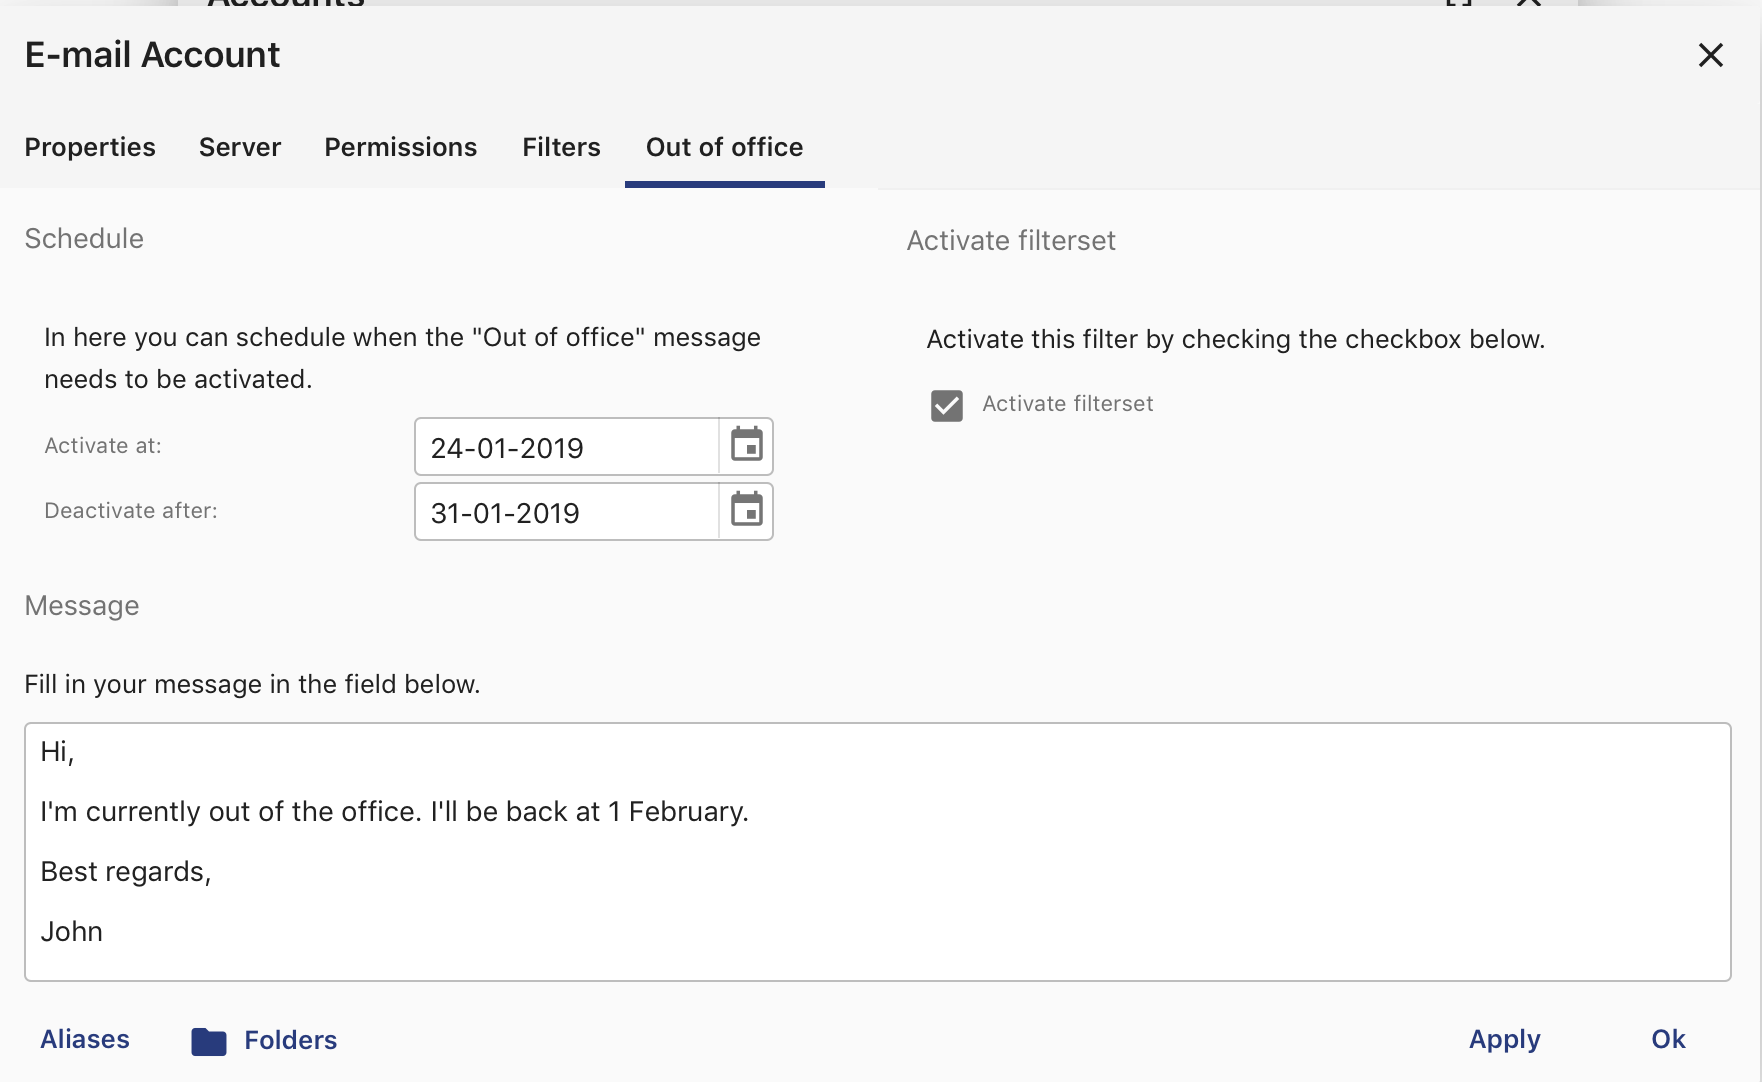
Out of office
Without sieve support
When sieve is not supported. GroupOffice will fallback on a simpler filtering system. It can only move incoming e-mails to specified folders based on the from, to or subject text.
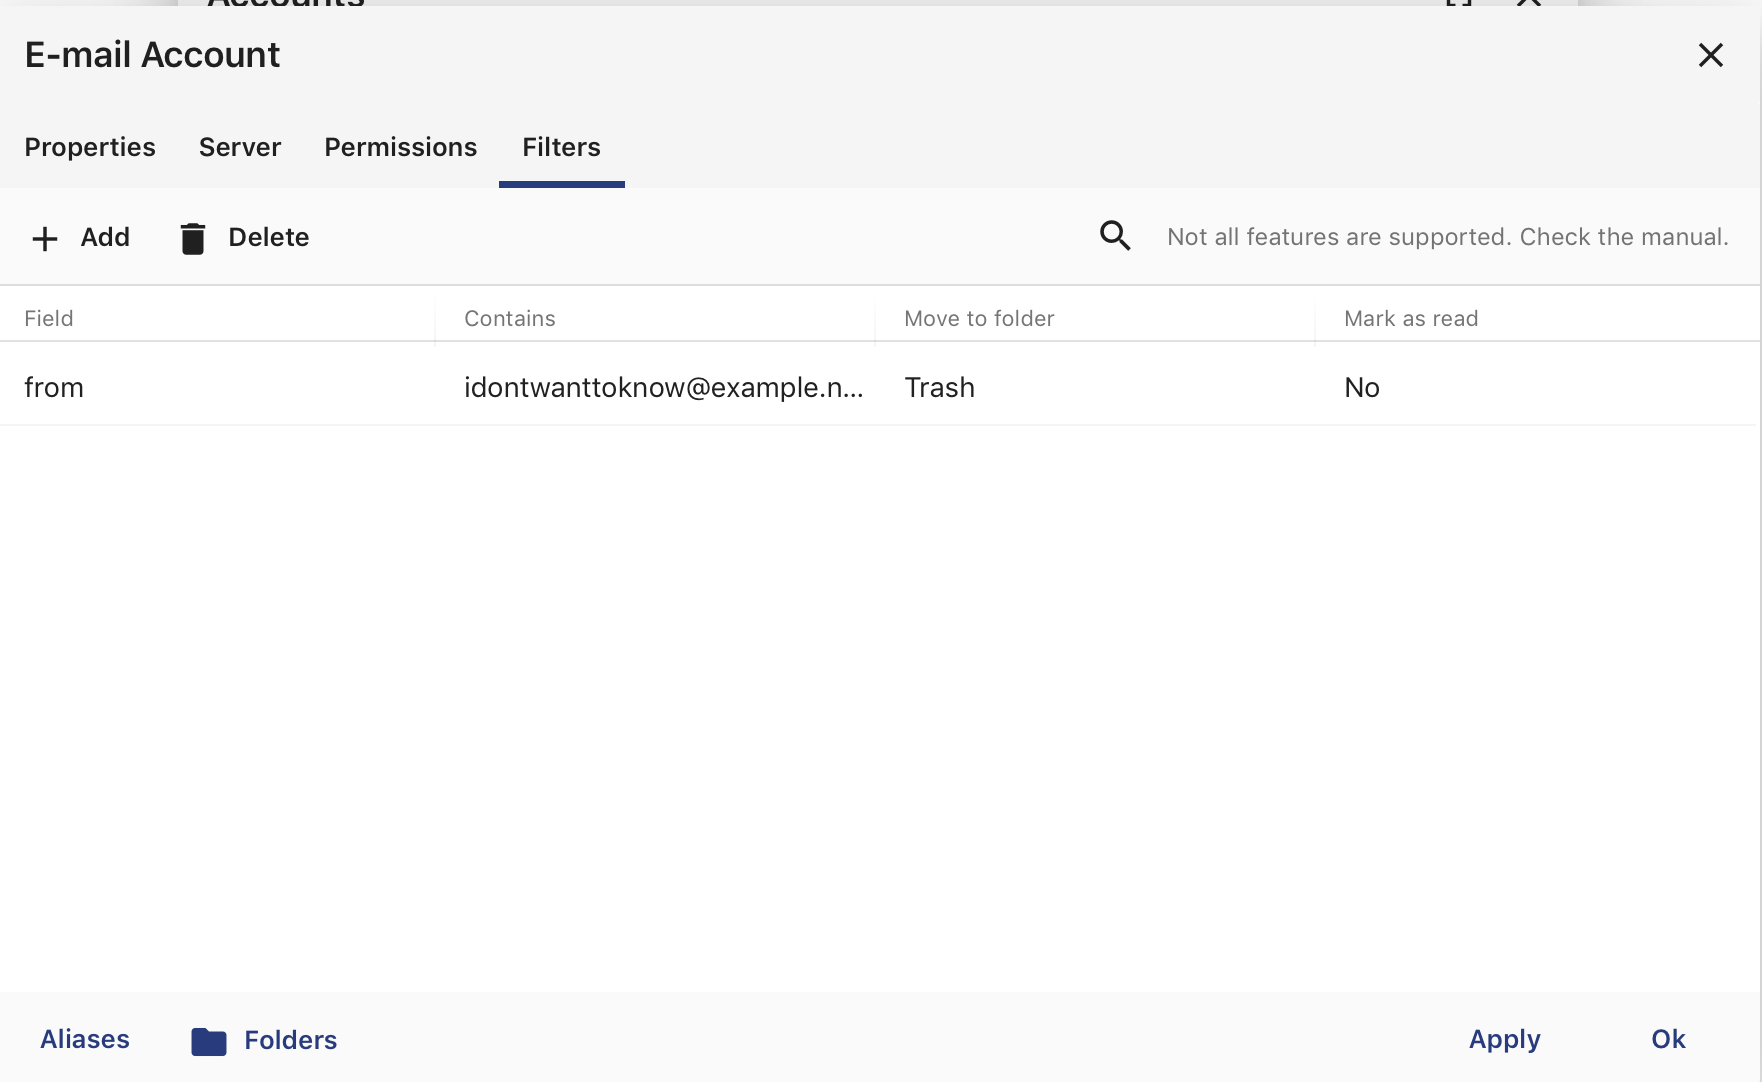
Filters window without sieve support
Default mail client on your computer
You can setup GroupOffice as your default mail client on your macOS, Windows or Linux computer. So when clicking an e-mail address in other applications GroupOffice will open with the e-mail compose window. To do this you need to install the Assistant. When it’s installed you can select it in your OS:
Note
For this to work you will have to edit at least one file so the assisant knows where your GroupOffice installation is hosted.
Windows
Go to Settings -> Apps -> “Default apps” and select “GroupOffice” for mail:
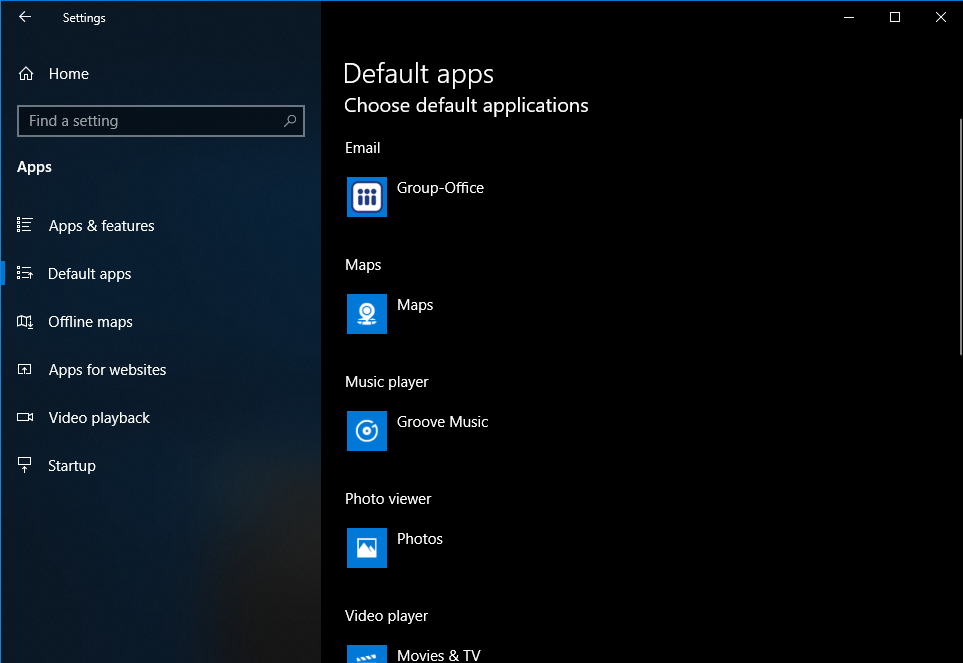
Windows 10 default apps
macOS
Go to Mail -> Preferences -> General and select “GroupOffice Assistant” as default e-mail reader:
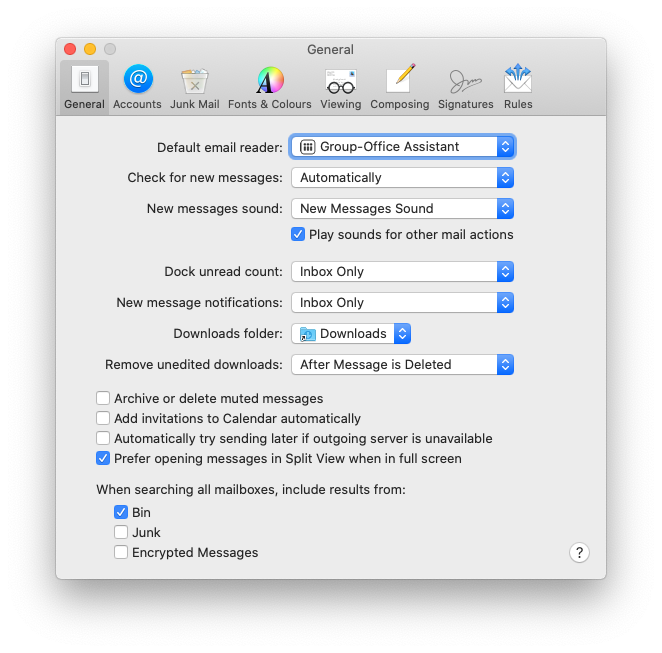
macOS default e-mail reader
Ubuntu or (other Gnome based Linux OS)
Go to Settings -> Details -> “Default applications” and select “GroupOffice Assistant” for mail:
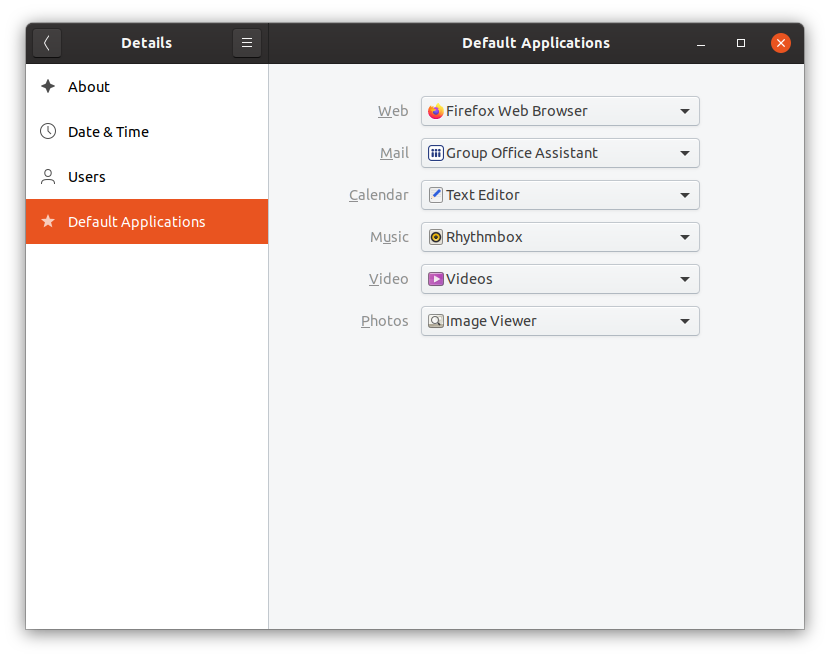
Ubuntu default apps
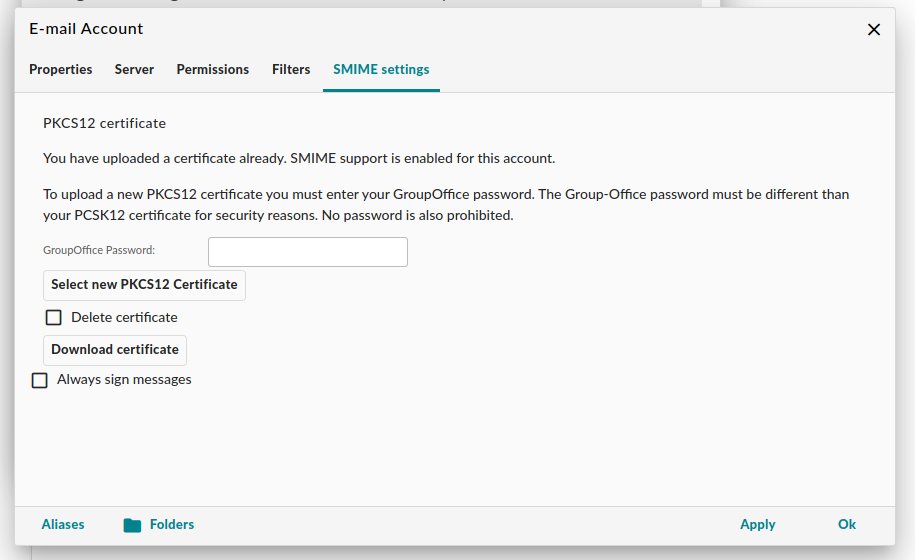
S-Mime
With S/MIME you can sign and encrypt your messages. If the S/MIME module has been installed you should have an “SMIME” tab at:
E-mail -> Settings -> Accounts -> Double click account.
Here you must upload a PCSK12 (*.p12) certificate. For security reasons, you must enter your GroupOffice password here. GroupOffice will verify that the GroupOffice password does not match the PCSK12 password file. A PCSK12 file without a password will also not be accepted.
Obtaining a certificate for SMIME
A good article on how to get a certificate can be found here:
http://kb.mozillazine.org/Getting_an_SMIME_certificate
You can import the certificate into Firefox and create a *.p12 backup file at with the Firefox certificate manager.
You can find that in the Advanced menu of the Firefox preferences tab. For security reasons, make sure you choose a password
that is different from your GroupOffice account.
Note
Somehow GroupOffice is unable to verify the certificate if you generate the p12 backup file with Google Chrome. Please use Firefox to obtain your p12 file.
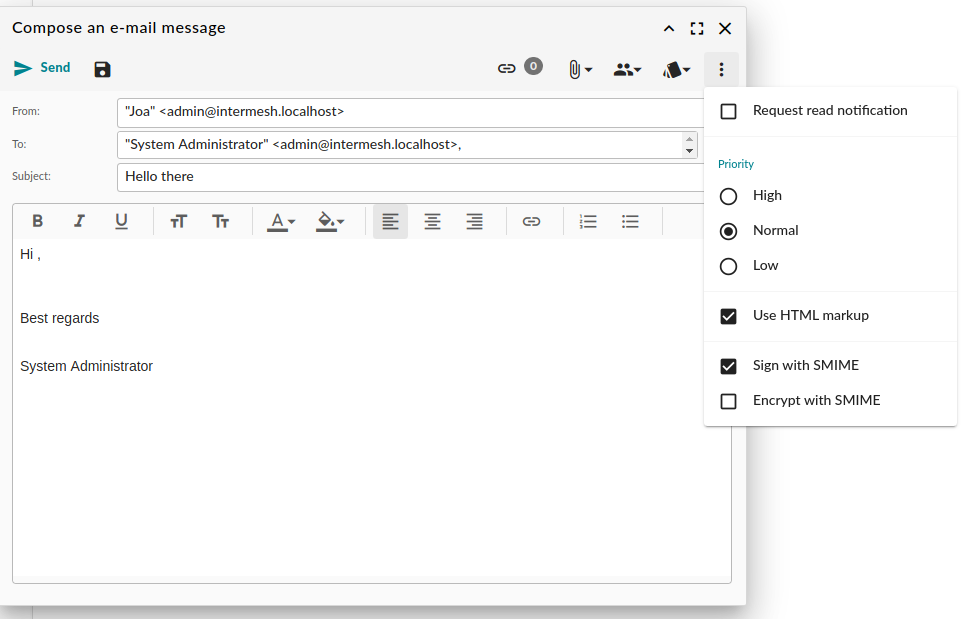
Signing and Encrypting messages
Once you’ve setup your certificate you can sign and encrypt messages in the e-mail composer using the “Extra options” menu (See screenshot). Note that you’ll need the public certificates of all the recipients when encrypting a message. You can obtain public certificates by verifying their signatures when they send you a signed message.
Verifying and saving public certificates
When you receive a signed message, you can verify the signature. When the signature is valid. GroupOffice will automatically save the public certificate which can be used to send encrypted messages.
Root Certificates
For correct verification you might need to set some extra certificates in the GroupOffice config file. For debian servers, the following extra setting should suffice:
$config['smime_root_cert_location'] = '/etc/ssl/certs';
Note on OpenSSL v3.x
When your system is using OpenSSL v3.x it can be that it’s unable to read p12 files that have been created with older versions of openssl. You may get an error like:
error:0308010C:digital envelope routines::unsupported
They moved weaker algorithms into a legacy encoder. Here’s a guide on how to enable the legacy provider permanently via the openssl configuration: https://www.practicalnetworking.net/practical-tls/openssl-3-and-legacy-providers/ Also check the comments at the bottom of the article because there’s something missing.
Searching in message bodies
As of Group Office 6.6.103, searching in email bodies has been disabled by default. Full body search is quite a resource hog. If you want to search the bodies you should implement Full Text Search indexing on the server. The GroupOffice mailserver supports FTS and advertises this so it’s enabled automatically. If you do wish to enable email body search for other IMAP servers, please add the following configuration option to your Group Office configuration file:
$config['community'] = [
    'email' => [
        'forceFTS' => [
            'your.imap.host' => true
        ]
    ]
];